Введение
This manual provides essential information for the safe and efficient operation of your SCULPFUN S9 PRO 10W Laser Engraver. The S9 PRO features 10W laser beam shaping technology, offering a 0.06mm ultra-fine laser focus for strong cutting penetration and precision. It is capable of cutting materials such as 15mm thick wood and 10mm acrylic, and engraving ceramics and stainless steel. Please read this manual thoroughly before use to ensure proper setup, operation, and maintenance.

Информация по безопасности
Работа с лазерным гравировальным станком сопряжена с потенциальными опасностями. Соблюдайте все правила техники безопасности, чтобы предотвратить травмы или повреждения.
- Защита глаз: Always wear appropriate laser safety glasses when operating the machine. The integrated laser filter on the S9 PRO blocks 98% of ultraviolet light, allowing observation without additional safety glasses for bystanders, but direct laser exposure should always be avoided.
- Выключатель: The machine is equipped with a secure power switch. Always turn off the machine when not in use or during maintenance.
- Безопасное размещение: Utilize the fastening holes on the four feet and frame structure to secure the machine and data cables, preventing accidental movement.
- Защита поверхности: Use the provided A4-sized steel pad to protect your work surface from laser damage.
- Вентиляция: Обеспечьте надлежащую вентиляцию в рабочем пространстве для рассеивания паров, образующихся во время гравировки и резки.
- Легковоспламеняющиеся материалы: Do not engrave or cut highly flammable materials without proper precautions.
- Дети и домашние животные: Keep children and pets away from the operating area. The laser point can attract attention, but direct exposure is dangerous.

Содержимое упаковки
При распаковке убедитесь в наличии всех компонентов:
- 1 x SCULPFUN S9 Pro 10 W Laser Engraver
- A4-sized steel pad
- Адаптер питания
- USB-кабель
- Инструменты для сборки
- Руководство пользователя (этот документ)
Руководство по настройке
1 Сборка
The SCULPFUN S9 PRO features a fast assembly design, allowing for installation typically within 10 to 20 minutes. Follow the steps below:
- Шаг 1: Assemble the main frame components.
- Шаг 2: Attach the X-axis and laser module to the frame.
- Шаг 3: Подключите все необходимые кабели.
- Заканчивать: Убедитесь, что все соединения надежно закреплены и рама устойчива.
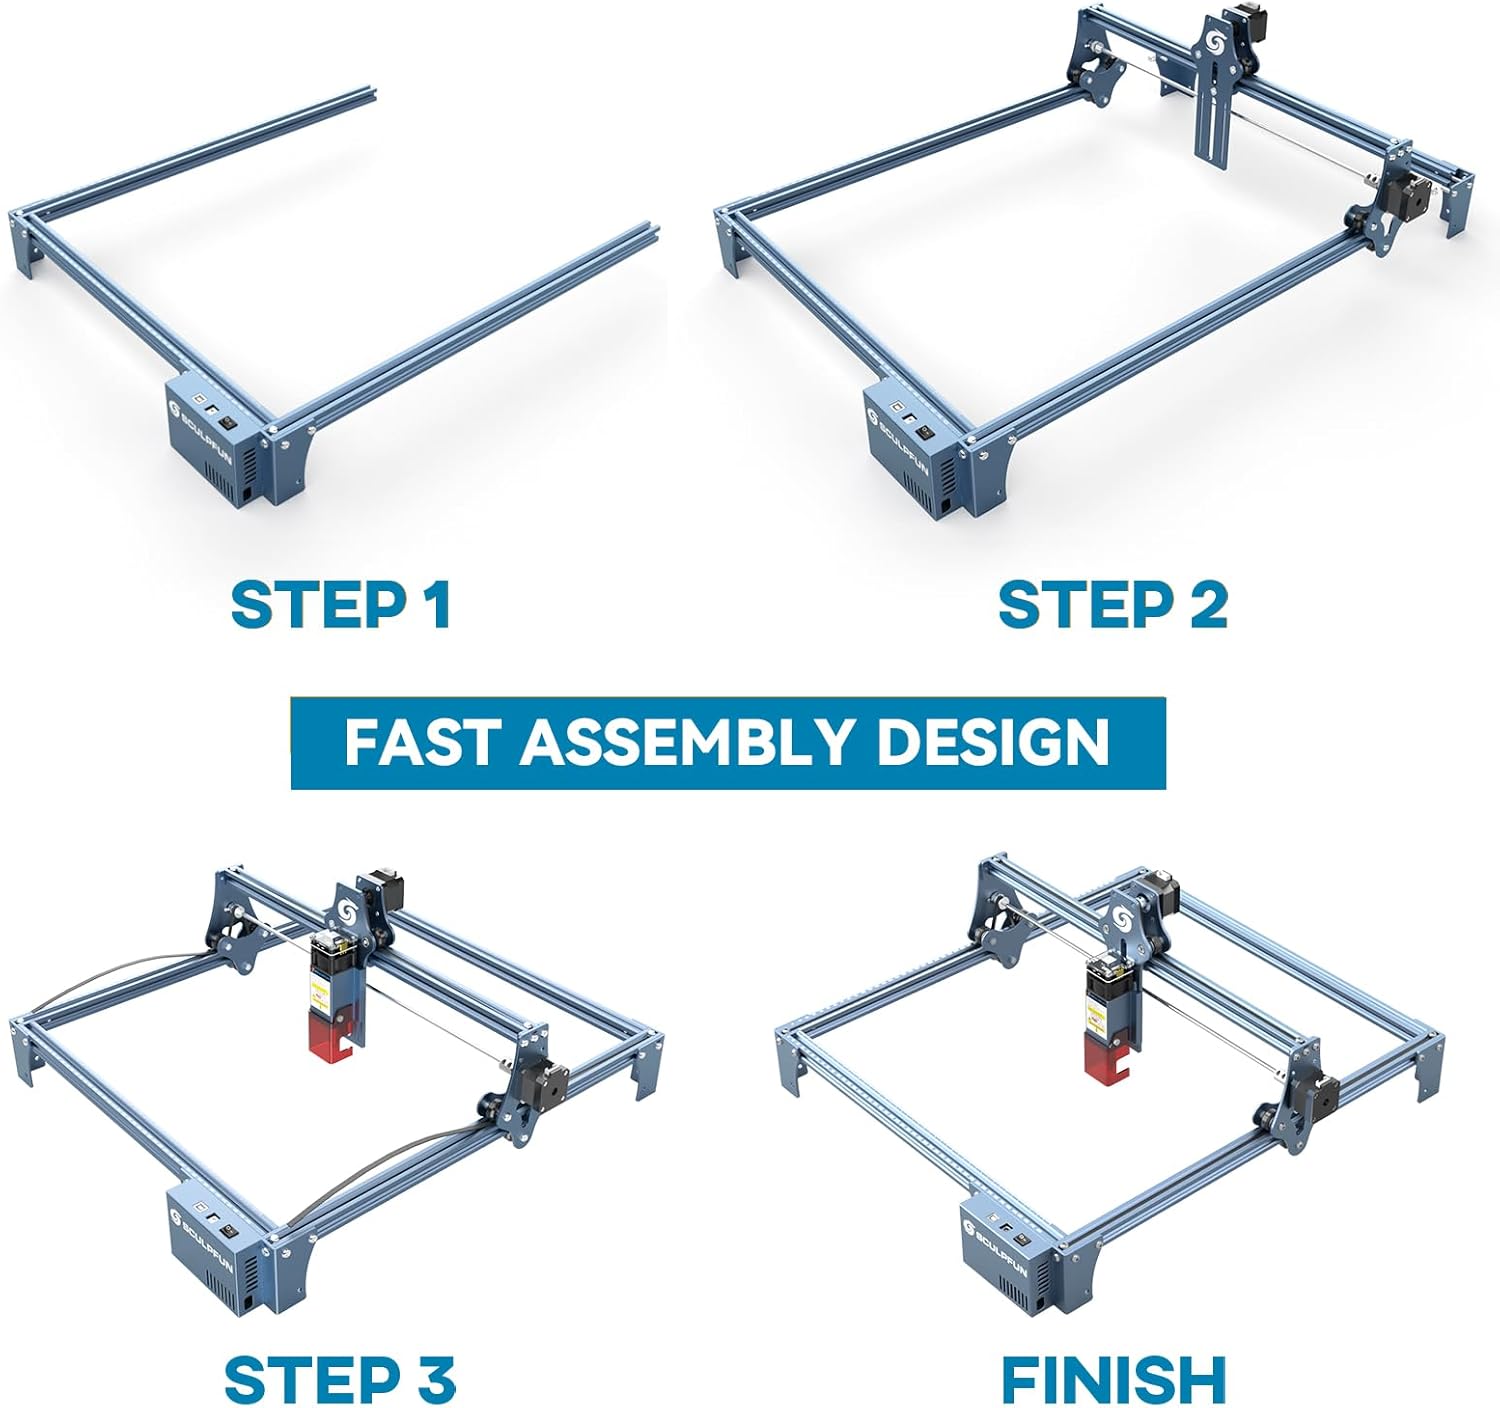
The full-metal structure enhances robustness and engraving accuracy. The X and Y axes include precise scale lines, forming a rectangular measuring ruler for quick object sizing.


2. Регулировка фокуса
The S9 PRO features a quick fixed-focus design. The laser combines a fixed-focus lens with a sliding design for easy adjustment.
- Place the laser module over your material.
- Move the laser module up or down until the focus is achieved.
- Tighten the screws to secure the laser module in place.

Инструкция по эксплуатации
1. Совместимость программного обеспечения
The SCULPFUN S9 PRO is compatible with various advanced engraving software:
- LaserGRBL (Windows)
- LightBurn (Windows, macOS, Linux)
- Бенбокс
- GrblController
- ЛайтФайр
It supports engraving in PWM mode and various file Поддерживаемые форматы: JPG, PNG, DXF, SVG, AI, G-code, NC и BMP.

2. Material Capabilities
The 10W laser module provides strong cutting and engraving capabilities across a wide range of materials:
- Резка: Up to 15mm thick wood, 10mm black acrylic.
- Гравировка: Wood, leather, ceramics, stainless steel, aluminum oxide, PCB board, paper, cardboard, dark stone, and more.


3. General Operation Workflow
- Дизайн: Create or import your design using compatible software (e.g., LightBurn, LaserGRBL).
- Размещение материала: Place your material on the work surface, ensuring it is flat and secure. Use the integrated rulers for precise positioning.
- Регулировка фокуса: Отрегулируйте фокус лазера, как описано в разделе «Настройка».
- Настройки программного обеспечения: Configure laser power, speed, and passes in your chosen software according to the material and desired effect. Refer to software documentation for detailed settings.
- Начать операцию: Запустите процесс гравировки или резки из программного обеспечения. Следите за работой станка во время выполнения операции.
- Завершение: Once the process is complete, turn off the machine and carefully remove your finished piece.
Обслуживание
Regular maintenance ensures optimal performance and extends the lifespan of your SCULPFUN S9 PRO.
- Очистите линзу лазера: Для поддержания точности лазера периодически очищайте линзу лазера мягкой безворсовой тканью, смоченной специальным раствором для чистки линз.
- Очистите рабочую зону: Remove debris and dust from the engraving area after each use to prevent interference with machine movement.
- Осмотрите ремни и направляющие: Check the drive belts for tension and wear. Keep the guide rails clean and lubricated if necessary to ensure smooth movement of the laser module.
- Обновления прошивки: Ознакомьтесь с официальным сайтом SCULPFUN. webПосетите сайт, чтобы узнать о доступных обновлениях прошивки и убедиться, что ваше устройство оснащено новейшими функциями и улучшениями.
Поиск неисправностей
В этом разделе рассматриваются распространенные проблемы, с которыми вы можете столкнуться.
- Лазер не стреляет:
- Check if the power cable is securely connected and the power switch is on.
- Verify that the USB cable is connected to your computer and the machine.
- Ensure the software is correctly configured and sending commands.
- Check the laser module connection.
- Низкое качество гравировки/резки:
- Re-check the laser focus. An incorrect focus is a common cause of poor quality.
- Adjust laser power and speed settings in your software. Different materials require different settings.
- Убедитесь, что материал лежит ровно и надежно закреплен.
- Если линза лазера загрязнена, очистите её.
- Machine Not Moving Correctly:
- Check for any obstructions on the rails or belts.
- Ensure belts are properly tensioned and not slipping.
- Убедитесь, что все кабели надежно подключены.
- Перезапустите программное обеспечение и машину.
- Проблемы с подключением программного обеспечения:
- Убедитесь, что в вашей программе выбран правильный COM-порт.
- Try restarting your computer and the engraver.
- Reinstall the software or drivers if necessary.
For persistent issues, refer to the SCULPFUN support webсайт или свяжитесь со службой поддержки клиентов.
Технические характеристики
| Бренд | СКУЛЬПФАН |
| Номер модели | S9PRO10W-ELE |
| Мощность лазера | 10 Вт (диодный лазер) |
| Лазерный Фокус | 0.06mm (Ultrafine) |
| Точность гравировки | 0.01 мм |
| Область гравировки | 400 х 410 мм |
| Источник питания | AC |
| Размеры упаковки | 61.79 х 38.4 х 13.4 см |
| Вес упаковки | 4.95 кг |
| Включенные компоненты | 1 x SCULPFUN S9 Pro 10 W laser engraver |
| Совместимость программного обеспечения | LaserGRBL, LightBurn, Benbox, GrblController, LiteFire |
| Поддерживаемые ОС | Windows, MacOS, Linux |
| Поддерживается File Форматы | JPG, PNG, DXF, SVG, AI, G-code, NC, BMP |
Гарантия и поддержка
For warranty information, technical support, or service inquiries, please contact SCULPFUN customer support through their official webСайт или магазин, где был приобретён товар. Сохраните чек в качестве подтверждения покупки.
Производитель: СКУЛЬПФАН
Первая доступная дата: 29 ноября 2024 г.