Введение
This manual provides detailed instructions for the installation, operation, and maintenance of your Yottamaster M.2 NVMe Enclosure. This device is designed to convert an M.2 NVMe SSD into a portable external storage solution, leveraging USB 3.2 Gen 2x2 technology for high-speed data transfer up to 20Gbps. Please read this manual thoroughly before using the product to ensure proper functionality and longevity.

This image displays the Yottamaster M.2 NVMe enclosure, available in three distinct colors: Yotta Grey, Moon Silver, and Rose Gold. The enclosure supports USB 3.2 Gen 2x2 Type-C for high-speed data transfer.
Содержимое упаковки
Пожалуйста, убедитесь, что в вашей посылке присутствуют все перечисленные ниже предметы:
- Yottamaster M.2 NVMe Enclosure (MS8-C3-GY)
- Кабель USB-C-USB-C
- Кабель USB-C — USB-A
- Термопрокладка
- Отвертка
- Крепежные винты
- Руководство пользователя (этот документ)
Технические характеристики
| Особенность | Деталь |
|---|---|
| Бренд | Йоттамастер |
| Номер модели | MS8-C3-GY |
| Интерфейс | USB 3.2 Gen 2x2 Type-C |
| Скорость передачи данных | До 20 Гбит/с |
| Совместимость с твердотельным накопителем | M.2 NVMe PCIe SSDs (M Key, B&M Key) |
| Форм-факторы SSD | 2230, 2242, 2260, 2280 |
| Материал | Алюминиевый сплав |
| Цвет | Grey (Yotta Grey, Moon Silver, Rose Gold variants available) |
| Acceleration Protocol | UASP, S.M.A.R.T, TRIM |
| Количество портов | 1 (USB-C) |

This image illustrates the ultra-fast performance of the Yottamaster M.2 NVMe enclosure, achieving laboratory test speeds of 2060 MB/s for reading and 1822 MB/s for writing, utilizing USB 3.2 Gen 2x2 (20Gbps) technology.
Настраивать
Выполните следующие шаги, чтобы установить твердотельный накопитель M.2 NVMe в корпус:
- Unscrew and Open the Back Cover: Use the provided screwdriver to carefully remove the screws and slide open the back cover of the enclosure.
- Attach the Thermal Pad to SSD: Peel off the protective film from one side of the thermal pad and gently apply it to the surface of your M.2 NVMe SSD. Ensure it covers the main chip area for optimal heat transfer.
- Install the Heat Dissipation Vest: Place the heat dissipation vest (aluminum heatsink) directly onto the thermal pad on your SSD. This component aids in drawing heat away from the SSD.
- Insert the SSD and Secure: Carefully insert your prepared M.2 NVMe SSD into the M.2 slot inside the enclosure. Align the notch on the SSD with the key in the slot. Once inserted, fix it with the provided screws to secure the SSD in place. Close the back cover and fasten the screws.

This image provides a visual guide for the easy installation process, detailing four steps: unscrewing the back cover, attaching the thermal pad to the SSD, installing the heat dissipation vest, and inserting the SSD into the enclosure.

This graphic illustrates the broad compatibility of the enclosure with M.2 NVMe SSDs, supporting both M Key and B&M Key types, and various form factors including 2230, 2242, 2260, and 2280.
Инструкция по эксплуатации
After successful SSD installation, connect the enclosure to your computer or compatible device using the provided USB-C to USB-C or USB-C to USB-A cable. The enclosure is plug-and-play, meaning it should be automatically recognized by your operating system.
- Первоначальное использование: For a new SSD, it may need to be initialized, partitioned, and formatted through your operating system's disk management utility before it can be used for storage. Refer to your operating system's documentation for instructions on disk management.
- Передача данных: Once recognized, the SSD will appear as an external drive. You can drag and drop files, copy, paste, or use backup software to transfer data to and from the enclosure.
- Безопасное удаление: Перед отсоединением кабеля всегда безопасно извлекайте накопитель из операционной системы, чтобы предотвратить повреждение данных.

This image confirms the wide system compatibility of the enclosure, supporting major operating systems such as Windows, Linux, Android, and Mac OS.
Обслуживание
To ensure optimal performance and longevity of your Yottamaster M.2 NVMe Enclosure:
- Уборка: Для очистки внешней поверхности корпуса используйте мягкую сухую ткань. Избегайте использования жидких чистящих средств или растворителей.
- Хранилище: Когда бокс не используется, храните его в прохладном, сухом месте, вдали от прямых солнечных лучей и экстремальных температур.
- Умение обращаться: Handle the enclosure with care to avoid drops or impacts, which could damage the internal SSD or the enclosure itself.
- Обновления прошивки: Periodically check the Yottamaster official website for any available firmware updates for your enclosure model.
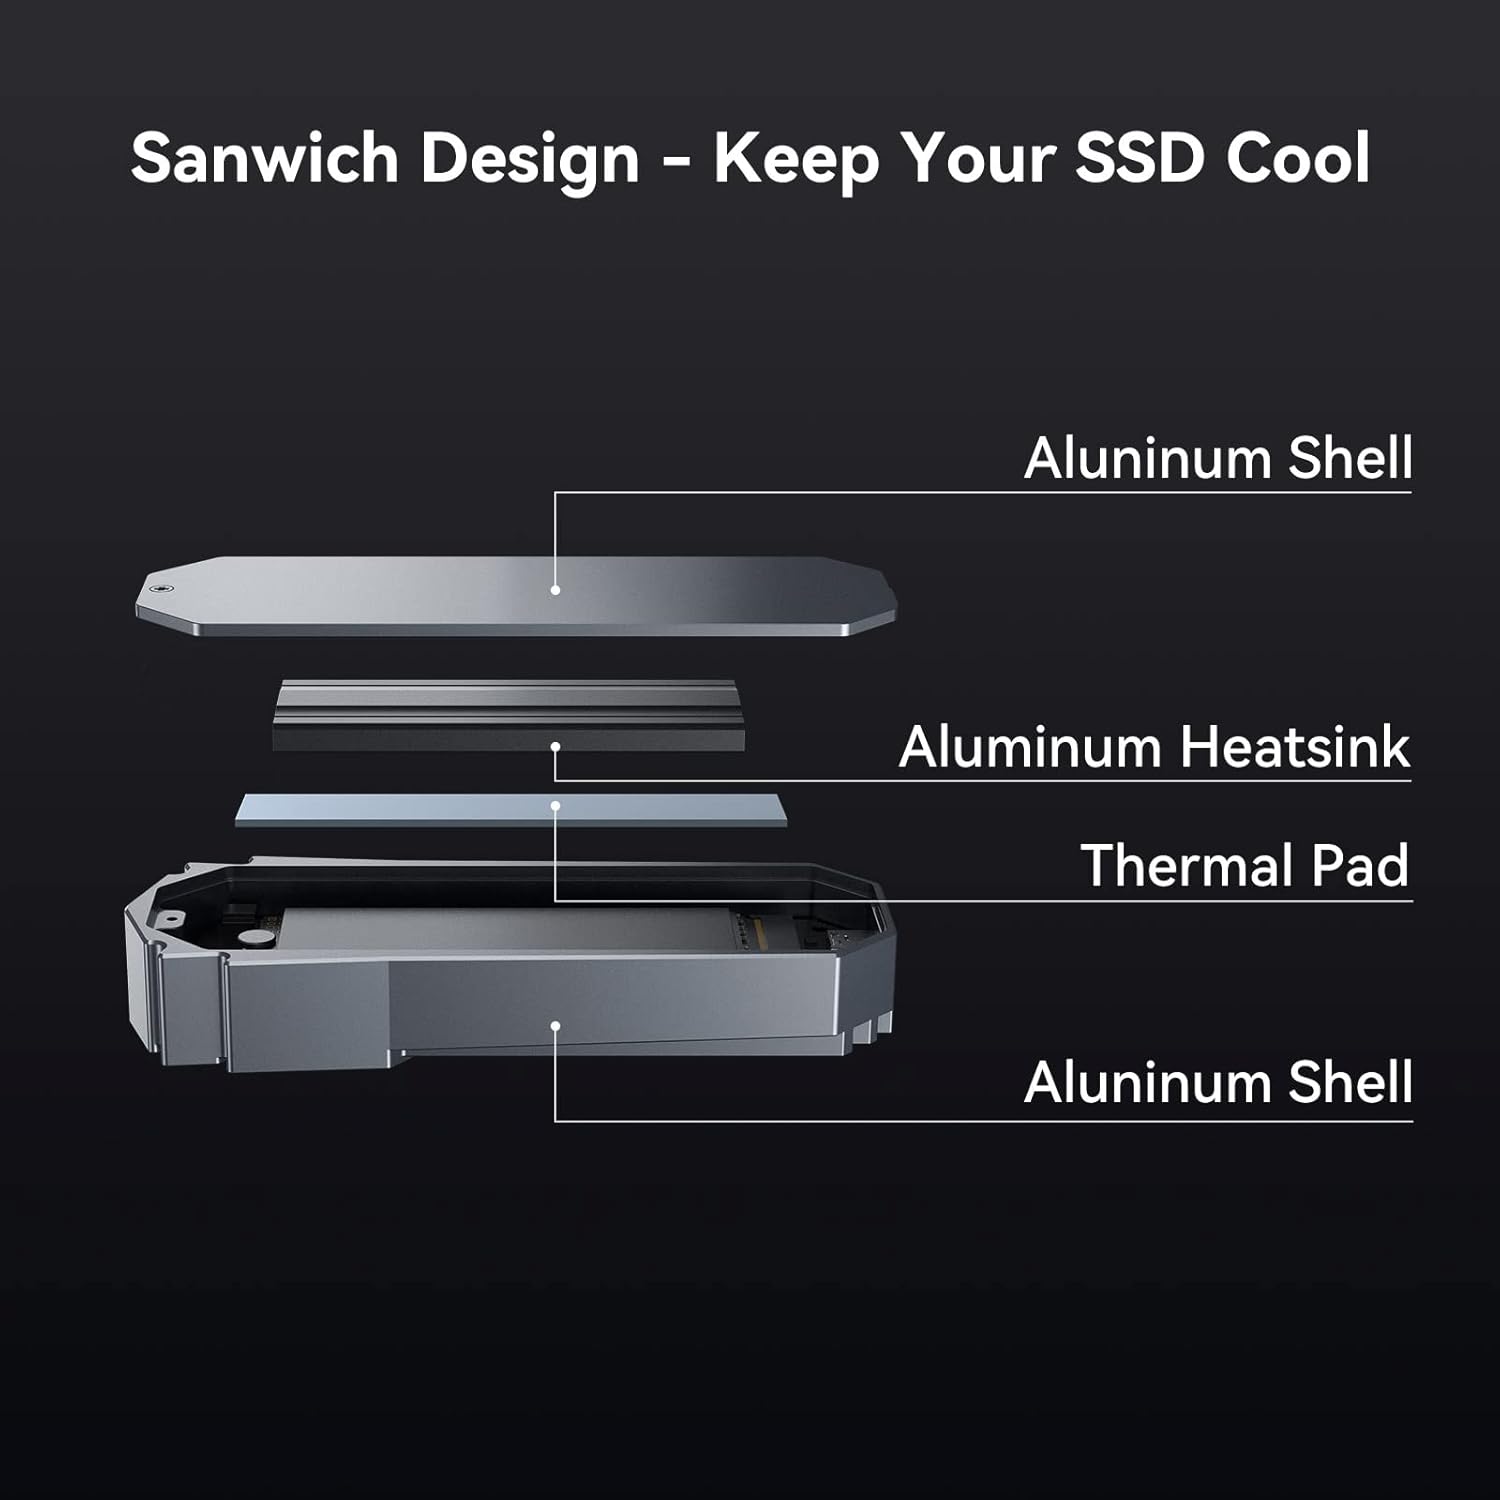
This diagram details the internal 'Sandwich Design' of the enclosure, engineered to keep your SSD cool. It consists of an outer aluminum shell, an aluminum heatsink, and a thermal pad, all working together for efficient heat dissipation.

This image presents data on the enclosure's temperature control, showing how the device maintains stable operating temperatures over a 30-minute period, reaching 53.2°C after 30 minutes of use.
Поиск неисправностей
If you encounter issues with your enclosure, refer to the following common problems and solutions:
- Корпус не распознан:
- Ensure the USB cable is securely connected to both the enclosure and your device.
- Попробуйте использовать другой порт USB на вашем компьютере.
- Test with a different USB cable to rule out cable issues.
- Verify that the SSD is correctly installed and secured within the enclosure.
- For new SSDs, ensure it has been initialized, partitioned, and formatted in your operating system's disk management.
- Низкая скорость передачи данных:
- Ensure your computer's USB port supports USB 3.2 Gen 2x2 (20Gbps) for maximum speed. Connecting to a slower port (e.g., USB 3.0, USB 2.0) will result in reduced speeds.
- Verify that the SSD itself is capable of high speeds.
- Закройте другие приложения, которые могут потреблять системные ресурсы или выполнять операции ввода-вывода на диске.
- Enclosure Becomes Hot During Use:
- It is normal for aluminum enclosures to become warm during high-speed data transfer, as the aluminum acts as a heatsink to dissipate heat from the SSD.
- Ensure the thermal pad and heatsink are correctly installed and making proper contact with the SSD.
- Avoid placing the enclosure on soft surfaces that might obstruct airflow.
- Случайные разрывы соединения:
- Проверьте наличие ослабленных кабельных соединений.
- Ensure your system's power management settings are not configured to turn off USB devices to save power.
- Обновите USB-драйверы вашего компьютера.
Гарантия и поддержка
Yottamaster products come with a standard manufacturer's warranty. For specific warranty terms and conditions, please refer to the warranty card included with your product or visit the official Yottamaster website. If you require technical assistance or have questions not covered in this manual, please contact Yottamaster customer support through their official webсайт или контактную информацию, указанную на упаковке вашего продукта.