1. Введение
This manual provides essential instructions for the safe and efficient operation of your ROARBATT 4000W 24V Pure Sine Wave Power Inverter. This device converts 24V DC battery power into 110V/120V AC household electricity, suitable for powering various appliances. Please read this manual thoroughly before installation and use to ensure proper function and to prevent damage to the unit or connected devices.

Figure 1.1: ROARBATT 4000W Pure Sine Wave Power Inverter with included remote control and battery cables.
2. Инструкции по технике безопасности
Adherence to these safety guidelines is crucial for preventing personal injury and damage to the inverter or connected equipment.
- Вентиляция: Убедитесь, что инвертор установлен в хорошо проветриваемом помещении. Не закрывайте вентиляционные отверстия.
- Сухая среда: Avoid exposure to water, rain, snow, or spray. The inverter is designed for indoor or protected use.
- Правильное заземление: Always connect the inverter to a proper earth ground. Refer to the installation section for details.
- Vol входtage: Подключайте инвертор только к источнику постоянного тока напряжением 24 В. Подключение к другим источникам постоянного токаtagэто может привести к повреждению.
- Выходная нагрузка: Do not exceed the inverter's rated continuous power output of 4000W. The peak power is 8000W.
- Легковоспламеняющиеся материалы: Не используйте инвертор вблизи легковоспламеняющихся материалов, газов или паров.
- Дети: Храните инвертор в недоступном для детей месте.
- Обслуживание: Не пытайтесь ремонтировать инвертор самостоятельно. Доверьте все работы по обслуживанию квалифицированному персоналу.
- Подключение аккумулятора: Always connect the positive (+) terminal of the battery to the positive (+) terminal of the inverter and the negative (-) terminal of the battery to the negative (-) terminal of the inverter. Reverse polarity will cause damage.
3. Продукт закончилсяview
The ROARBATT 4000W Pure Sine Wave Power Inverter is designed for reliability and versatility. It features multiple output options and an intelligent display for monitoring.
3.1 Основные компоненты
- Инверторный блок: The main power conversion unit.
- Дистанционное управление: Allows for convenient power ON/OFF control from a distance.
- Кабели батареи: Heavy-duty cables for connecting to a 24V DC battery bank.
- Заземляющий провод: Для надлежащего заземления устройства.
- Плавкие предохранители: Spare 40A fuses for protection.
- Гаечный ключ: For securing battery cable connections.
3.2 Front and Rear Panel Features

Figure 3.1: Key features of the inverter, including DC input terminals, cooling fans, AC outlets, USB ports, and remote control port.
Особенности инвертора:
- Входные клеммы постоянного тока: Положительная (красная) и отрицательная (черная) клеммы для подключения батареи 24 В постоянного тока.
- Вентиляторы охлаждения: Intelligent temperature-controlled fans activate automatically to maintain optimal operating temperature.
- Светодиодный дисплей: Предоставляет информацию о состоянии оборудования в режиме реального времени.
- Индикатор питания: Светодиодный индикатор, показывающий состояние питания.
- Переключатель включения / выключения питания: Main switch for the inverter.
- USB-порты: Two 5V DC, 3.4A USB ports for charging mobile devices.
- Порт дистанционного управления: Разъем RJ10 для подключения проводного пульта дистанционного управления.
- Розетки переменного тока: Four 110V/120V AC outlets for connecting standard appliances.
- AC Terminal Blocks: For heavy-duty AC output connections (4000W-8000W peak).
- Клемма заземляющего провода: For grounding the inverter chassis.
3.3 Внутренний дизайн

Figure 3.2: Internal components highlighting the high-precision circuit board and robust cooling system for stable output and extended product life.
4. Настройка и установка
Follow these steps for safe and correct installation of your inverter.
4.1 Выбор места установки
- Mount the inverter on a flat, stable surface.
- Ensure adequate ventilation around the unit. Maintain at least 6 inches (15 cm) of clear space on all sides.
- Избегайте воздействия прямых солнечных лучей, источников тепла и влаги.
- Keep away from any flammable materials or gases.
4.2 Connecting Battery Cables
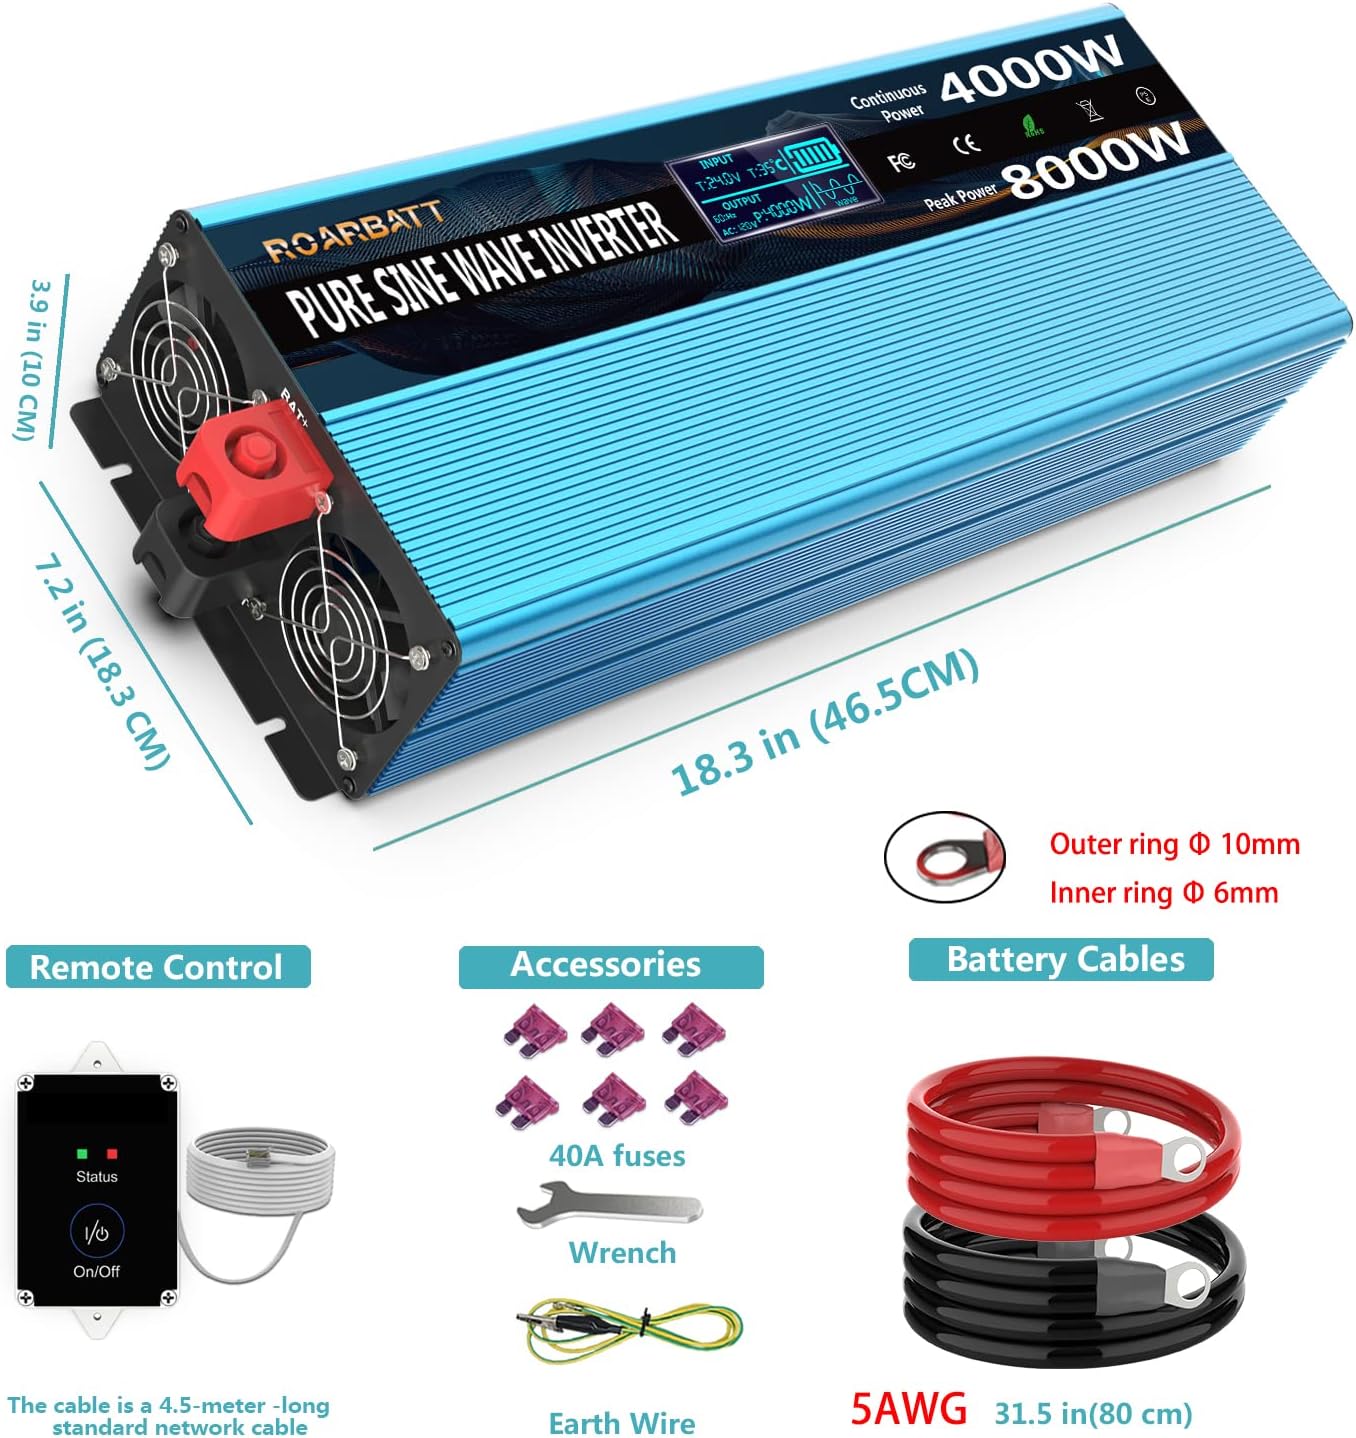
Figure 4.1: Included accessories: remote control, battery cables, 40A fuses, wrench, and earth wire. Also shows inverter dimensions.
- Убедитесь, что выключатель питания инвертора находится в положении «ВЫКЛ».
- Подключите красный кабель аккумулятора к положительный (+) terminal of the inverter. Use the provided wrench to tighten securely.
- Подключите черный кабель аккумулятора к отрицательный (-) клемму инвертора. Надежно затяните.
- Подключите другой конец красный кабель аккумулятора к положительный (+) terminal of your 24V DC battery bank.
- Подключите другой конец черный кабель аккумулятора к отрицательный (-) terminal of your 24V DC battery bank.
- Verify all connections are tight and secure to prevent arcing.
4.3 Заземление инвертора
Connect the provided earth wire from the inverter's ground terminal to a reliable earth ground point (e.g., vehicle chassis, ground rod, or proper electrical ground system).
4.4 Подключение пульта дистанционного управления
Plug the RJ10 connector of the remote control cable into the 'Remote Control' port on the inverter. The remote control allows you to power the inverter ON/OFF from a convenient location.
5. Инструкция по эксплуатации
Learn how to power on your inverter and utilize its features.
5.1 Включение/выключение питания
- After all connections are secure, switch the main power switch on the inverter to the 'ON' position. Alternatively, if the remote control is connected, you can use its ON/OFF button.
- The LED display will illuminate, and the cooling fan may briefly activate.
- To power off, switch the main power switch to 'OFF' or use the remote control.
5.2 Using AC Outlets and USB Ports
- Plug your 110V/120V AC appliances into the four AC outlets. Ensure the total power consumption does not exceed 4000W.
- For high-power loads, consider using the AC terminal blocks for a more robust connection.
- Connect your USB-powered devices to the two 5V DC, 3.4A USB ports for charging.
5.3 Understanding the Intelligent LCD Display

Figure 5.1: The intelligent LCD display provides real-time status information.
The LCD display provides critical information about the inverter's operation and battery status:
- Vol входtage Data (BT): Отображает текущее входное напряжение постоянного тока.tagе от аккумулятора.
- Working Temperature (T): Shows the internal operating temperature of the inverter.
- Мощность аккумулятора: Indicates the estimated remaining battery capacity.
- Выход Voltagе (переменный ток): Отображает громкость выходного переменного токаtagе (110В/120В).
- Appliance's Using Power (P): Shows the current power consumption of connected AC appliances.
- Режим защиты: Indicates if the inverter is in a protection state (e.g., overload, low voltagд).
- Pure Sine Wave Indicator: Confirms the output waveform is pure sine wave.
6. Техническое обслуживание
Регулярное техническое обслуживание обеспечивает долговечность и оптимальную производительность вашего инвертора.
- Уборка: Периодически протирайте внешнюю поверхность инвертора сухой мягкой тканью. Убедитесь, что вентиляционные отверстия свободны от пыли и мусора.
- Соединения: Регулярно проверяйте все соединения постоянного и переменного тока, чтобы убедиться в их надежности и отсутствии коррозии.
- Хранилище: При длительном хранении инвертора отсоедините его от аккумулятора и храните в прохладном, сухом месте.
- Состояние аккумулятора: Maintain your battery bank according to the battery manufacturer's instructions. A healthy battery is crucial for inverter performance.
7. Поиск Неисправностей
This section addresses common issues and their solutions. The inverter features advanced protection mechanisms that may cause it to shut down or alarm under certain conditions.
| Проблема | Возможная причина | Решение |
|---|---|---|
| Инвертор не включается | Ослабленные соединения аккумулятора; Низкий уровень заряда аккумулятораtage; Blown fuse; Inverter switch OFF. | Check and tighten battery cables; Charge battery; Replace fuses (use only 40A); Ensure inverter switch is ON. |
| Нет выходного сигнала переменного тока, но инвертор включен. | Overload protection; Short circuit protection; Over-temperature protection. | Reduce load below 4000W; Disconnect faulty appliance; Allow inverter to cool down. Check LCD for protection mode indication. |
| Низкая громкостьtage Сигнализация/Отключение | Объем аккумулятораtage dropped below 20V (alarm) or 19V (shutdown). | Charge or replace battery. Reduce load to extend battery life. |
| Более объемtage Завершение работы | Входная громкостьtage exceeded 32V DC. | Check charging system (e.g., solar charge controller) to ensure proper voltagэлектронное регулирование. |
| Защита от перегрузки | Connected appliance(s) draw more than 4000W continuously or 8000W peak. | Отключите некоторые электроприборы, чтобы уменьшить нагрузку. Перезапустите инвертор. |
| Защита от перегрева | Internal temperature exceeded 65°C. | Ensure adequate ventilation. Reduce load. Allow inverter to cool down. |
8. Технические характеристики
Detailed technical specifications for the ROARBATT 4000W 24V Pure Sine Wave Power Inverter.
| Особенность | Спецификация |
|---|---|
| Непрерывная мощность | 4000 Вт |
| Пиковая мощность | 8000 Вт |
| Входной объем постоянного токаtage | 24 В постоянного тока |
| Выходной ток переменного токаtage | 110V/120V AC ±5% |
| Форма выходного сигнала | Pure Sine Wave (THD≤3%) |
| No-Load Current Draw | ≤ 0.6A |
| Максимальная эффективность | 90% |
| USB-выход | 2 x 5V DC, Max. 3.4A |
| Розетки переменного тока | 4 |
| Входная низкая громкостьtage Будильник | 20 ± 0.5 В постоянного тока |
| Входная низкая громкостьtage Завершение работы | 19 ± 1 В постоянного тока |
| Входное превышение громкостиtage Завершение работы | 32 ± 1 В постоянного тока |
| Защита от перегрева | 65 ± 5 ° С |
| Рабочая температура | 0–40°С |
| Температура хранения | -10–45°С |
| Охлаждающий вентилятор | Temperature controlled (activates near 113℉ / 45°C) & Power controlled (activates up to 1/2 rated power) |
| Длина кабеля пульта дистанционного управления | 15 ft (RJ10 Plug) |
| Кабели аккумулятора | 2 pairs (red/black), 2.62 ft length |
| Вес товара | 16.27 фунта |
| Размеры упаковки | 23.9 x 10.4 x 7.5 дюйма |
9. Гарантия и поддержка
Your ROARBATT 4000W 24V Pure Sine Wave Power Inverter comes with a Гарантия 24 месяца с даты покупки.
This warranty covers defects in materials and workmanship under normal use. It does not cover damage caused by improper installation, misuse, abuse, neglect, accident, or unauthorized repair.
For warranty claims or technical support, please contact ROARBATT customer service. Please have your purchase information and product model number ready when contacting support.