1. Введение
This manual provides detailed instructions for the installation, operation, and maintenance of your Audiobank P1502 2-Channel Car Amplifier and the included 8-gauge installation wiring kit. Please read this manual thoroughly before attempting installation or operation to ensure proper use and to prevent damage to the unit or your vehicle's electrical system.

Figure 1.1: Audiobank P1502 2-Channel Car Ampусилитель. На этом изображении показана верхняя часть. view of the silver-colored amplifier with the 'AUDIOBANK' logo and '1500WATTS' text.
2. Информация по технике безопасности
Во время установки и эксплуатации всегда соблюдайте следующие меры предосторожности:
- Перед началом любых работ с электрооборудованием отсоедините отрицательную клемму аккумуляторной батареи автомобиля.
- Убедитесь, что вся проводка должным образом изолирована, чтобы предотвратить короткие замыкания.
- Смонтируйте amplifier securely to prevent it from becoming a projectile in an accident.
- Избегайте монтажа ampЗащиту следует производить в местах, подверженных воздействию прямых солнечных лучей, чрезмерного тепла или влаги.
- Use appropriate gauge wiring as specified in this manual and the installation kit.
- Do not bypass or modify the included fuse.
- If you are unsure about any part of the installation, consult a professional car audio installer.
3. Содержимое упаковки
Проверьте наличие всех предметов в посылке:
- Audiobank P1502 2-Channel Car Ampпожизненнее
- High Quality Thick 17 Feet 8 Gauge Power Cable
- Premium 3 Feet 8 Gauge Ground Cable
- Inline AGU Fuse Holder & 60A Fuse
- True Sound 17 Feet Double Shielded RCA Cable
- High Quality 17 Feet / 18 Gauge Turn-On Cable
- 20 Feet / 16 Gauge Speaker Wire
- Все необходимые принадлежности и клеммы для установки.

Figure 3.1: Components of the 8-gauge car amplifier installation wiring kit. This image displays various cables (power, ground, RCA, speaker, remote), an AGU fuse holder with a fuse, and assorted terminals.
4. Настройка и установка
Правильная установка имеет решающее значение для оптимальной производительности и безопасности. Внимательно следуйте этим инструкциям:
4.1. Монтаж Ampпожизненнее
- Choose a secure location that is dry, well-ventilated, and away from direct heat sources. Common locations include under a seat, in the trunk, or behind a panel.
- Обеспечьте достаточную циркуляцию воздуха вокруг ampРадиатор усилителя для предотвращения перегрева.
- Use the provided mounting hardware to firmly secure the ampПрикрепите фильтр к твердой поверхности в вашем автомобиле.
4.2. Проводные соединения
Refer to the diagrams below for proper wiring. Always ensure the vehicle's battery is disconnected before making any connections.
4.2.1. Подключение питания
- Земля (земля): Подсоедините 3-футовый заземляющий кабель сечением 8 AWG от ampПодключите клемму заземления устройства к чистой неокрашенной металлической поверхности на шасси автомобиля. Обеспечьте надёжное соединение с низким сопротивлением.
- Удаленный (REM): Connect the 18-gauge turn-on cable from the ampПодключите клемму REM усилителя к выходу дистанционного включения головного устройства. Этот провод подает сигнал на... amplifier to turn on and off with your stereo.
- + 12В: Connect the 17-foot 8-gauge power cable from the amplifier's +12V terminal to the positive (+) terminal of your vehicle's battery. Install the inline AGU fuse holder with the 60A fuse as close to the battery as possible (within 18 inches) to protect the power cable.

Рисунок 4.1: Сзади view Аудиобанк P1502 amplifier showing the power input terminals (GND, REM, +12V) and speaker output terminals (CH1, CH2, Bridge). The fuse slots are also visible.

Figure 4.2: The 17-foot 8-gauge red power cable included in the kit.
4.2.2. Соединения аудиовходов
- Connect the 17-foot double-shielded RCA cable from the RCA outputs of your head unit to the RCA INPUTs (CH1 and CH2) on the ampпожизненнее.
- Alternatively, if your head unit does not have RCA outputs, use the speaker-level inputs (if applicable) by connecting the speaker wires from your head unit to the amplifier's speaker-level input terminals.
4.2.3. Выходные соединения динамиков
- Подключите динамики к amplifier's speaker output terminals using the 16-gauge speaker wire.
- Убедитесь в правильной полярности (+ к + и - к -) для каждого динамика.
- For 2-channel stereo operation, connect one speaker to CH1 and another to CH2.
- For bridged (mono) operation, connect a single subwoofer or speaker to the BRIDGE terminals (typically CH1+ and CH2- or as marked on the amplifier). The P1502 supports tri-mode operation.
- The amplifier is 2 Ohm stable, allowing for flexible speaker configurations.

Figure 4.3: The 20-foot 16-gauge red and black speaker wire included in the kit.
5. Инструкция по эксплуатации
После установки отрегулируйте ampНастройки усилителя для оптимального звучания.
5.1. AmpLifier Controls
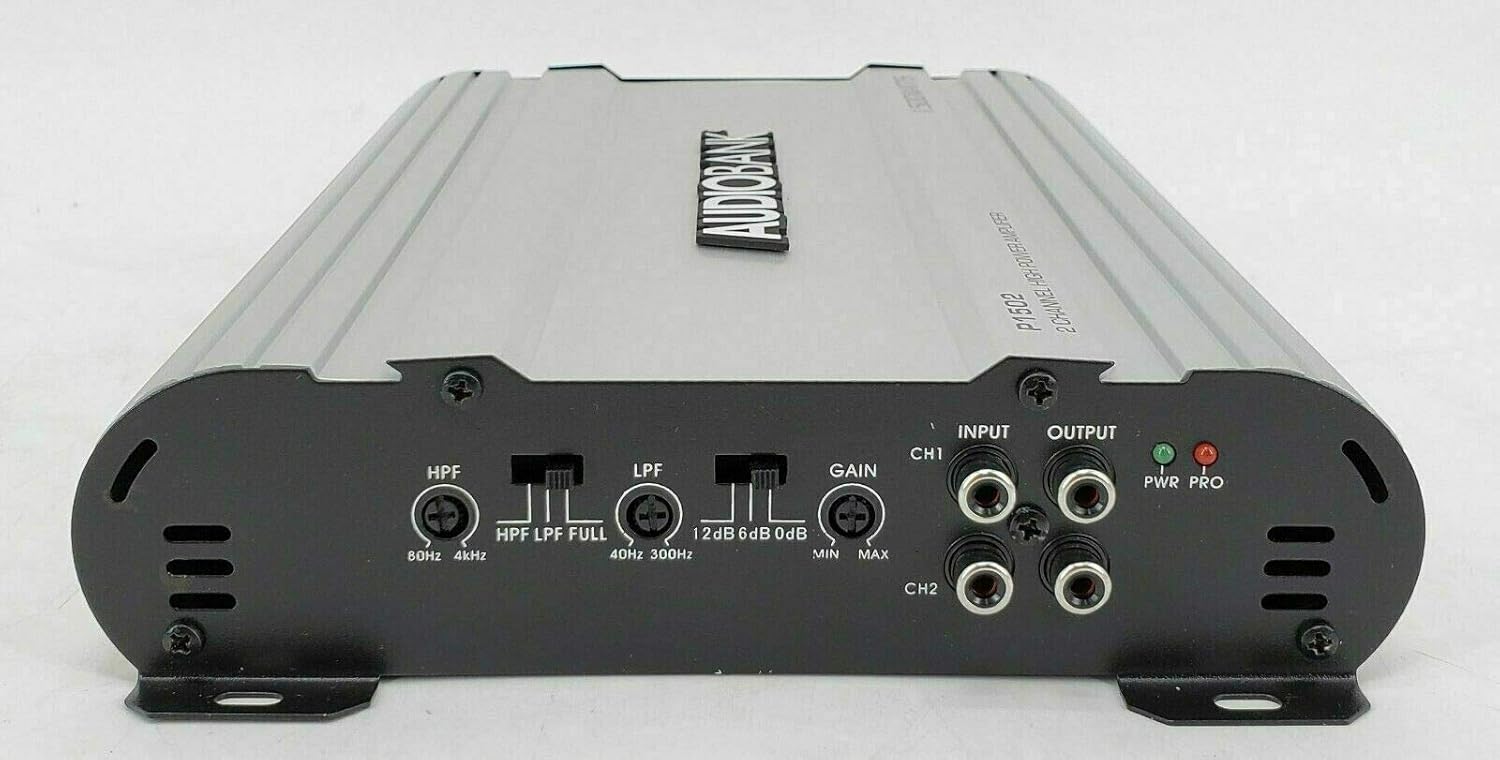
Рисунок 5.1: Передняя часть view Аудиобанк P1502 amplifier showing the control panel with HPF, LPF, Gain, Input, Output, and LED indicators.
- Input Gain Control (GAIN): Этот элемент управления соответствует amplifier's input sensitivity to the output of your head unit. Start with the gain at minimum (MIN) and slowly increase it until you hear distortion, then back off slightly.
- Фильтр нижних частот (ФНЧ): Adjusts the frequency range (40Hz-300Hz) for signals passed to subwoofers. Only frequencies below the set point will be ampлифицированный.
- High Pass Crossover (HPF): Adjusts the frequency range (80Hz-4kHz) for signals passed to full-range speakers. Only frequencies above the set point will be ampлифицированный.
- Усиление басов: Provides an adjustable bass enhancement from 0 to +12dB. Use sparingly to avoid distortion.
5.2. Светодиодные индикаторы
- Светодиод PWR (Питание): Загорается зеленым цветом, когда ampУсилитель включен и работает в обычном режиме.
- Светодиодная подсветка PRO (защита): Горит красным, когда amplifier enters protection mode due to a fault (e.g., overheating, short circuit, low impedance). If this LED lights up, turn off your system immediately and troubleshoot the issue.
6. Техническое обслуживание
To ensure the longevity and performance of your ampпожизненнее:
- Регулярно проверяйте все соединения проводки на герметичность и отсутствие коррозии.
- Держите amplifier's heatsink clean and free from dust or debris to maintain proper cooling. Use a soft, dry cloth for cleaning.
- Обеспечьте достаточную вентиляцию вокруг amplifier во все времена.
- Не подвергайте amplifier to liquids or excessive moisture.
7. Поиск Неисправностей
Если у вас возникли проблемы с вашим ampПеред обращением к специалисту ознакомьтесь со следующей таблицей:
| Проблема | Возможная причина | Решение |
|---|---|---|
| Нет питания (светодиод PWR не горит) | Перегоревший предохранитель, плохое соединение питания/заземления, отсутствие сигнала от пульта дистанционного управления. | Check the inline fuse and replace if necessary. Verify +12V, GND, and REM connections. Ensure head unit is on. |
| Protection Mode (PRO LED on) | Перегрев, короткое замыкание динамика, слишком низкое сопротивление. | Позволять amplifier to cool. Check speaker wiring for shorts. Verify speaker impedance is within acceptable limits (2 Ohm stable). |
| Нет звука | Отсутствие входного сигнала, неправильная настройка усиления, отсоединены провода динамиков. | Check RCA or speaker-level input connections. Adjust gain. Verify speaker connections. |
| Искаженный звук | Gain set too high, improper crossover settings, poor ground. | Reduce gain. Adjust LPF/HPF settings. Check ground connection. |
8. Технические характеристики
| Особенность | Спецификация |
|---|---|
| Номер модели | Р1502 |
| Количество каналов | 2 |
| Максимальная выходная мощность | 1500 Вт пиковая мощность |
| Максимальная мощность (2 Ом) | 750W x 2 |
| Мощность RMS (4 Ом) | 175W x 2 |
| Мостовое питание (4 Ом) | 1500W x 1 |
| Соотношение сигнал/шум | 99дБ |
| Частота среза нижних частот (регулируемая) | 40Гц-300Гц |
| Кроссовер высоких частот | 80Гц-4кГц |
| Усиление басов (регулируемое) | 0 - +12 дБ |
| Tri-mode Operation | Да |
| Входы | Линейный уровень и уровень динамиков |
| Частотная характеристика | 20Hz ~ 22kHz |
| Коэффициент нелинейных искажений (при среднеквадратичном значении выходного сигнала) | 0.01% |
| Разделение каналов | 90дБ |
| Dampфактор | 125+ |
| Рейтинг предохранителя | 20A x 2 |
| Размеры (Ш x В x Г) | 8 x 2 x 11.38 дюйма |
| Минимальный объем поставкиtage | 12 Вольт |
| Тип крепления | Поверхностный монтаж |
| Спецификация соответствует | ФКС |
9. Гарантия и поддержка
For warranty information and technical support, please refer to the documentation provided with your purchase or contact Audiobank customer service directly. Keep your proof of purchase for warranty claims.