1. Введение
This manual provides detailed instructions for the installation, operation, and maintenance of your Audiobank P2001 Monoblock Car Audio AmpУсилитель. Пожалуйста, внимательно прочтите данное руководство перед установкой или эксплуатацией, чтобы обеспечить правильное использование и предотвратить повреждение устройства или аудиосистемы вашего автомобиля.
The Audiobank P2001 is a high-performance Class AB monoblock amplifier designed to deliver powerful and clear audio output for your car's subwoofer system. It comes with a comprehensive 4-gauge amplifier installation wiring kit to facilitate a complete setup.
2. Информация по технике безопасности
Важные меры предосторожности:
- Перед началом любых электромонтажных работ всегда отсоединяйте отрицательную клемму аккумуляторной батареи автомобиля.
- Убедитесь, что вся проводка должным образом изолирована, чтобы предотвратить короткие замыкания.
- Смонтируйте ampНадежно закрепите усилитель, чтобы предотвратить его отсоединение во время движения транспортного средства.
- Избегайте монтажа ampЗащиту следует производить в местах, подверженных воздействию прямых солнечных лучей, чрезмерного тепла или влаги.
- Use appropriate gauge wiring as specified in this manual to handle the ampТребования к питанию лифиера.
- Если вы не уверены в каких-либо этапах установки, обратитесь к профессиональному установщику автомобильной аудиосистемы.
- Этот amplifier is designed for 12V DC negative ground systems only.
3. Содержимое упаковки
Проверьте наличие всех предметов в упаковке:
- Моноблок Audiobank P2001 Ampпожизненнее
- Дистанционное управление уровнем сабвуфера
- High Quality Thick 17 Feet FT 4 Gauge GA Power Cable
- Premium 3 Feet FT 4 Gauge GA Ground Cable
- Inline AGU Fuse Holder & 80A + 100A Fuse
- True Sound 17 Feet FT Double Shielded RCA Cable
- High Quality 17 Feet FT / 18 GA Turn-On Cable
- 20 Feet FT / 16 GA Speaker Wire
- Все необходимые принадлежности и клеммы для установки.

Image: The Audiobank P2001 amplifier shown alongside the complete 4-gauge amplifier installation wiring kit, including power cable, ground cable, RCA cables, speaker wire, fuse holder, and various terminals.
4.Основные характеристики
- Выходная мощность: 2000 Watts Peak Power, 425W x 1 RMS at 4 Ohms.
- Class AB Operation: Эффективное и высококачественное воспроизведение звука.
- Возможность работы в трех режимах: Универсальные возможности конфигурации.
- Источник питания MOSFET: Pulse Width Modulated (PWM) for stable power delivery.
- 2 Ohm Stable Operation: Обеспечивает гибкую конфигурацию акустических систем.
- Heavy-Duty Aluminum Alloy Heatsink: Обеспечивает эффективный отвод тепла.
- Continuously Variable Low Pass Crossover: Adjustable from 50Hz to 250Hz for precise audio tuning.
- Усиление басов: Variable from 0 to +12dB for enhanced low-frequency response.
- Дистанционная регулировка уровня сабвуфера: Удобная регулировка уровня басов с водительского места.
- Continuously Variable Input Gain Control: Соответствует ampЧувствительность усилителя к входному сигналу источника.
- Схема плавного включения: Prevents pops and thumps during power-up.
- Схема защиты: Thermal and Speaker Short Protection with LED indicators for power and protection status.
5. Настройка и установка
Proper installation is crucial for optimal performance and safety. If you are not confident in your ability to install this unit, please seek professional assistance.
5.1 Монтаж Ampпожизненнее
Choose a mounting location that is dry, well-ventilated, and secure. Avoid areas where the amplifier could be damaged by moving objects or exposed to excessive heat or moisture. Ensure there is sufficient airflow around the heatsink for proper cooling.

Изображение: сверху view Аудиобанк P2001 amplifier, showcasing its heavy-duty aluminum alloy heatsink design.
5.2 Подключение проводки
Follow these steps carefully for wiring the ampпожизненнее:
- Подключение питания (+12В):
Run the 4-gauge power cable from the vehicle's positive battery terminal to the amplifier's "+12V" terminal. Install the inline AGU fuse holder within 18 inches (45 cm) of the battery. Ensure the fuse is removed from the holder until all other connections are made.
- Заземление (GND):
Подсоедините заземляющий кабель сечением 4 AWG от amplifier's "GND" terminal to a clean, unpainted metal surface on the vehicle's chassis. Ensure a good electrical connection by scraping away any paint or rust. The ground cable should be as short as possible, ideally less than 3 feet (1 meter).
- Remote Turn-On Connection (REM):
Connect the 18-gauge turn-on cable from the amplifier's "REM" terminal to the remote output of your head unit. This wire tells the ampУсилитель должен включаться при включении головного устройства.
- Вход RCA:
Connect the double-shielded RCA cable from the RCA output of your head unit to the "INPUT" RCA jacks on the amplifier. For optimal sound quality, use high-quality RCA cables.
- Выходное соединение динамика:
Подключите сабвуфер(ы) к клеммам "SPEAKER OUTPUT" на... amplifier using the 16-gauge speaker wire. Ensure correct polarity (+ to + and - to -) for each speaker. This amplifier is 2 Ohm stable, allowing for various subwoofer configurations.
- Дистанционная регулировка уровня сабвуфера:
Plug the remote level control into the "REMOTE" port on the amplifier and mount it in a convenient location for easy access.
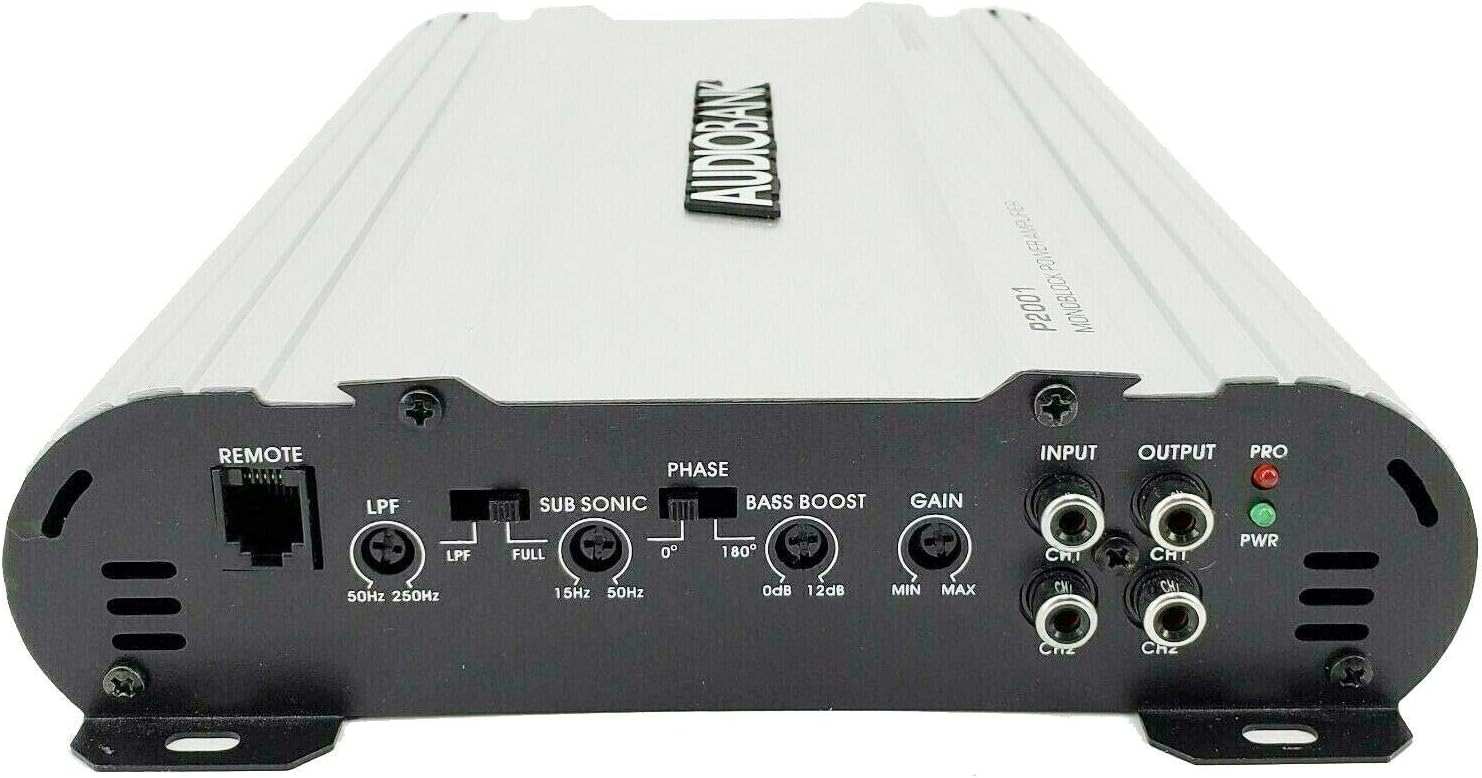
Image: Rear panel of the Audiobank P2001 amplifier, detailing the power input terminals (GND, REM, +12V) and speaker output terminals, along with the fuse slots.

Image: Front panel of the Audiobank P2001 amplifier, displaying the remote control port, low pass filter (LPF), sub sonic filter, phase switch, bass boost, gain control, RCA input/output, and power/protection LED indicators.
6. Инструкция по эксплуатации
6.1 Первоначальное включение
Once all connections are securely made and the fuse is inserted into the fuse holder:
- Turn on your vehicle's ignition and then your head unit.
- The "PWR" (Power) LED on the amplifier should illuminate, indicating it is receiving power. If the "PRO" (Protection) LED illuminates, refer to the Troubleshooting section.
- Начнем с amplifier's GAIN control set to minimum.
- Воспроизведите знакомую аудиозапись на умеренном уровне громкости на головном устройстве.
6.2 Настройка элементов управления
- GAIN Control (Input Sensitivity):
Постепенно увеличивайте значение регулятора GAIN на ampУсилитель работает до тех пор, пока не услышите искажения, затем немного уменьшите громкость. Это соответствует amplifier's input to your head unit's output level. Do not use the GAIN control as a volume knob.
- Фильтр нижних частот (ФНЧ):
Adjust the LPF (50Hz ~ 250Hz) to filter out high frequencies from reaching your subwoofer, ensuring it only reproduces bass notes. A common starting point is around 80-100Hz, but this can be adjusted based on your subwoofer and personal preference.
- Сабвуферный фильтр:
Этот фильтр удаляет крайне низкие, неслышимые частоты, которые могут приводить к потере качества звука. amplifier power and potentially damage your subwoofer. Set it slightly below your subwoofer's resonant frequency or the lowest frequency you want reproduced (e.g., 15Hz-30Hz).
- Переключение фаз (0°/180°):
This switch helps to align the subwoofer's output with the rest of your car's speakers. Experiment with both settings (0° and 180°) to find the one that provides the most impactful and cohesive bass response.
- Усиление басов:
Use the BASS BOOST control (0 to +12dB) to enhance low frequencies. Use sparingly to avoid distortion and potential damage to your subwoofer. Start at 0dB and increase gradually if desired.
- Дистанционная регулировка уровня сабвуфера:
This knob allows for convenient real-time adjustment of the subwoofer's output level from your driving position.
7. Техническое обслуживание
- Уборка: Для чистки используйте мягкую сухую ткань. ampОсмотрите внешний корпус усилителя. Не используйте агрессивные химикаты или абразивные чистящие средства.
- Вентиляция: Обеспечить amplifier's heatsink fins remain clear of dust and debris to maintain proper cooling. Periodically check for any obstructions.
- Соединения: Периодически проверяйте все электрические соединения на надежность крепления и наличие коррозии. Ненадежные соединения могут привести к ухудшению работы или повреждению.
- Замена предохранителя: Если amplifier's fuse blows, replace it only with a fuse of the same type and rating (80A or 100A AGU type, as supplied). Using a fuse with a higher rating can cause serious damage to the ampпредохранитель или электрическая система транспортного средства.
8. Поиск Неисправностей
Прежде чем обращаться в службу поддержки, пересмотрите...view следующие распространенные проблемы и решения:
| Проблема | Возможная причина | Решение |
|---|---|---|
| Нет питания (светодиод PWR выключен) |
|
|
| Protection LED (PRO) On |
|
|
| Нет аудиовыхода |
|
|
| Искаженный звук |
|
|
9. Технические характеристики
| Особенность | Спецификация |
|---|---|
| Максимальная выходная мощность | 2000 Вт |
| Максимальная мощность (2 Ом) | 2000W x 1 |
| Мощность RMS (4 Ом) | 425W x 1 |
| Соотношение сигнал/шум | 90дБ |
| Частота среза нижних частот (регулируемая) | 50 ~ 250Hz |
| Усиление басов (регулируемое) | 0 - +12 дБ |
| Дистанционное управление сабвуфером | Да |
| Частотная характеристика | 20Hz ~ 22kHz |
| Коэффициент нелинейных искажений (при среднеквадратичном значении выходного сигнала) | 0.01% |
| Разделение каналов | 90дБ |
| Dampфактор | 125+ |
| Рейтинг предохранителя | 20A x 2 (Total 40A) |
| Размеры (Ш x В x Г) | 8 x 2 x 12 дюйма |
| Тип крепления | Поверхностный монтаж |
| Количество каналов | 1 (Моноблок) |
| Спецификация соответствует | ФКС |
10. Информация о гарантии
Specific warranty details for the Audiobank P2001 amplifier are not provided in the available product information. Please refer to the product packaging or contact Audiobank directly for warranty terms and conditions.
11. Поддержка клиентов
For technical assistance or further inquiries regarding your Audiobank P2001 amplifier, please contact Audiobank customer support through their official website or the retailer from whom the product was purchased. Please have your model number (P2001) and purchase details ready when contacting support.