
1. Введение и окончаниеview
This manual provides detailed instructions for the installation, operation, maintenance, and troubleshooting of the ASRock 760GM-HDV Rev: 1.01 Desktop Motherboard. This motherboard is designed for AMD AM3/AM3+ processors and supports DDR3 memory, offering a reliable foundation for personal computer systems.
Key features include an AMD 760G/SB710 chipset, support for up to 32GB DDR3 RAM, and integrated graphics with HDMI, VGA, and DVI outputs. It also provides USB and SATA 3GB/s connectivity.
2. Настройка и установка
Before beginning installation, ensure your workspace is clean, well-lit, and static-free. Always handle the motherboard by its edges and use an anti-static wrist strap to prevent electrostatic discharge (ESD) damage.
2.1 Внешний вид материнской платы
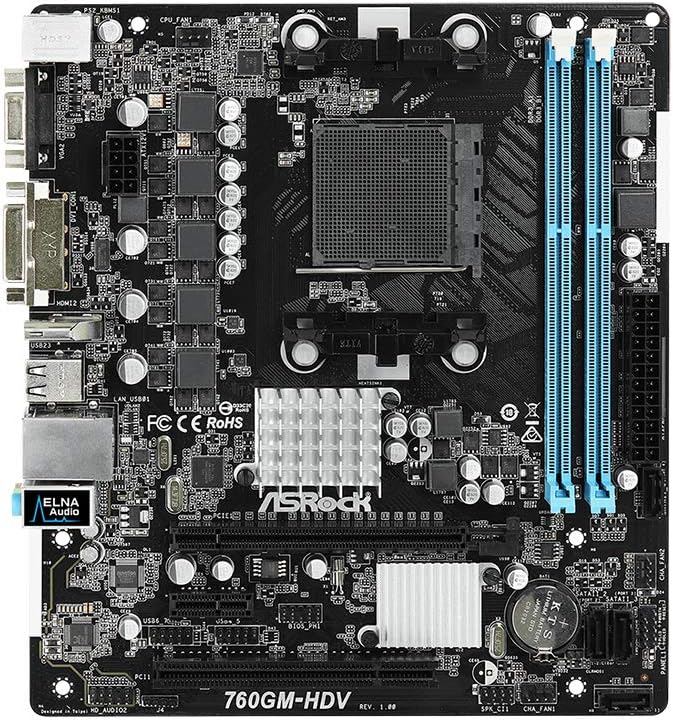
Рисунок 1: Вершина view of the ASRock 760GM-HDV motherboard, showing the CPU socket, RAM slots, PCIe slots, and various connectors.
2.2 Этапы установки компонентов
- Подготовьте дело: Install the I/O shield into the rear opening of your computer case. Ensure standoffs are correctly aligned and installed for the Micro ATX form factor.
- Установка процессора: Open the CPU socket lever. Carefully align your AMD AM3/AM3+ processor with the socket, ensuring the golden triangle on the CPU matches the triangle on the socket. Gently place the CPU into the socket without force. Close the lever to secure the CPU.
- Установите кулер процессора: Apply thermal paste to the CPU (if not pre-applied on the cooler). Mount the CPU cooler according to its manufacturer's instructions, ensuring it is securely fastened and the fan cable is connected to the CPU_FAN header on the motherboard.
- Установка оперативной памяти: Open the clips on both ends of the DDR3 DIMM slots. Align the memory module's notch with the slot's key. Press down firmly on both ends of the module until the clips snap into place. This motherboard supports dual-channel DDR3 memory.
- Установите материнскую плату: Аккуратно установите материнскую плату в корпус, совместив отверстия для винтов с выступами. Закрепите материнскую плату винтами.
- Подключить источник питания: Подключите 24-контактный разъем питания ATX и 4-контактный разъем питания ATX 12 В от вашего блока питания к соответствующим портам на материнской плате.
- Подключите устройства хранения данных: Connect SATA data cables from your hard drives or SSDs to the SATA 3GB/s ports on the motherboard. Connect power cables from the power supply to your storage devices.
- Подключите кабели передней панели: Connect the power button, reset button, HDD LED, power LED, and front USB/audio headers from your case to the corresponding pins on the motherboard. Refer to the motherboard's silkscreen labels for correct orientation.
- Установка карт расширения: If using a dedicated graphics card or other PCIe expansion cards, insert them into the appropriate PCIe slots and secure them with the case's retention mechanism.
3. Инструкция по эксплуатации
3.1 Initial Power-On and BIOS Access
- After all components are installed and connected, connect your monitor, keyboard, and mouse to the appropriate ports.
- Включите систему. Во время загрузки несколько раз нажмите кнопку ДЕЛ or F2 клавиша для входа в утилиту настройки BIOS/UEFI.
- In the BIOS, you can configure boot order, system time, and various hardware settings. Save changes before exiting.
3.2 Подключение периферийных устройств
The ASRock 760GM-HDV motherboard offers a range of rear I/O ports for connecting external devices:

Рисунок 2: Rear I/O panel of the ASRock 760GM-HDV motherboard, showing PS/2, VGA, DVI, HDMI, USB, LAN, and audio ports.
- Порты PS/2: For connecting legacy PS/2 keyboards and mice.
- VGA, DVI, HDMI Ports: For connecting displays. Use one port at a time for integrated graphics output.
- USB-порты: For connecting USB devices such as keyboards, mice, external drives, and printers.
- Порт локальной сети: For connecting to a wired network using an Ethernet cable.
- Аудиоразъемы: Для подключения колонок, наушников и микрофонов.
3.3 Установка драйвера
After installing your operating system, install the necessary drivers for the motherboard's chipset, integrated graphics, audio, and LAN. These drivers are typically provided on a support CD or can be downloaded from the ASRock official webсайт для вашей конкретной модели.
4. Техническое обслуживание
- Очистка от пыли: Regularly clean dust from inside your computer case, especially around the CPU cooler, chipset heatsink, and fan vents. Use compressed air and ensure the system is powered off and unplugged.
- Обновления BIOS: Периодически проверяйте ASRock. website for BIOS updates. BIOS updates can improve system stability, compatibility, and performance. Follow the update instructions carefully to avoid system damage.
- Проверки компонентов: Ensure all cables are securely connected and no components are loose. Check for any signs of physical damage or overheating.
5. Поиск Неисправностей
- Нет питания/нет POST:
- Verify all power cables (24-pin ATX, 4-pin 12V) are securely connected.
- Убедитесь, что процессор и оперативная память установлены правильно.
- Попробуйте загрузиться только с необходимыми компонентами (процессор, одна планка оперативной памяти, видеокарта, если нет встроенной графики).
- Для сброса CMOS-памяти извлеките батарейку CMOS на несколько минут или воспользуйтесь перемычкой для сброса CMOS-памяти.
- Нет дисплея:
- Ensure the monitor is connected to the correct video output (motherboard's integrated graphics or a dedicated graphics card).
- Проверьте питание монитора и выбор входного сигнала.
- При использовании дискретной видеокарты убедитесь, что она правильно установлена и подключена к источнику питания.
- Операционная система не загружается:
- Check boot order in BIOS to ensure the correct drive is selected.
- Verify SATA data and power connections to the boot drive.
- Выполните диагностическую проверку накопителя.
6. Технические характеристики
| Особенность | Спецификация |
|---|---|
| Производитель | ASRock |
| Номер модели | 760GM-HDV |
| Тип чипсета | AMD 760G / SB710 |
| Сокет ЦП | AM3 / AM3+ |
| Совместимые процессоры | AMD Athlon, AMD Sempron (AM3/AM3+ series) |
| Технология оперативной памяти | DDR3 |
| Максимальный размер оперативной памяти | 32 ГБ |
| Тактовая частота памяти | До 3400 МГц (OC) |
| Интегрированная графика | AMD Radeon HD 3000 (on 760G chipset) |
| Порты видеовыхода | VGA, DVI, HDMI |
| SATA-порты | SATA 3GB/s |
| USB-порты | USB 2.0 (rear and internal headers) |
| Локальная сеть | Гигабитная локальная сеть |
| Форм-фактор | Микро ATX |
| Разъем основного питания | 24-контактный ATX |
| Разъем питания процессора | 4-pin ATX 12V |
7. Гарантия и поддержка
Подробную информацию о гарантии см. в гарантийном талоне, прилагаемом к вашему продукту, или на официальном сайте ASRock. website. ASRock provides technical support for its products. For assistance, please visit the ASRock support page or contact their customer service department.
Официальный представитель ASRock Webсайт: www.asrock.com