1. Продукт закончилсяview
The EPEVER TRIRON 4210N is a 40A Maximum Power Point Tracking (MPPT) solar charge controller designed for 12V/24V DC systems. It efficiently manages power from solar panels to charge various battery types, including lead-acid (Sealed, Gel, Flooded, User) and lithium (LiFePO4, Li-NiCoMn, Lithium User). This set includes the TRIRON 4210N controller and the MT50 Remote Meter for enhanced monitoring and control.
Основные характеристики:
- Advanced MPPT technology for high tracking efficiency.
- Modular design for flexible configuration with different display and interface modules.
- Supports multiple battery types: Sealed (AGM), Gel, Flooded, Lead-acid User, LiFePO4 Lithium, Li(NiCoMn)O2 Lithium, Lithium User (9~34V).
- Negative ground design for broad application compatibility.
- Dual 5V DC USB output interface (Max 2.2A) for charging electronic devices.
- Четыреtage charging (bulk, absorption, float, equalization) to prolong battery life.
- Comprehensive electronic protection features.
- Функция статистики энергии в реальном времени.
Содержимое упаковки:
В комплект обычно входит:
- EPEVER TRIRON 4210N MPPT Solar Charge Controller
- EPEVER MT50 Дистанционный счетчик
- Remote Temperature Sensor (RT-S)
- USB to RS485 Communication Cable
- Руководство пользователя

Image: Contents of the EPEVER TRIRON 4210N and MT50 Remote Meter package, including the controller, remote meter, temperature sensor, and cables.
2. Информация по технике безопасности
Перед установкой и эксплуатацией внимательно прочтите все инструкции и предупреждения. Несоблюдение этих инструкций может привести к поражению электрическим током, пожару или серьёзным травмам.
- Ensure all wiring is correctly polarized and securely connected. Loose connections can cause overheating and fire.
- Всегда сначала подключайте аккумулятор к контроллеру заряда, затем солнечную панель и, наконец, нагрузку. Отключение производится в обратном порядке.
- Do not attempt to repair or modify the controller. Refer servicing to qualified personnel.
- Установите контроллер в хорошо проветриваемом помещении, вдали от легковоспламеняющихся материалов и коррозионных газов.
- Wear appropriate personal protective equipment (PPE), including eye protection and insulated gloves, when working with batteries and solar panels.
- Обеспечьте громкость системыtage is compatible with the controller's specifications (12V/24V auto work).
- Для предотвращения перегрузки по току используйте соответствующие автоматические выключатели или предохранители для всех соединений.
3. Установка
3.1 Монтаж контроллера
Mount the controller vertically on a flat, non-flammable surface in a dry, well-ventilated indoor area. Ensure there is sufficient clearance around the controller for heat dissipation. The recommended clearances are 150mm (5.9 inches) above and below the unit.

Image: Controller dimensions and recommended mounting clearances for proper ventilation.
3.2 Подключение проводки
Follow the wiring sequence carefully to prevent damage to the controller or other components. Always ensure all power sources are disconnected before making or breaking connections.
- Подключите аккумулятор: Connect the battery cables to the controller's battery terminals (marked with '+' and '-'). Ensure correct polarity. Always connect the battery first.
- Подключите солнечную панель: Connect the solar panel cables to the controller's PV terminals (marked with solar panel icon and '+' and '-'). Ensure correct polarity.
- Подключите нагрузку постоянного тока: Connect the DC load cables to the controller's load terminals (marked with light bulb icon and '+' and '-'). Ensure correct polarity.
- Connect Remote Temperature Sensor: Plug the remote temperature sensor into the designated port on the controller. Secure the sensor to the battery case for accurate temperature compensation.
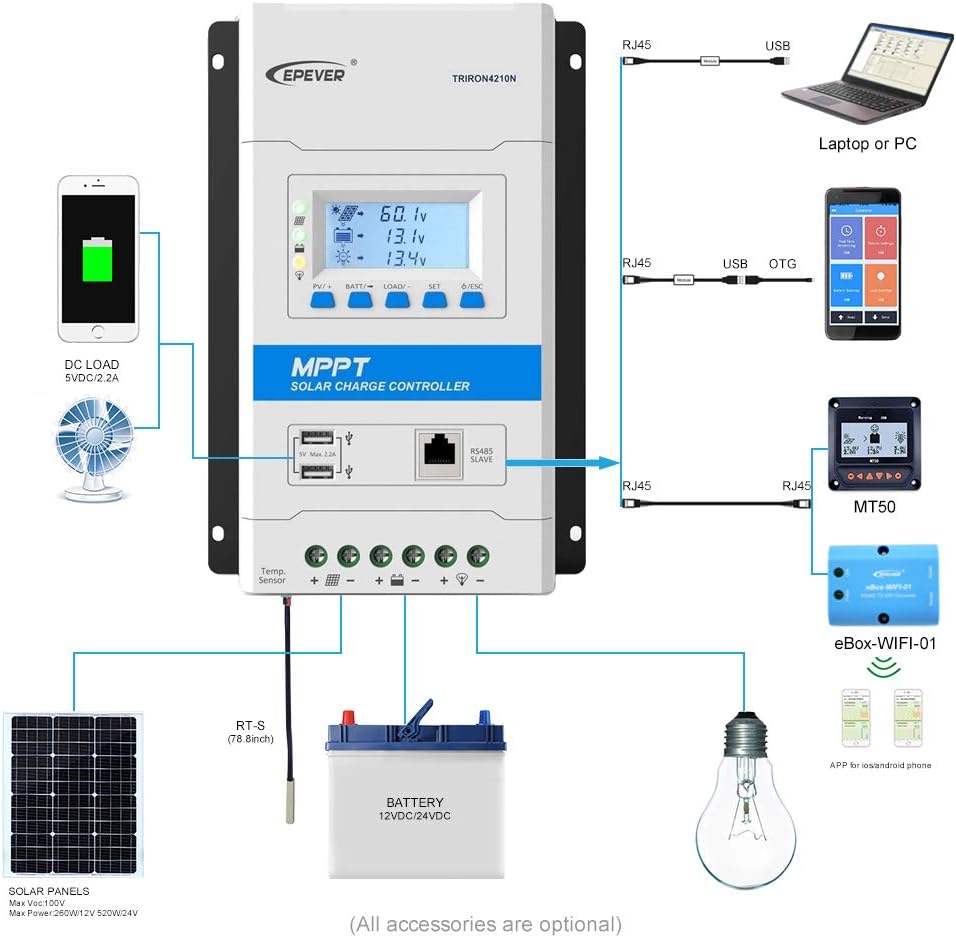
Image: Detailed wiring diagram showing connections for solar panels, battery, and DC load to the TRIRON 4210N controller.
Video: This video demonstrates the unboxing, component identification, and step-by-step installation process for the EPEVER TRIRON 4210N solar charge controller, including wiring the battery, solar panel, and remote temperature sensor.
3.3 Подключение дистанционного измерительного прибора MT50
The MT50 Remote Meter connects to the controller via an RJ45 communication cable. This allows for remote monitoring of system status and parameter settings.
- Connect one end of the RJ45 cable to the RS485 port on the TRIRON 4210N controller.
- Connect the other end of the RJ45 cable to the corresponding port on the MT50 Remote Meter.
3.4 Коммуникационные интерфейсы
The TRIRON 4210N features an RS485 communication port, allowing connection to various accessories for extended functionality:
- Программное обеспечение для ПК: Connect via an RS485 to USB adapter cable for monitoring and parameter configuration using PC software.
- Мобильное приложение: Connect via an eBox-WIFI-01 or eBox-BLE-01 module for wireless monitoring and control through a mobile application.
4. Операция
4.1 ЖК-дисплей и кнопки
The controller features an LCD display and five buttons for viewing system parameters and making adjustments.

Image: Various screens displayed on the TRIRON 4210N LCD, showing PV voltage, current, battery status, and load information.
- Кнопка PV/+: Used to navigate forward through display screens or increase parameter values.
- BATT/→ Button: Used to navigate right through display screens or move cursor during parameter setting.
- Кнопка ЗАГРУЗИТЬ/- Used to navigate backward through display screens or decrease parameter values.
- Кнопка SET: Used to enter parameter setting mode or confirm a setting.
- Кнопка ESC: Used to exit parameter setting mode or return to the previous screen.
4.2 Настройки параметров
To adjust parameters such as battery type, capacity, and temperature unit, use the navigation buttons to access the setting menus. Press the SET button to enter edit mode, use PV/+ and LOAD/- to change values, and SET again to confirm. Refer to the detailed instructions in the included user manual for specific parameter adjustments.
4.3 выхода USB
The controller is equipped with dual 5V DC USB ports (Max 2.2A) for charging compatible electronic devices. These ports are active when the controller is powered by the battery.
5. Техническое обслуживание
Регулярное техническое обслуживание обеспечивает оптимальную производительность и долговечность вашего контроллера заряда солнечных батарей.
- Проверьте соединения: Периодически проверяйте все электрические соединения на надежность крепления и наличие коррозии. Затяните все ослабленные соединения.
- Очистите контроллер: Содержите контроллер в чистоте, без пыли и мусора. Убедитесь, что ребра радиатора не заблокированы, чтобы обеспечить надлежащее охлаждение.
- Осмотрите кабели: Проверьте все кабели на наличие признаков износа, повреждений или разрушения изоляции. Немедленно замените поврежденные кабели.
- Проверка батареи: Для свинцово-кислотных аккумуляторов проверьте уровень электролита и состояние клемм в соответствии с рекомендациями производителя аккумулятора.
- Обновления программного обеспечения: Проверьте производителя webсайт для получения любых доступных обновлений прошивки для вашего контроллера.
6. Поиск Неисправностей
This section provides basic troubleshooting steps for common issues. For more complex problems, consult the full user manual or contact EPEVER technical support.
Распространенные проблемы и решения:
- Нет дисплея/нет питания:
- Проверьте соединения аккумулятора и убедитесь, что они надежны и правильно поляризованы.
- Проверьте аккумулятор vol.tage находится в пределах рабочего диапазона контроллера.
- Нет зарядки от солнечной панели:
- Проверьте соединения и полярность солнечных панелей.
- Убедитесь, что на солнечные панели попадает достаточно солнечного света.
- Проверьте напряжение обрыва цепи солнечной панели.tage (Voc) находится в пределах диапазона входного сигнала контроллера.
- Загрузка не работает:
- Проверьте соединения нагрузки и полярность.
- Ensure the load is not exceeding the controller's rated load current.
- Проверьте уровень заряда батареиtage; the load may be disconnected if the battery voltagе слишком мало.
- Incorrect Battery Readings:
- Verify the remote temperature sensor is correctly connected and placed near the battery.
- Ensure the correct battery type and capacity are set in the controller's parameters.
7. Технические характеристики
| Параметр | Ценить |
|---|---|
| Модель | TRIRON4210N-mppt |
| Том системыtage | 12/24VDC Auto Work |
| Номинальный ток заряда | 40А |
| Входная мощность батареиtage Диапазон | 8-32В |
| Максимум. Объем разомкнутой цепи PVtage | 100V (Min operating environment temp); 92V (25℃ environment temp) |
| МПП Томtage Диапазон | (Vbat+2V) ~ 72V |
| Max. PV Array Power Support | 520W (12V battery); 1040W (24V battery) |
| Температура рабочей среды | -25℃ ~ +55℃ (with LCD) / -30℃ ~ +55℃ (without LCD) |
| Lithium Battery Types Supported | LiFePO4 (4 series; 8 series) / Li-NiCoMn (3 series; 6 series) / User (Lithium battery setting requires RS485 or WIFI BOX) |
| Lead-acid Battery Types Supported | Sealed (AGM), Gel, Flooded, Lead-acid User |
| Самопотребление | ≤14 мА (12 В); ≤15 мА (24 В) |
| Температурная компенсация | -3 мВ / ℃ / 2 В |
| Заземление | Общий отрицательный |
| Terminals/Wire Size | 6AWG (16 мм²) |
| USB-выход | Dual 5V DC, Max 2.2A |
| Вес товара | 6.69 фунта |
| Размеры упаковки | 17.56 x 8.43 x 4.88 дюйма |
| СКП | 655160074776 |
8. Гарантия и поддержка
For warranty information and technical support, please refer to the documentation included with your product or visit the official EPEVER webСохраните чек о покупке в качестве подтверждения покупки для предъявления гарантийных претензий.