
1. Introduction
This manual provides detailed instructions for the installation, operation, and maintenance of the Biostar TB250-BTC PRO motherboard. This motherboard is designed to support Intel Core i7/i5/i3/Pentium/Celeron processors with an LGA1151 socket and DDR4 memory. It features extensive PCI Express slots for multi-GPU configurations.
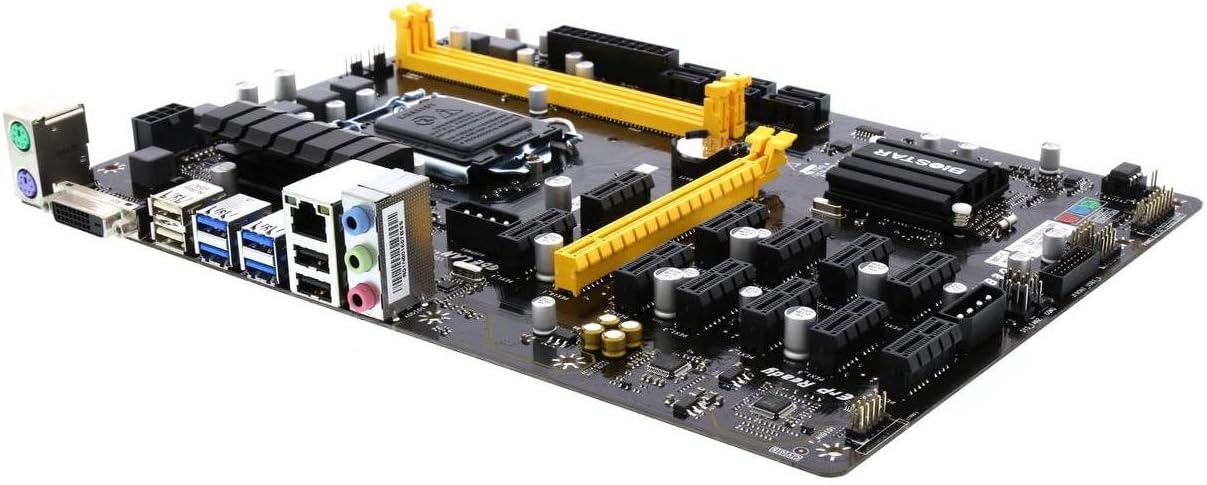
Figure 1: Overview of the Biostar TB250-BTC PRO Motherboard.
2. Package Contents
Verify that all items listed below are present in your motherboard package. If any item is damaged or missing, contact your retailer.
- Biostar TB250-BTC PRO Motherboard
- User Manual
- SATA Cables
- Rear I/O Panel Shield
- Driver CD (may not be included in all packages, drivers are available online)

Figure 2: Typical contents included with the Biostar TB250-BTC PRO Motherboard.
3. Setup and Installation
Follow these steps to properly install your motherboard components.
3.1. Motherboard Layout

Figure 3: Detailed layout of the Biostar TB250-BTC PRO Motherboard, highlighting key components and connectors.
3.2. CPU Installation
- Locate the LGA1151 CPU socket on the motherboard.
- Open the CPU socket lever and remove the protective cover.
- Carefully align your Intel Core i7/i5/i3/Pentium/Celeron processor with the socket, ensuring the gold triangle on the CPU matches the indicator on the socket.
- Gently place the CPU into the socket without forcing it.
- Close the socket lever to secure the CPU.
- Install the CPU cooler according to its manufacturer's instructions.
3.3. RAM Installation
- Locate the DDR4 memory slots.
- Open the clips at both ends of the memory slot.
- Align the notch on the DDR4 memory module with the key in the memory slot.
- Insert the memory module firmly into the slot until the clips snap into place.
- Ensure both clips are fully closed and the module is seated correctly.
3.4. Graphics Card (GPU) Installation
The TB250-BTC PRO motherboard supports multiple graphics cards for specialized applications. It features one PCI Express 3.0 x16 slot and twelve PCI Express 3.0 x1 slots.
- Insert your primary graphics card into the PCI Express 3.0 x16 slot.
- For additional GPUs, use the PCI Express 3.0 x1 slots. Risers are typically required for these slots.
- Secure each graphics card or riser firmly.
- Connect the necessary power cables to each graphics card.
- Important Note: Bios setting changes are required to utilize all 12 GPUs. Refer to the BIOS section for details. Windows operating systems generally support a maximum of 8 AMD or NVIDIA GPUs.
3.5. Storage Device Installation
Connect your SATA storage devices (HDDs/SSDs) to the SATA 6Gb/s connectors on the motherboard using SATA data cables. Ensure power is supplied to each device from your power supply unit.
3.6. Power Connections
Connect the 24-pin ATX power connector and the 8-pin CPU power connector from your power supply unit to the corresponding ports on the motherboard.
3.7. Rear I/O Panel Connections
Connect your peripherals to the appropriate ports on the rear I/O panel.

Figure 4: Rear I/O panel of the Biostar TB250-BTC PRO Motherboard, showing various connectivity options.
- PS/2 Ports: For connecting PS/2 keyboard and mouse.
- DVI-D Port: For video output.
- USB 2.0 Ports: For connecting USB 2.0 devices.
- USB 3.0 Ports: For connecting USB 3.0 devices.
- RJ-45 Gigabit LAN Port: For network connection.
- Analog Audio Ports: For audio input/output.
3.8. BIOS Settings for Multi-GPU
To enable full support for multiple GPUs, access the BIOS setup utility during boot-up (usually by pressing DEL or F2). Navigate to the PCI-E settings and ensure all PCI-E slots are enabled and configured for optimal performance. Specific settings may vary based on BIOS version; consult the on-screen help within the BIOS for detailed guidance.
4. Operating Instructions
After completing the hardware installation, connect your display, keyboard, and mouse. Power on your system. The motherboard will initiate the boot process. You may need to install an operating system if not already present. Ensure all necessary drivers for the motherboard and installed components are installed for proper functionality.
Video 1: Overview of a B250 BTC 12P Mining Mainboard, demonstrating its features and potential use cases.
Video 2: Product overview, showcasing the motherboard's design and connectivity options.
5. Maintenance
Regular maintenance helps ensure the longevity and stable operation of your motherboard.
- Dust Removal: Periodically clean dust from the motherboard and components using compressed air. Ensure the system is powered off and unplugged before cleaning.
- Connection Checks: Verify that all cables and components are securely connected.
- Software Updates: Keep your operating system, drivers, and BIOS updated to the latest versions for optimal performance and security.
- Temperature Monitoring: Monitor system temperatures to prevent overheating, especially in multi-GPU setups. Ensure adequate airflow within your system.
6. Troubleshooting
This section addresses common issues you might encounter.
- System Does Not Boot:
- Check all power connections (24-pin ATX, 8-pin CPU, GPU power).
- Ensure RAM modules are correctly seated.
- Verify CPU installation and cooler connection.
- Try booting with minimal components (one RAM stick, one GPU) to isolate the issue.
- Graphics Cards Not Detected:
- Ensure GPUs are properly seated in their slots/risers and have adequate power.
- Access BIOS and verify that all PCI-E slots are enabled.
- Update graphics drivers to the latest version.
- Remember Windows operating system limitations for multiple GPUs (maximum 8 AMD or NVIDIA GPUs).
- BIOS Reset: If you encounter issues after changing BIOS settings, you can reset the BIOS to default settings. This usually involves clearing the CMOS by removing the CMOS battery for a few minutes or using a dedicated jumper on the motherboard. Refer to the motherboard diagram for the exact location of the CMOS battery or jumper.
- Operating System Installation Issues: Ensure your installation media is not corrupted and your storage drive is properly connected and recognized in BIOS.
7. Specifications
| Feature | Detail |
|---|---|
| Brand | Biostar |
| Model Name | TB250-BTC PRO |
| CPU Socket | LGA 1151 |
| Compatible Processors | Intel Celeron, Intel Pentium, Core i7/i5/i3 |
| Chipset Type | Intel B250 |
| RAM Memory Technology | DDR4 |
| Memory Clock Speed | 2400 MHz (supports 2400/2133/1866) |
| Number of USB 2.0 Ports | 2 (rear) |
| Product Dimensions | 13.1 x 10 x 2.5 inches |
| Item Weight | 1 pounds |
| Platform | Windows 7, Windows 8 (Note: Windows 10/11 also supported, but GPU limits apply) |
8. Warranty and Support
For warranty information and technical support, please refer to the official Biostar website or contact your local retailer. Keep your proof of purchase for warranty claims.


