1. Introducere
Thank you for choosing the elejoy 15A MPPT Step-Up Solar Charge Controller EL-MU400SP. This device is designed to efficiently charge 24V-85V lead-acid and lithium batteries from solar panels, maximizing energy harvest through its advanced MPPT (Maximum Power Point Tracking) technology. It is suitable for various applications including home solar systems, camping setups, and RVs. This manual provides essential information for safe installation, operation, and maintenance of your solar charge controller.
2. Instrucțiuni de siguranță
- Citiți cu atenție toate instrucțiunile înainte de instalare și utilizare.
- Ensure all wiring is correctly polarized and securely connected to prevent damage to the controller or battery.
- Always connect the battery first, then the solar panel. Disconnect in the reverse order: solar panel first, then battery.
- Nu dezasamblați și nu încercați să reparați controlerul. Contactați personal calificat pentru service.
- Instalați controlerul într-o zonă bine ventilată, departe de materiale inflamabile și de lumina directă a soarelui.
- Purtați echipament individual de protecție (EIP) adecvat atunci când lucrați cu baterii și panouri solare.
- Ensure the solar panel's open-circuit voltage (Voc) does not exceed the controller's maximum input voltage.
3. Produs terminatview
3.1 Caracteristici cheie
- Vol. Largtage Gama: Supports 24V-85V lead-acid and lithium batteries.
- Step-Up MPPT Technology: Charges high-voltage batteries from lower-voltage solar panels.
- High PV Utilization: Achieves ≥99% maximum PV utilization efficiency.
- Robust Heat Dissipation: Features an aluminum heat sink and unique structural design for optimal thermal management.
- Afișaj LED HD: Monitorizare în timp real a curentului, volumuluitage, and other data.
- Control multimod: Offers various load control modes for flexible energy management.
3.2 Componente
The elejoy EL-MU400SP controller features a durable aluminum casing with an integrated heat sink for efficient cooling. The front panel includes an HD LED display and control buttons for easy operation.

Figura 3.2.1: Faţă view of the controller showing the LED display and control buttons. The display indicates input PV voltage and current, and output battery voltage and current. Control buttons include 'OK', '-', and '+' for setting output voltage.

Figura 3.2.2: Înclinat view of the controller, illustrating the robust aluminum heat sink design and the secure input/output wiring terminals.
4. Configurare și instalare
4.1 Montarea controlerului
- Alegeți un loc uscat, bine ventilat, ferit de lumina directă a soarelui, temperaturi ridicate și umiditate.
- Ensure sufficient clearance around the controller for proper airflow and heat dissipation.
- Mount the controller vertically on a non-flammable surface using appropriate screws.
4.2 Conexiuni de cablare
Follow the wiring diagram carefully. Incorrect wiring can damage the controller and connected devices. Always connect the battery first, then the solar panel. Disconnect in the reverse order.
- Conectați bateria: Connect the positive (+) and negative (-) terminals of your battery to the "OUTPUT" terminals of the controller. Ensure correct polarity.
- Conectați panoul solar: Connect the positive (+) and negative (-) terminals of your solar panel(s) to the "INPUT" terminals of the controller. Ensure correct polarity.
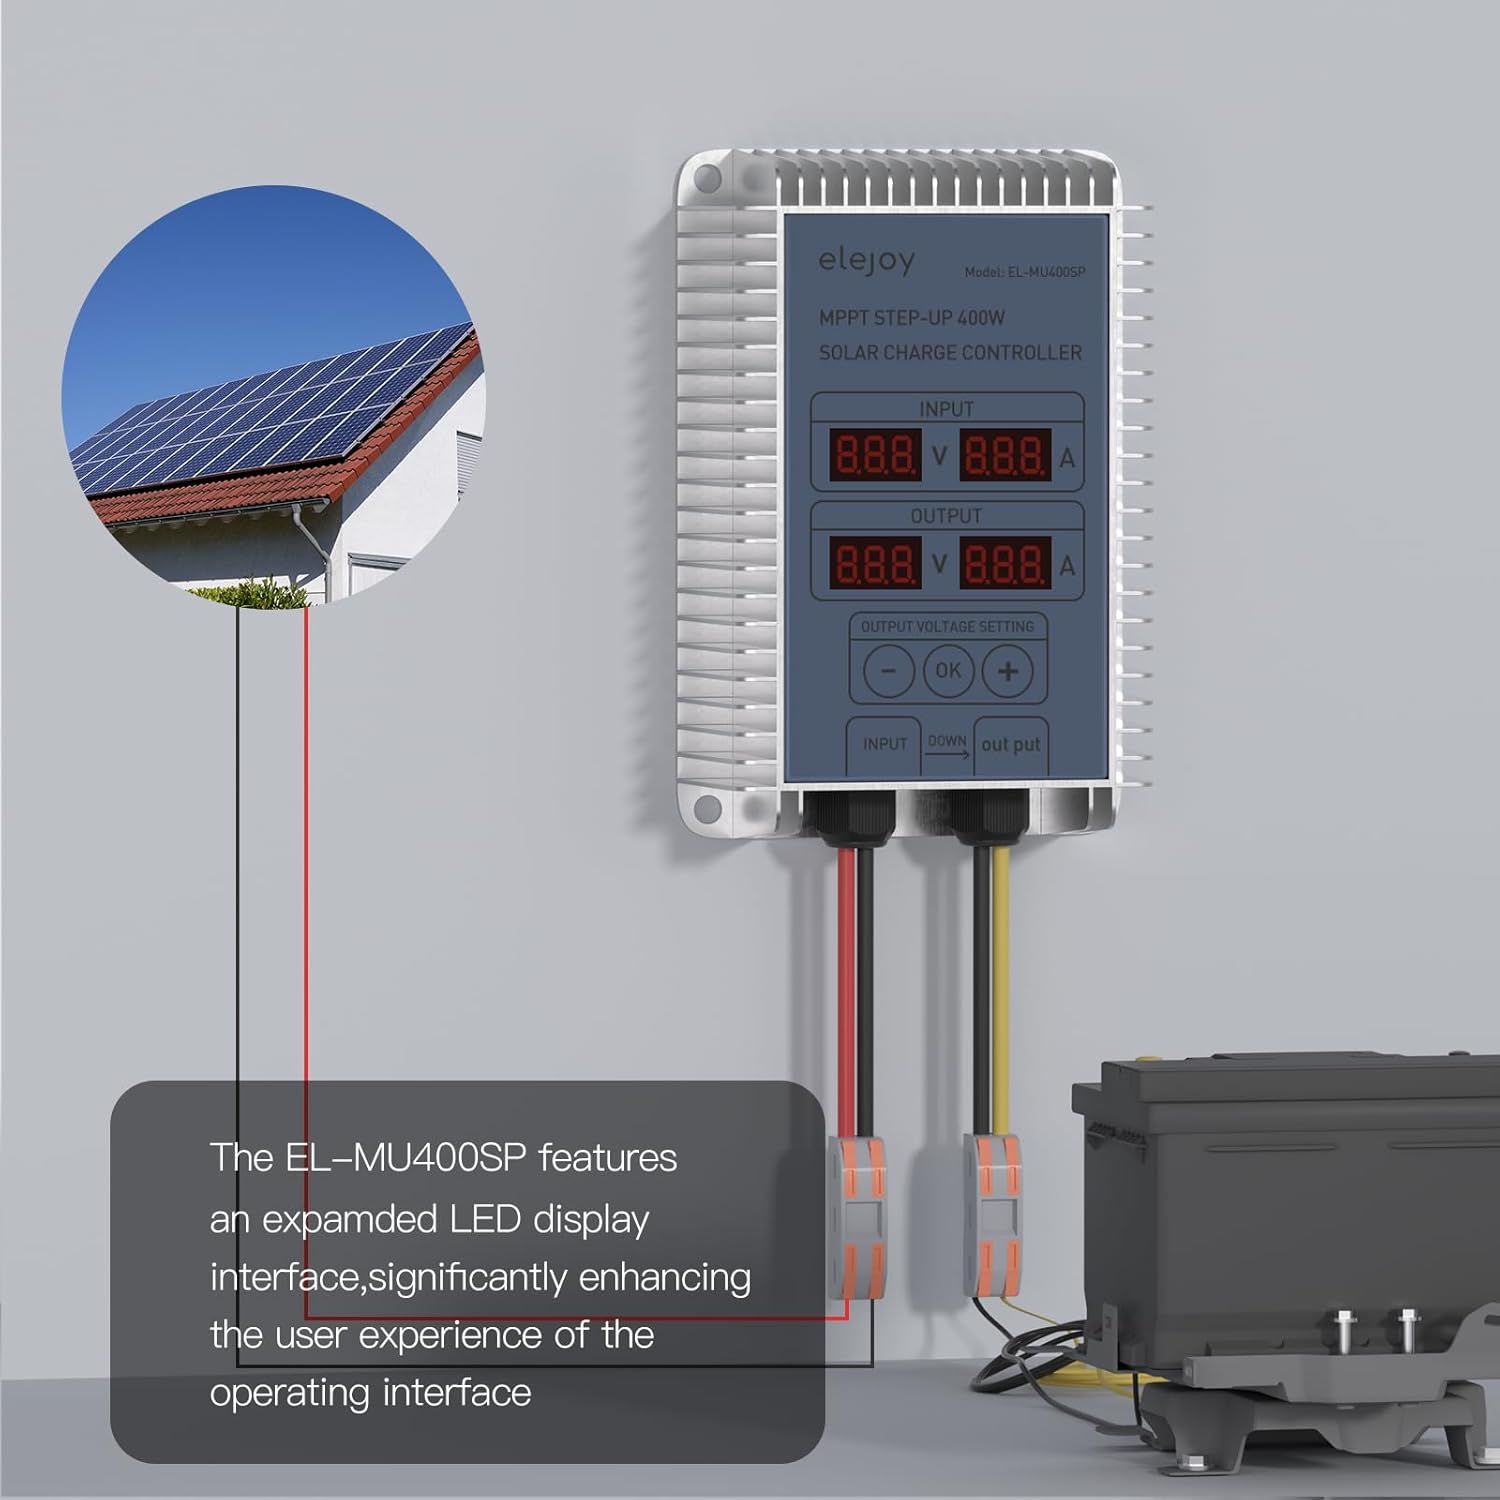
Figura 4.2.1: Typical wiring setup for the elejoy MPPT Step-Up Solar Charge Controller. Solar panels connect to the input, and the battery connects to the output.

Figura 4.2.2: Detailed connection diagram, emphasizing the PV input range and the connection points for solar panel and battery.
5. Instrucțiuni de utilizare
5.1 Pornirea inițială
Once the battery and solar panel are connected, the controller will automatically power on. The HD LED display will show real-time input (PV) and output (battery) voltage și valorile curente.
5.2 Afișează informații
The LED display provides critical operational data:
- INTRARE: Afișează volumultage (V) and current (A) from the solar panel.
- IEȘIRE: Afișează volumultage (V) and current (A) being delivered to the battery.
Figura 5.2.1: The LED display interface, indicating input and output electrical parameters and the output voltage setting controls.
5.3 Setting Output Voltage
The controller allows adjustment of the output voltage to match your battery's charging requirements. Use the '-', 'OK', and '+' buttons:
- Press the 'OK' button to enter the output voltagmodul de setare e.
- Use the '-' and '+' buttons to adjust the desired output voltage.
- Press 'OK' again to confirm and save the setting.
The controller automatically detects 24V-85V lithium battery activation. It is compatible with various battery types including LiFePO4, SLD, FLD, GEL, and AGM.

Figura 5.3.1: Battery compatibility and automatic detection feature for 24-85V lithium batteries.
6. Întreținere
- Inspecție regulată: Verificați periodic toate conexiunile cablurilor pentru strângere și coroziune.
- curatenie: Keep the controller clean and free from dust and debris. Use a dry cloth to wipe the casing. Nu utilizați lichide sau solvenți.
- Ventilare: Ensure the area around the controller remains unobstructed to allow for proper heat dissipation.
- Verificare de mediu: Verificați dacă mediul de operare se încadrează în intervalele de temperatură și umiditate specificate.
7. Depanare
| Problemă | Cauza posibila | Soluţie |
|---|---|---|
| Controlerul nu pornește | Bateria nu este conectată sau are un volum scăzuttage; incorrect wiring. | Verificați conexiunile bateriei și voltage. Ensure battery is connected first. |
| Fără curent de încărcare | Solar panel not connected or insufficient sunlight; incorrect solar panel wiring. | Verify solar panel connections and ensure adequate sunlight. Check solar panel voltage. |
| Ieșire voltage incorect | Ieșire voltage setting is wrong. | Reglați volumul de ieșiretage using the control buttons as described in Section 5.3. |
| Supraîncălzire | Ventilație slabă; sarcină excesivă. | Asigurați o circulație adecvată a aerului în jurul controlerului. Reduceți sarcina dacă este necesar. |
8. Specificații
| Parametru | Valoare |
|---|---|
| Model | EL-MU400SP |
| Marca | elejoy |
| Putere maximă de intrare PV | 400W |
| Vol. intrare max PVtage (VOC) | 55V |
| Curent nominal de încărcare | 15A |
| Volumul baterieitage Gama | 24V-85V (Lead-Acid, LiFePO4, Lithium) |
| PV Utilization Efficiency | ≥99% |
| Material | Aluminiu |
| Dimensiuni produs (L x l x H) | 4.72 cm x 3.15 cm x 1.57 cm |
| Greutatea articolului | 0.48 kg |
| Tip de afișare | LED |
| Temperatura de operare | -20°C până la 50°C |

Figura 8.1: Physical dimensions of the elejoy EL-MU400SP controller.
9. Garanție și asistență
elejoy products are manufactured to high-quality standards. For warranty information, technical support, or service inquiries, please contact elejoy customer support through their official website or the retailer from whom the product was purchased. Please have your model number (EL-MU400SP) and purchase details ready when contacting support.
Pentru mai multe informații, vizitați oficialul elejoy Store on Amazon.