TP-Link ER706W
TP-Link ER706W Omada Gigabit AX3000 WiFi 6 VPN Router User Manual
Model: ER706W
1. Introducere
The TP-Link ER706W Omada Gigabit AX3000 WiFi 6 VPN Router is a high-performance networking device designed for robust and secure network environments. It integrates advanced Wi-Fi 6 technology with comprehensive VPN capabilities, making it suitable for both home and business applications. This manual provides detailed instructions for setting up, operating, and maintaining your ER706W router.
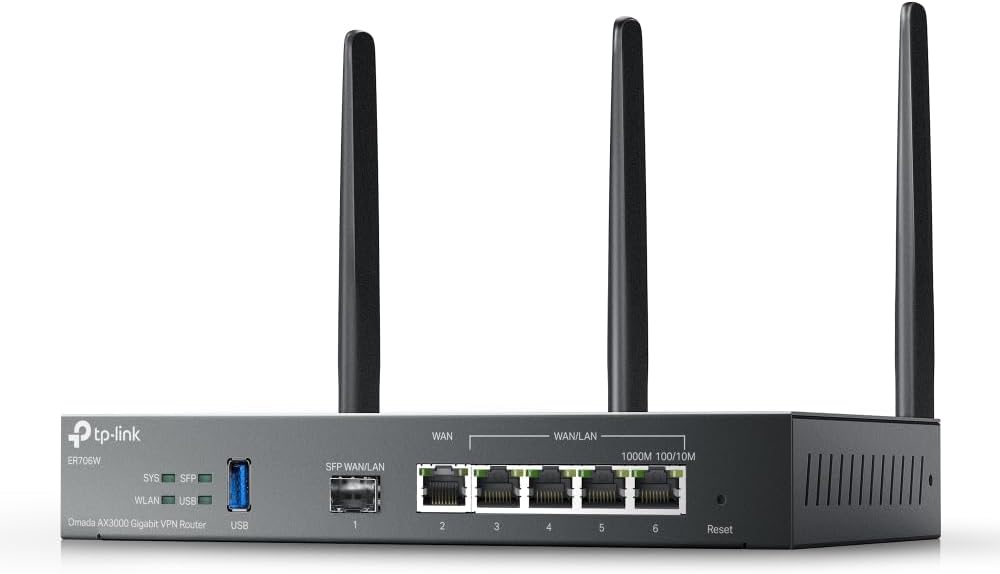
Figura 1: Față view of the TP-Link ER706W router, showing the ports and antennas.
2. Conținutul pachetului
Verificați dacă toate articolele sunt prezente în colet. Dacă lipsește sau este deteriorat vreun articol, vă rugăm să contactați distribuitorul.
- ER706W Omada Gigabit AX3000 WiFi 6 VPN Router
- Ghid de instalare
- Adaptor de curent continuu
- Detachable Antennas (Quantity: 4)
3. Caracteristicile produsului
The ER706W router offers a comprehensive set of features designed for high performance, security, and flexibility:
- AX3000 WiFi 6: Delivers ultra-fast wireless speeds of up to 2402 Mbps on 5 GHz and 574 Mbps on 2.4 GHz, leveraging Wi-Fi 6 technologies like OFDMA and 1024-QAM.
- Multi-WAN Ports: Equipped with 1x Gigabit SFP slot and 5 Gigabit RJ45 ports, supporting up to 5 WAN ports for load balancing and increased broadband utilization.
- Omada Mesh Support: Seamlessly integrates with Omada access points to extend Wi-Fi coverage without additional cabling or switches, featuring intelligent self-organization and self-healing capabilities.
- Capacități VPN avansate: Supports high-security SSL/IPSec/GRE/WireGuard/PPTP/L2TP VPN and OpenVPN protocols for secure remote access and site-to-site connections.
- Port USB 3.0: Includes one USB 3.0 port for USB storage support and LTE backup functionality when used with an LTE dongle.
- Management centralizat: Manage your network easily through the Omada SDN platform, including cloud access and the Omada App.
- Securitate robustă: Features a powerful firewall, IP/MAC/URL filtering, IP-MAC binding, DoS defense, and convenient VLAN support to protect your network.

Figure 2: Visual representation of the ER706W's core features.

Figura 3: Pesteview of the ER706W's security functionalities.
4. Hardware terminatview
Familiarize yourself with the physical components and ports of your ER706W router.

Figura 4: Panoul din spate view with port descriptions.
4.1 Indicatoarele panoului frontal
| Indicator | Stare | Descriere |
|---|---|---|
| SYS | Verde solid | Sistemul funcționează normal. |
| Verde intermitent | System is starting up or performing self-test. | |
| Oprit | Power is off or system error. | |
| SFP | Verde solid | SFP port is linked. |
| Verde intermitent | SFP port is transmitting/receiving data. | |
| WLAN | Verde solid | Funcția wireless este activată. |
| Verde intermitent | Wireless data is being transmitted/received. | |
| USB | Verde solid | USB device is connected and recognized. |
| Verde intermitent | USB data is being transmitted/received. |
4.2 Porturi și butoane de pe panoul din spate
- Stecher: Connects to the provided DC power adapter.
- Port USB 3.0: For connecting USB storage devices or an LTE dongle for backup WAN.
- SFP WAN/LAN Port (Port 1): A Gigabit SFP slot that can function as either a WAN or LAN port.
- Gigabit RJ45 WAN Port (Port 2): A dedicated Gigabit Ethernet port for WAN connection.
- Gigabit RJ45 WAN/LAN Ports (Ports 3-6): Four Gigabit Ethernet ports that can be configured as WAN or LAN ports.
- Buton de resetare: Apăsați și țineți apăsat timp de aproximativ 8 secunde pentru a restaura routerul la setările implicite din fabrică.
- Conectori antene: Four connectors for attaching the detachable Wi-Fi antennas.
5. Configurare
Follow these steps to set up your ER706W router.
5.1 Conexiune hardware
- Atașați antene: Screw the four detachable antennas firmly onto the antenna connectors on the rear panel of the router.
- Connect Internet:
- If you have a fiber optic connection, insert the SFP module (not included) into the SFP WAN/LAN port (Port 1) and connect the fiber cable.
- For a standard Ethernet connection, connect your modem or ISP's Ethernet cable to the Gigabit RJ45 WAN port (Port 2). You can also use Ports 1, 3, 4, 5, or 6 if configured as WAN ports.
- Conectați dispozitivele locale: Connect your computers, switches, or other network devices to any of the available LAN ports (Ports 1, 3, 4, 5, or 6, depending on configuration) using Ethernet cables.
- Pornire: Connect the DC power adapter to the router's power connector and then plug the adapter into a power outlet. The SYS LED will flash during startup and turn solid green when the router is ready.
5.2 Configurare inițială
The ER706W can be managed via the Omada SDN Controller or through its standalone web interfata.
Using Omada SDN Controller (Recommended for Omada Networks)
- Ensure your Omada SDN Controller (hardware controller, software controller, or cloud-based) is running and accessible.
- Connect the ER706W to your network where the Omada Controller can discover it.
- Log in to your Omada Controller. The ER706W should appear in the "Devices" list as "Pending".
- Adopt the device. Once adopted, you can configure all settings, including WAN, LAN, Wi-Fi, and VPN, from the Omada Controller interface.
Using Standalone Web Interfață
- Ensure your computer is connected to one of the LAN ports of the ER706W.
- Deschide a web browser și introduceți adresa IP implicită: 192.168.0.1 (or check the label on the bottom of the device).
- Introduceți numele de utilizator și parola implicite, care sunt de obicei admin for both. You will be prompted to change these upon first login.
- Follow the Quick Setup Wizard to configure your internet connection (WAN settings), LAN settings, and Wi-Fi settings.
- Salvați setările și reporniți routerul dacă vi se solicită.
6. Funcționare
6.1 Configurare Wi-Fi
The ER706W supports Wi-Fi 6 (802.11ax) on both 2.4 GHz and 5 GHz bands.
- Access the wireless settings via the Omada Controller or standalone web interfata.
- Configure your SSID (network name), security type (WPA2/WPA3 recommended), and password for both 2.4 GHz and 5 GHz bands.
- Enable or disable Wi-Fi as needed.

Figura 5: Capacități de viteză Wi-Fi 6.
6.2 Configurarea VPN-ului
The ER706W supports various VPN protocols for secure remote access and site-to-site connections.
- Navigate to the VPN section in the management interface.
- Choose the desired VPN type (e.g., IPSec, SSL VPN, OpenVPN, PPTP, L2TP, WireGuard).
- Follow the on-screen instructions to configure VPN parameters such as remote IP addresses, authentication methods, and encryption settings.
- Asigurați-vă că există reguli adecvate de firewall pentru a permite traficul VPN.

Figure 6: VPN connection example.
6.3 Omada Mesh Integration
When integrated into an Omada network, the ER706W can participate in Omada Mesh for extended Wi-Fi coverage.
- Ensure your Omada Access Points are also adopted by the same Omada Controller.
- The Omada Controller will automatically manage mesh connections, providing intelligent self-organization and self-healing capabilities.
- Refer to the Omada SDN Controller documentation for detailed mesh network configuration.
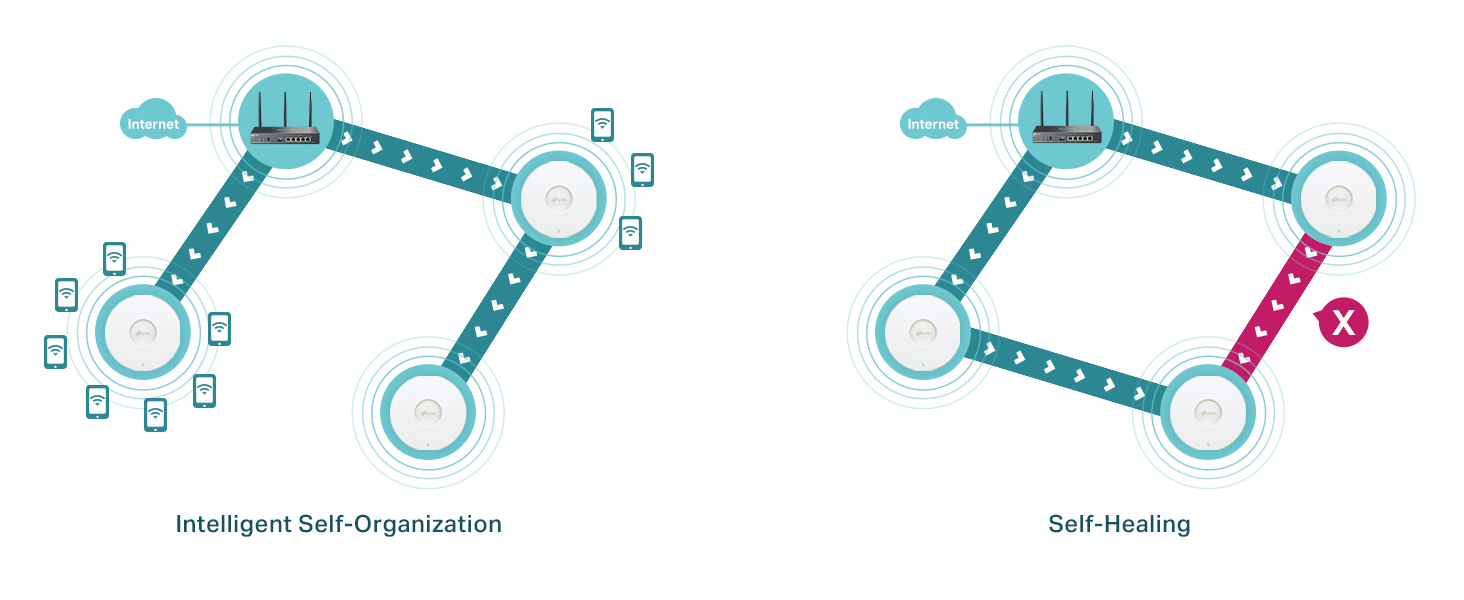
Figure 7: Omada Mesh network behavior.
7. Întreținere
7.1 Actualizare firmware
Keeping your router's firmware up to date ensures optimal performance, security, and access to new features.
- Verificați actualizările:
- Via Omada Controller: The controller will notify you of available firmware updates for adopted devices. Follow the controller's instructions to perform the upgrade.
- Prin Web Interfata: Conectați-vă la router web interface, navigate to "System Tools" or "Firmware Upgrade", and check for new versions. You may need to download the latest firmware file de la oficialul TP-Link website (www.tp-link.com/us/support/download/er706w/).
- Efectuați actualizarea: Follow the on-screen instructions to upload and install the firmware. Do not power off the device during the upgrade process.
7.2 Configurarea copierii de rezervă și a restaurării
It is recommended to back up your router's configuration before major changes or firmware upgrades.
- În web interface, go to "System Tools" > "Backup & Restore".
- Click "Backup" to save the current configuration to your computer.
- To restore, select the backup file and click "Restore".
7.3 Curățarea dispozitivului
Keep the router clean to ensure proper ventilation and operation.
- Opriți dispozitivul și deconectați toate cablurile.
- Folosiți o lavetă moale și uscată pentru a șterge exteriorul. Nu utilizați produse de curățare lichide sau aerosoli.
- Asigurați-vă că orificiile de ventilație sunt lipsite de praf și obstacole.
8. Depanare
8.1 Nu se poate accesa Web Pagina de management
- Asigurați-vă că ați conectat computerul la un port LAN al routerului.
- Verify your computer's IP address is in the same subnet as the router (e.g., if router is 192.168.0.1, your computer should be 192.168.0.x). Set your computer to obtain an IP address automatically.
- Ștergeți memoria cache și cookie-urile browserului sau încercați un alt browser.
- Disable any firewall or antivirus software temporarily.
- If the issue persists, try resetting the router to factory defaults (see Section 4.2).
8.2 Fără acces la internet
- Check all cable connections. Ensure the WAN cable is securely connected to the correct WAN port.
- Verify the WAN LED indicator is on or flashing, indicating a connection.
- Restart your modem and then the router.
- Check your WAN settings in the router's web interface. Ensure the connection type (DHCP, Static IP, PPPoE) and credentials are correct as provided by your ISP.
- If using a modem, ensure it is working correctly by connecting a computer directly to it.
8.3 Probleme de conexiune Wi-Fi
- Ensure the WLAN LED is solid green.
- Check your Wi-Fi network name (SSID) and password.
- Mută-te mai aproape de router pentru a verifica dacă există probleme cu puterea semnalului.
- Try changing the Wi-Fi channel or channel width in the wireless settings to avoid interference.
- Ensure your wireless adapter supports Wi-Fi 6 if you are trying to connect using AX speeds.
9. Specificații
| Categorie | Detaliu |
|---|---|
| Model | ER706W |
| Dimensiuni (L x l x H) | 14.72 x 8.9 x 1.4 inchi (37.4 x 22.6 x 3.6 cm) |
| Greutatea articolului | 3.43 lire (1.56 kg) |
| Standarde wireless | IEEE 802.11ax/ac/n/a (5 GHz), IEEE 802.11ax/n/b/g (2.4 GHz) |
| Viteze Wi-Fi | AX3000 (2402 Mbps pe 5 GHz, 574 Mbps pe 2.4 GHz) |
| Clasa de bandă de frecvență | Dual-Band |
| Interfețe | 1x Gigabit SFP WAN/LAN, 1x Gigabit RJ45 WAN, 4x Gigabit RJ45 WAN/LAN, 1x USB 3.0 Port |
| Protocoale VPN | SSL/IPSec/GRE/WireGuard/PPTP/L2TP VPN, OpenVPN |
| management | Omada SDN Controller (Cloud-Based, Hardware, Software), Standalone Web UI |
| Alimentare electrică | DC Power Adapter (Included) |
| Temperatura de operare | 0°C până la 40°C (32°F până la 104°F) |
| Temperatura de depozitare | -20°C până la 70°C (-4°F până la 158°F) |
| Umiditatea de funcționare | 10% până la 90% fără condensare |
| Umiditatea de depozitare | 5% până la 90% fără condensare |
10. Garanție și asistență
10.1 Informații despre garanție
TP-Link provides a limited warranty for this product. The specific warranty period and terms may vary by region and local laws. Please refer to the official TP-Link website or your local retailer for detailed warranty information.
10.2 Suport tehnic
Pentru asistență tehnică, actualizări de firmware și informații despre produs, vă rugăm să vizitați pagina oficială de asistență TP-Link. website:
You can also find FAQs, troubleshooting guides, and community forums on the support page. When contacting support, please have your product model (ER706W) and serial number ready.
Ask a question about this manual
Ask about setup, troubleshooting, compatibility, parts, safety, or missing instructions. Manuals+ will review the question and use this page’s manual context to help answer it.