1. Introdução
This manual provides detailed instructions for the safe operation, setup, maintenance, and troubleshooting of your 4DRC H2 High Speed RC Car. Please read this manual thoroughly before operating the vehicle to ensure proper function and to prevent damage or injury. Keep this manual for future reference.

Image: The 4DRC H2 High Speed RC Car, highlighting its 4WD, 2.4Ghz control, dual batteries, 30KM/H speed, strong power, and drift tires.
2. Precauções de segurança
Observe sempre as seguintes diretrizes de segurança para evitar ferimentos ou danos ao produto:
- Operate the RC car in open areas away from people, pets, and obstacles.
- Não opere perto de vias públicas, corpos d'água ou fontes de alta tensão.tage linhas.
- Mantenha as mãos, cabelos e roupas largas longe das peças móveis.
- Não toque no motor imediatamente após o uso, pois ele pode estar quente.
- Certifique-se de que as baterias estejam carregadas corretamente e sejam manuseadas com cuidado.
- Recomenda-se a supervisão de um adulto para usuários mais jovens.
- Do not modify the product, as this may void the warranty and cause unsafe operation.
3. Package Contents & Components Overview
3.1 Conteúdo da embalagem
Verifique se todos os itens estão presentes na embalagem:
- Carro RC 4DRC H2
- Controle remoto
- Lithium Ion Batteries (x2)
- Cabo de carregamento USB
- Racing Tires (pre-installed or separate set)
- Drift Tires (separate set)
- Manual de instruções

Image: An illustration showing the 4DRC H2 RC Car, remote controller, two batteries, USB charger, and two sets of tires (racing and drift), alongside the product box and manual.
3.2 Car Components
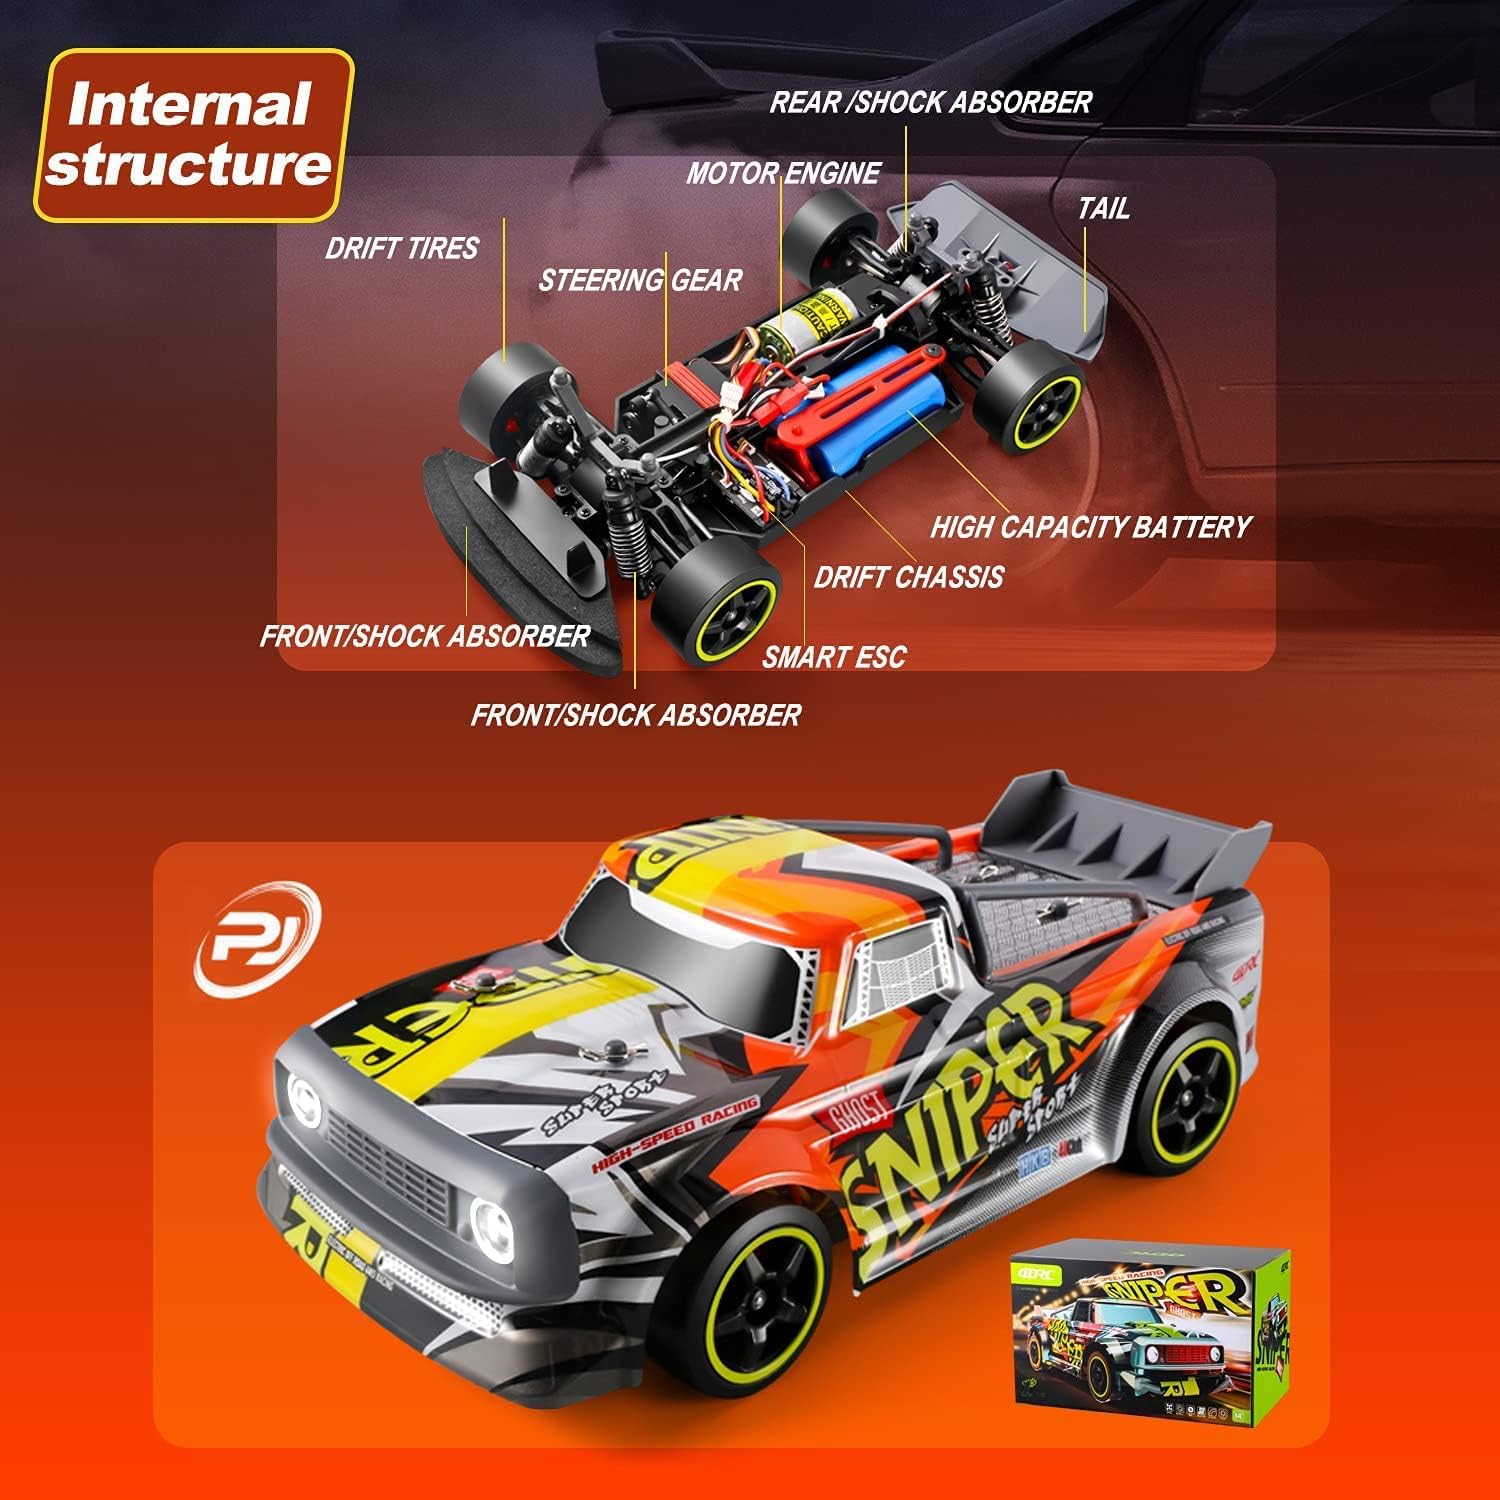
Image: A diagram illustrating the internal components of the RC car, including the motor engine, steering gear, smart ESC, high capacity battery, drift chassis, and front/rear shock absorbers.
3.3 Controlador Remoto Sobreview

Imagem: Uma imagem detalhada view of the remote control, labeling the Body Stability System (ESP+), Turn-to-Fine-Tuning, Reverse Throttle, Wheel Status Indicator Light (Green), TX (Transmitter), ST.TRIM, ST.D/R (Steering Range), ST.REV (Reverse Steering Amplitude), and Remote Control Status Indicator Light (Red).
4. Configuração
4.1 Carregando a bateria do carro
- Conecte o cabo de carregamento USB à bateria.
- Plug the USB end into a suitable USB power adapter (e.g., computer USB port, phone charger).
- A luz indicadora no carregador mostrará o status do carregamento (consulte as instruções do carregador para obter informações específicas sobre os padrões de luz).
- Depois de totalmente carregada, desconecte a bateria do carregador.
Observação:
- Não sobrecarregue a bateria.
- Sempre supervisione o carregamento.
- Allow the battery to cool down before recharging after use.

Image: Two blue Lithium Ion batteries, indicating the power source for the RC car.
4.2 Installing Car Battery
- Localize o compartimento da bateria na parte inferior do carro de controle remoto.
- Abra a tampa do compartimento.
- Insert the charged battery, ensuring correct polarity.
- Feche bem a tampa do compartimento da bateria.
4.3 Instalação das pilhas do controle remoto
- Abra o compartimento da bateria na parte traseira do controle remoto.
- Insert the required batteries (usually AA, refer to packaging for exact type and quantity), observing correct polarity.
- Feche a tampa do compartimento da bateria.
4.4 Emparelhando o controle remoto
- Turn on the RC car. The car's indicator light will flash.
- Ligue o controle remoto.
- The remote controller and car will automatically pair. Once paired, the indicator lights on both the car and remote will become solid.
4.5 Changing Tires
The 4DRC H2 comes with two sets of tires: racing tires for grip and drift tires for sliding maneuvers.
- To change tires, carefully remove the wheel nuts using the provided tool.
- Remove the current tires and replace them with the desired set.
- Securely fasten the wheel nuts.

Image: The 4DRC H2 RC Car displayed with two distinct sets of tires: one labeled 'Racing Tires' suitable for all terrain, and another labeled 'Drift Tires' suitable for drifting.
5. Operação
5.1 Controles Básicos
- Acionador do acelerador: Puxe para acelerar para a frente, empurre para frear/dar ré.
- Volante: Vire à esquerda para virar à esquerda, vire à direita para virar à direita.

Image: A close-up of the remote control, indicating the steering wheel and accelerator trigger for controlling the RC car.
5.2 Advanced Controls & Adjustments
- ST.TRIM: Adjusts the steering trim to ensure the car drives straight when the steering wheel is centered.
- ST.D/R (Direção com Taxa Dupla): Adjusts the maximum steering angle. Lowering this value reduces the steering sensitivity.
- TH.REV (Throttle Reverse): Inverte a direção do acelerador.
- ST.REV (Steering Reverse): Inverte o sentido de direção.
- ESP+ (Body Stability System): Activates or deactivates the electronic stability program for improved control, especially during high-speed maneuvers or on slippery surfaces.

Image: The remote control with a speed indicator, suggesting variable speed control.
5.3 Dicas de Condução
- Comece devagar para se familiarizar com os controles.
- Experiment with different tire types for various terrains and driving styles (racing vs. drifting).
- Utilize the ESP system for enhanced stability, especially when learning or on challenging surfaces.

Image: The RC car depicted on four different terrains: rocky ground (rock climbing), asphalt (racing), grassy field (grassland), and sand (sandy land), illustrating its versatility.
Video: An official product video demonstrating the 4DRC H2 high-speed RC car in action, showcasing its speed, drift capabilities, and performance on various surfaces.
6. Manutenção
6.1 Limpeza
- After each use, especially in dusty or dirty conditions, clean the car with a soft brush or cloth.
- Não utilize água ou produtos químicos agressivos, pois isso pode danificar os componentes eletrônicos.
- Remove any debris from the wheels, suspension, and motor area.
6.2 Cuidados com a bateria
- Guarde as baterias em local fresco e seco, longe da luz solar direta.
- Do not store fully charged or completely depleted batteries for extended periods. Charge them to about 50% for long-term storage.
- If the car will not be used for a long time, remove the batteries from both the car and the remote controller.
6.3 Inspeção Geral
- Verifique regularmente se há parafusos soltos ou peças danificadas.
- Ensure the shock absorbers are functioning correctly.
- Inspecione os pneus para verificar se há desgaste.

Imagem: Uma imagem detalhada view of the RC car's shock absorber, indicating its role in suspension and handling.

Image: The underside of the RC car chassis, highlighting the anti-collision cotton for impact protection.
7. Solução De Problemas
| Problema | Possível causa | Solução |
|---|---|---|
| O carro não responde ao controle remoto. | Baterias fracas no carro ou no controle remoto; Não emparelhado; Fora do alcance. | Charge/replace batteries; Re-pair car and remote; Operate within range. |
| O carro está andando torto. | É necessário ajustar o trim da direção. | Adjust the ST.TRIM knob on the remote controller. |
| Velocidade ou potência reduzida. | Low car battery; Motor/drivetrain obstruction. | Recharge car battery; Check for debris in gears or wheels. |
| Car stops unexpectedly. | Superaquecimento; Bateria fraca. | Allow car to cool down; Recharge battery. |
8. Especificações
- Marca: 4RDC
- Modelo: H2
- Escala: 1:16
- Sistema de transmissão: 4WD (tração nas quatro rodas)
- Velocidade máxima: Até 30 km/h
- Frequência de controle: 2.4 GHz
- Baterias: 2 baterias de íon de lítio (incluídas)
- Peso do item: Aproximadamente 3.48 libras
- Dimensões da embalagem: 13.7 x 8.11 x 7.56 polegadas
- Características: High-speed motor, independent shock absorption, drift tires, racing tires, LED lights, body stability system.
9. Garantia e suporte
For warranty information and customer support, please refer to the contact details provided on the product packaging or visit the official 4DRC webGuarde o comprovante de compra como prova para eventuais solicitações de garantia.