1. Introdução
The Franklin Sensors ProSensor T11/X1100 is an electronic stud finder designed to detect wood and metal studs behind drywall and other common wall materials. This device utilizes multiple sensors to provide accurate and simultaneous detection of stud edges and centers.
1.1 Conteúdo da embalagem
- Franklin Sensors ProSensor T11/X1100 Stud Finder
- Lápis
1.2 Principais Características
- 11-Sensor Technology: Provides enhanced accuracy and simultaneous display of stud edges and center.
- No Calibration Required: Ready to use by simply pressing and holding the activation button.
- Start Anywhere Scanning: Allows scanning to begin at any point on the wall, even directly over a stud.
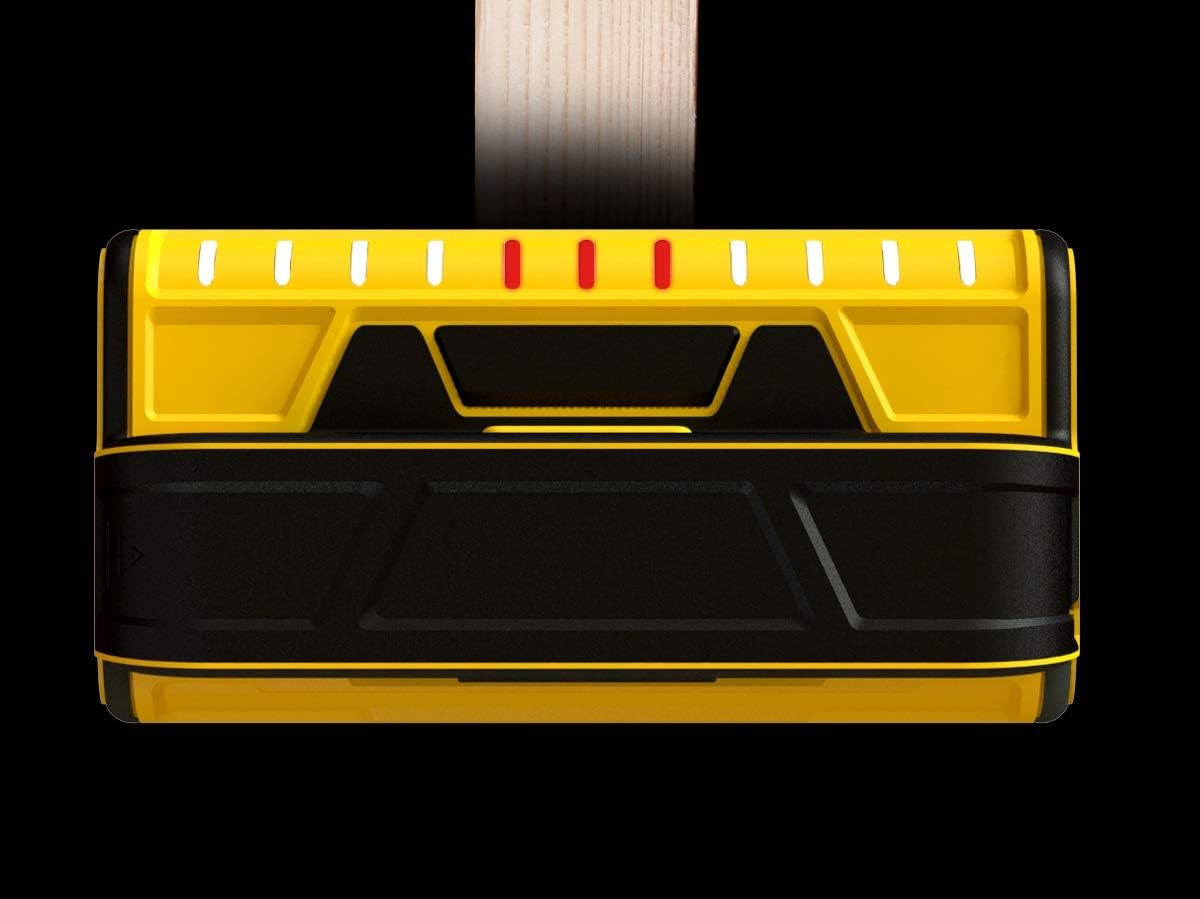
- Indicadores LED: 11 precision LEDs visually track and indicate the location and width of studs.
- Profundidade máxima de detecção: Detects objects up to 1 3/5 inches (approximately 4 cm) deep.
- Integrated Pencil Caddy: For convenient marking.

2. Configuração
2.1 Instalação da bateria
- Localize a tampa do compartimento da bateria na parte traseira do dispositivo.
- Deslize a tampa aberta.
- Insira duas (2) pilhas AA, certificando-se da polaridade correta (+/-).
- Feche bem a tampa do compartimento da bateria.
Observação: The ProSensor T11/X1100 is designed for use with standard AA batteries and is not compatible with rechargeable batteries.
3. Instruções de operação
3.1 Operação Geral
- Place the stud finder flat against the wall surface where you intend to scan.
- Press and hold the activation button located on the top of the device. The device will activate instantly without requiring calibration.
- Slowly slide the stud finder horizontally across the wall.
- Observe the LED indicators. As the device moves over a stud, the LEDs will illuminate to indicate its presence and width.
- Once the stud is located, mark its edges and center using the integrated pencil caddy.
- Release the activation button to turn off the device.

3.2 How the ProSensor T11/X1100 Works
The ProSensor T11/X1100 utilizes 11 independent sensors that continuously scan the wall surface. When the device passes over a change in wall density, such as a stud, the sensors detect this change. The multiple sensors work together to accurately map the entire width of the stud, providing a comprehensive view rather than just a single point of detection.

3.3 Interpreting LED Readings
- Illuminated LEDs: Indicate the presence of a stud. The number of illuminated LEDs corresponds to the width of the detected object.
- Center Indication: The central illuminated LEDs will typically indicate the center of the stud.
- Edge Indication: The outermost illuminated LEDs on either side indicate the edges of the stud.
- Full Stud Display: The device displays the entire stud simultaneously, allowing for clear identification of single studs, double studs, and irregular configurations.

4. Manutenção
- Mantenha o dispositivo limpo e seco. Limpe com um pano macio e seco.amp Se necessário, limpe com um pano. Não utilize produtos de limpeza abrasivos ou solventes.
- Store the stud finder in a cool, dry place away from direct sunlight and extreme temperatures.
- Remova as pilhas se o dispositivo não for usado por um longo período para evitar vazamentos.
5. Solução De Problemas
- No LEDs illuminate: Check battery installation and replace batteries if necessary. Ensure the activation button is fully pressed and held.
- Leituras inconsistentes: Ensure the device is held flat against the wall and moved slowly. Avoid lifting or tilting the device during scanning. Ensure the wall surface is dry and free from excessive texture or wallpaper that might interfere with readings.
- False positives/negatives: The device is designed for drywall and similar materials. Performance may vary on different wall types (e.g., lath and plaster, concrete). Electrical wiring or plumbing near the surface can sometimes be detected.
6. Especificações
| Recurso | Especificação |
|---|---|
| Número do modelo | FST1102 |
| Dimensões do produto | 6.5 x 3.5 x 2.25 polegadas |
| Peso do item | 8 onças |
| Fonte de energia | 2 pilhas AA (não incluídas) |
| Profundidade de detecção | Up to 1 3/5 inches (4 cm) |
| Número de sensores | 11 |
| Cor | Amarelo |
7. Informações de segurança
AVISO: Este produto pode expô-lo a substâncias químicas que o Estado da Califórnia reconhece como causadoras de câncer, defeitos congênitos ou outros danos reprodutivos. Para mais informações, acesse [link para o site do Estado da Califórnia]. www.P65Warnings.ca.gov.
- Always exercise caution when drilling or cutting into walls. Before proceeding, verify the absence of electrical wires, plumbing, or other hazards using the stud finder and other appropriate methods.
- Do not rely solely on the stud finder to avoid hazards.
- Mantenha o dispositivo fora do alcance de crianças.
- Do not expose the device to water or extreme moisture.
- Não tente abrir ou modificar o dispositivo. Não há peças que possam ser reparadas pelo usuário em seu interior.
8. Garantia e Suporte
For warranty information or technical support, please contact Franklin Sensors directly. Refer to the product packaging or the official Franklin Sensors website para informações de contato atualizadas.
Fabricante: Franklin Sensors