1. Wprowadzenie
This manual provides detailed instructions for the installation, operation, and maintenance of your STUDIOFINIX Bluetooth 5.4 4-Zone 8-Channel Audio Amplifier Receiver. This amplifier is designed to deliver high-fidelity audio across multiple rooms, offering independent zone control, various input options, and a professional karaoke function. Please read this manual thoroughly before use to ensure proper setup and optimal performance.
2. Instrukcje bezpieczeństwa
- Źródło zasilania: Używaj wyłącznie dostarczonego zasilacza. Upewnij się, że napięcietage odpowiada wymaganiom określonym na urządzeniu.
- Wentylacja: Do not block any ventilation openings. Install in a location with adequate airflow to prevent overheating.
- Woda i wilgoć: Nie wystawiać urządzenia na działanie deszczu, wilgoci ani kapiących/rozpryskujących się płynów. Trzymać z dala od źródeł wody.
- Ciepło: Nie umieszczać w pobliżu źródeł ciepła, takich jak grzejniki, kratki wentylacyjne, piece i inne urządzenia wytwarzające ciepło.
- Czyszczenie: Unplug the unit from the power outlet before cleaning. Use a dry, soft cloth only.
- Serwisowanie: Nie próbuj samodzielnie naprawiać tego produktu. Wszelkie czynności serwisowe należy powierzyć wykwalifikowanemu personelowi serwisowemu.
- Impedancja głośnika: Ensure connected speakers have an impedance of 4-8 ohms. Connecting speakers with lower impedance may damage the ampliyfikator.
3. Zawartość opakowania
Sprawdź, czy w przesyłce znajdują się wszystkie elementy wymienione poniżej:
- STUDIOFINIKS Ampliyfikator x 1
- Zasilacz x 1
- Black Terminal Connectors x 4
- Instrukcja obsługi x 1

Figure 3.1: Package Contents. The image displays the amplifier unit, its power adapter, four black terminal connectors, and the user manual.
4. Koniec produktuview
4.1 Wprowadzenie do panelu przedniego
Na panelu przednim znajdują się główne elementy sterujące i porty wejściowe, co zapewnia wygodną obsługę urządzenia.

Figure 4.1: Front Panel Layout. Key controls include the Volume/Power ON/OFF knob, MIC VOL knob, MIC input, AUX input, USB port, TF Card slot, and Bass/Treble adjustment knobs.
- VOLUME/PWR ON/OFF: Controls the master volume and powers the unit on/off.
- GŁOŚNOŚĆ MIKROFONU: Reguluje głośność podłączonego mikrofonu.
- Wejście mikrofonowe: Gniazdo 3.5 mm do podłączenia mikrofonu.
- Wejście AUX: 3.5mm jack for auxiliary audio devices.
- Port USB: Do odtwarzania dźwięku files z dysku USB.
- Gniazdo karty TF: Do odtwarzania dźwięku filez karty TF (MicroSD).
- BASY/WYSOPY: Adjusts the low and high frequency response of the audio output.
4.2 Wprowadzenie do panelu górnego
The top panel features controls for mode selection, playback, and echo effects for karaoke.

Figure 4.2: Top Panel Layout. This view highlights the MODE button, playback controls (Fast Retreat/Previous Song, Play/Pause, Fast Forward/Next Song), and the ECHO button for microphone effects.
- Sposób użycia: Switches between input sources (Bluetooth, Optical, AUX, LINE IN, USB, TF Card).
- Sterowanie odtwarzaniem: Buttons for previous track, play/pause, and next track when using USB/TF card or Bluetooth.
- ECHO: Activates and adjusts the echo effect for the microphone input.
- Zone Control Buttons (1, 2, 3, 4): Independently turn on or off each of the four audio zones.
4.3 Back Panel Introduction
The back panel contains the main speaker outputs and additional wired input options.

Figure 4.3: Back Panel Layout. This image shows the DC IN port, speaker output terminals for Zones 1-4 (supporting 8 speakers), Optical input, and stereo RCA Line In (R/L) inputs.
- DC IN: Power input port for the provided power adapter.
- Speaker Outputs (ZONE 1-4): Connect up to 8 speakers (2 per zone) with 4-8 ohm impedance. Red terminals are positive (+), black terminals are negative (-).
- Wejście OPTYCZNE: Digital audio input for connecting devices like TVs or game consoles.
- WEJŚCIE LINII (P/L): Stereo RCA inputs for connecting analog audio sources.
5. Konfiguracja
5.1 Podłączenie głośników
Ten amplifier supports up to 8 speakers, divided into 4 independent zones. Ensure your speakers have an impedance of 4-8 ohms.
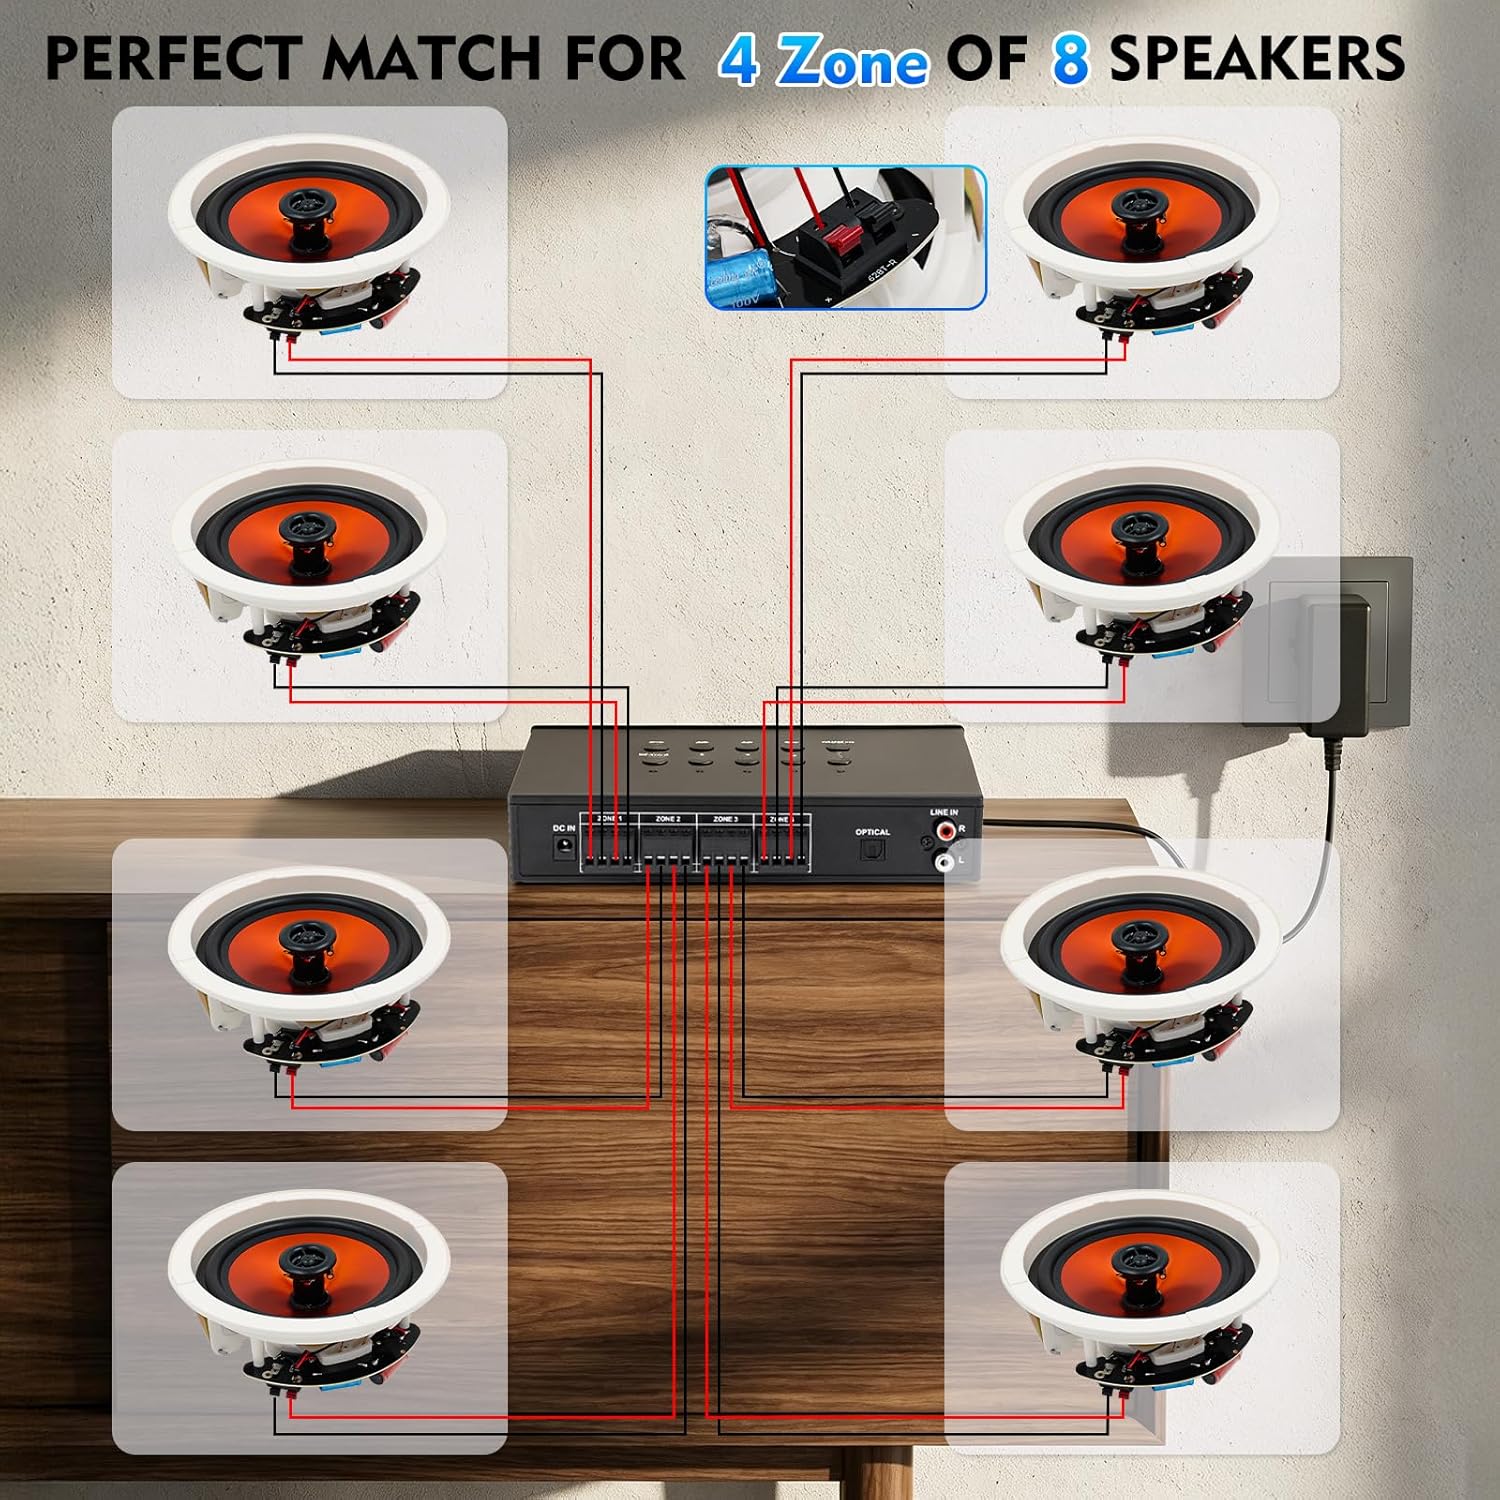
Figure 5.1: Speaker Wiring Diagram. This illustration demonstrates connecting two speakers per zone, with red wires to positive (+) terminals and black wires to negative (-) terminals on the amplifier's back panel.
- Zidentyfikuj zaciski dodatnie (+) i ujemne (-) głośników.
- Connect the positive (+) wire from each speaker to the corresponding red (+) terminal on the amplifier for the desired zone.
- Connect the negative (-) wire from each speaker to the corresponding black (-) terminal on the amplifier for the desired zone.
- Repeat for all speakers across the 4 zones. Ensure all connections are secure.
5.2 Połączenie zasilania
After connecting all speakers and audio sources, connect the power adapter.
- Insert the DC plug of the power adapter into the 'DC IN' port on the back of the ampliyfikator.
- Podłącz zasilacz do odpowiedniego gniazdka ściennego.
6. Instrukcja obsługi
6.1 Włączanie/wyłączanie i regulacja głośności
- Aby włączyć amplifier, rotate the VOLUME/PWR ON/OFF knob clockwise until the display illuminates.
- Aby wyłączyć urządzenie, należy przekręcić pokrętło w kierunku przeciwnym do ruchu wskazówek zegara, aż do kliknięcia.
- Adjust the master volume by rotating the VOLUME/PWR ON/OFF pokrętło.
6.2 Wybór źródła sygnału wejściowego
Naciśnij TRYB button on the top panel to cycle through available input sources: Bluetooth, Optical, AUX, LINE IN, USB, and TF Card.
6.3 parowanie Bluetooth
Aby podłączyć urządzenie Bluetooth:

Figure 6.1: Bluetooth Connectivity. The image shows a smartphone successfully paired with the amplifier, indicating stable Bluetooth 5.4 connection for wireless audio streaming.
- Wybierz tryb Bluetooth za pomocą TRYB button. The display will show "BT" or a similar indicator.
- Na smartfonie, tablecie lub innym urządzeniu z obsługą technologii Bluetooth włącz funkcję Bluetooth i wyszukaj dostępne urządzenia.
- Select "STUDIOFINIX" or a similar name from the list to pair.
- Po sparowaniu możesz przesyłać strumieniowo dźwięk bezprzewodowo do ampliyfikator.
6.4 Wired Input Operation
Ten amplifier supports various wired audio sources:

Figure 6.2: Multiple External Audio Sources. This graphic illustrates the diverse input options available, including Microphone, Bluetooth, USB, AUX, and TF Card, allowing connection of various external devices.
- Wejście optyczne: Connect a digital audio cable from your source (e.g., TV, game console) to the OPTICAL port on the back panel. Select Optical mode using the TRYB przycisk.
- Wejście AUX: Connect a 3.5mm audio cable from your device to the AUX port on the front panel. Select AUX mode.
- WYRYSOWAĆ: Connect RCA cables from your analog audio source (e.g., CD player) to the LINE IN (R/L) ports on the back panel. Select LINE IN mode.
- Karta USB/TF: Insert a USB drive or TF card into the respective slot on the front panel. The amplifier will automatically switch to USB or TF mode and begin playback. Use the playback controls on the top panel to manage tracks.
6.5 Funkcja karaoke
Enjoy karaoke with the built-in microphone input and echo effect.

Figure 6.3: Karaoke Ready. This image depicts individuals enjoying a karaoke session, highlighting the amplifier's capability to connect a microphone for vocal performances.
- Podłącz mikrofon do Wejście MIC na przednim panelu.
- Dostosuj głośność mikrofonu za pomocą GŁOŚNOŚĆ MIKROFONU pokrętło.
- Naciśnij ECHO button on the top panel to activate and adjust the echo effect for your vocals.
6.6 Independent Zone Control
Ten amplifier allows you to independently control the power for each of the four speaker zones.

Figure 6.4: 4-Zone Independent Control. This visual demonstrates how the amplifier can manage audio in four separate areas, allowing users to turn zones on or off as needed for multi-room audio customization.
- Użyj dedykowanego ZONE 1, ZONE 2, ZONE 3, ZONE 4 buttons on the top panel to toggle each zone on or off.
- Note that while zones can be independently turned on/off, the overall volume, bass, and treble settings apply to all active zones simultaneously.
6.7 Regulacja tonów niskich i wysokich
Adjust the audio's tonal characteristics using the BASS I POTROIĆ knobs on the front panel to suit your preference.
7. Konserwacja
- Czyszczenie: Disconnect the power before cleaning. Use a soft, dry cloth to wipe the exterior of the unit. Do not use liquid cleaners or aerosol sprays.
- Składowanie: If storing the unit for an extended period, disconnect it from power and store in a cool, dry place away from direct sunlight.
- Wentylacja: Regularnie sprawdzaj, czy otwory wentylacyjne są wolne od kurzu i zanieczyszczeń.
8. Rozwiązywanie Problemów
| Problem | Możliwa przyczyna | Rozwiązanie |
|---|---|---|
| Brak zasilania | Power adapter not connected; Power outlet not working; Unit is off. | Ensure power adapter is securely connected and plugged into a live outlet. Turn the VOLUME/PWR ON/OFF knob clockwise. |
| Brak dźwięku z głośników | Incorrect input source selected; Speaker wires loose or incorrectly connected; Volume too low; Specific zone turned off. | Press MODE to select the correct input. Check speaker wire connections (positive/negative). Increase master volume. Ensure the relevant zone button is ON. |
| Bluetooth nie łączy się | Not in Bluetooth mode; Device too far; Device already connected to another ampliyfikator. | Select Bluetooth mode. Move device closer to the amplifier. Disconnect from other Bluetooth devices and try pairing again. |
| Mikrofon nie działa | Microphone not plugged in; MIC VOL too low. | Ensure microphone is securely plugged into the MIC input. Increase the MIC VOL knob. |
| Karta USB/TF nie działa | Nieprawidłowy tryb; Niezgodny file format; Nośnik uszkodzony. | Select USB or TF mode. Ensure audio filePliki są w obsługiwanym formacie (np. MP3). Spróbuj użyć innego dysku USB lub karty TF. |
9. Specyfikacje
| Funkcja | Specyfikacja |
|---|---|
| Marka | STUDIOFINIKS |
| Numer modelu | ST-AMP-8PBT-BK-US |
| Liczba kanałów | 8 |
| Moc wyjściowatage | 480 watów (łącznie) |
| Wersja Bluetooth | 5.4 |
| Impedancja głośnika | 4-8 omów |
| Opcje wejściowe | Optical, AUX, LINE IN, USB, TF Card, MIC, Bluetooth |
| Odpowiedź częstotliwościowa | ±2dB@20-20kHz |
| Stosunek sygnału do szumu | 85dB |
| Wymiary (dł. x szer. x wys.) | 195mm x 40mm x 140mm (Approx.) |
10. Informacje o gwarancji
This STUDIOFINIX amplifier jest dostarczany z 1-roczna ograniczona gwarancja from the date of purchase. This warranty covers manufacturing defects in materials and workmanship under normal use. It does not cover damage caused by misuse, accident, unauthorized modification, or improper installation. Please retain your proof of purchase for warranty claims.
11. Obsługa klienta
For technical assistance, warranty claims, or general inquiries, please contact STUDIOFINIX customer support through the retailer's platform or visit the official STUDIOFINIX webwitryna do informacji kontaktowych.
Wsparcie online: www.studiofinix.com