1. Wprowadzenie
Thank you for choosing the Lepro Pen LED Flashlight. This compact and ultra-bright tactical penlight is designed for various applications, offering convenience and reliability. This manual provides essential information for the proper setup, operation, and maintenance of your flashlight.
2. Funkcje produktu
- 3 tryby oświetlenia: Provides 120 lumens for illumination with high brightness, low brightness, and flash modes for different circumstances. Flash mode can discharge for approximately 8 hours.
- Kompaktowy rozmiar: With a diameter of 0.59 inches and a length of 5.19 inches, weighing 29g, this pocket flashlight is easy to carry and store.
- Wodoodporność IPX4: Constructed from high-performance aluminum alloy, it is sturdy, durable, and protected against splashing water from any direction.
- Intuicyjna obsługa: Features a simple push-button switch for easy control of power and lighting modes.
- Szerokie zastosowanie: Nadaje się do camping, hiking, medical use, emergency survival, and professional tasks for doctors, nurses, and security personnel.

Image: The Lepro Pen LED Flashlight showing its compact dimensions (13cm/5.19in length, 1.6cm/0.63in diameter) and how it easily fits into a pocket.
3. Specyfikacje
| Producent | Trąd |
| Numer modelu | 120023L-GN-US-2 |
| Wymiary produktu | 1.6 x 1.6 x 13.21 cm; 110 g |
| Źródło zasilania | Zasilany bateryjnie |
| Typ baterii | Wymagane 4 baterie AAA (w zestawie) |
| Typ źródła światła | LED (XPE) |
| Biała jasność | 120 lumenów |
| Tworzywo | Aluminium |
| Cechy specjalne | Durable, Lightweight, Portable, Waterproof (IPX4) |
4. Konfiguracja
4.1 Instalacja baterii
The Lepro Pen LED Flashlight requires 2 AAA batteries for operation. Please follow these steps to install the batteries correctly:
- Odkręć tylną pokrywę latarki.
- Insert two AAA batteries into the battery compartment, ensuring the positive (+) and negative (-) terminals align with the indicators inside the flashlight.
- Dokładnie dokręć nakrętkę tylną.

Obraz: Wybuchowy view of the flashlight showing the tail cap, two AAA batteries, and the main body, with an arrow indicating correct battery insertion direction.
Video: A demonstration of how to insert AAA batteries into a similar Lepro pen flashlight and operate its basic functions.
4.2 Mocowanie klipsa
The flashlight comes with a detachable clip for versatile carrying options. You can attach it to your pocket, backpack strap, or even reverse it to clip onto a cap brim for hands-free use.

Image: Step-by-step guide showing how to remove the clip, reverse its mounting, and clip the flashlight onto a cap brim for hands-free illumination.
5. Instrukcja obsługi
5.1 Włączanie/wyłączanie i wybór trybu
The flashlight features an intuitive switch located on the tail cap for easy operation.
- Włączyć: Press the tail cap button once.
- Aby zmienić tryb: While the flashlight is on, press the tail cap button repeatedly to cycle through the modes: High Brightness → Low Brightness → Flash Mode.
- Wyłączyć: Continue cycling through the modes until the flashlight turns off, or press and hold the button for a few seconds.
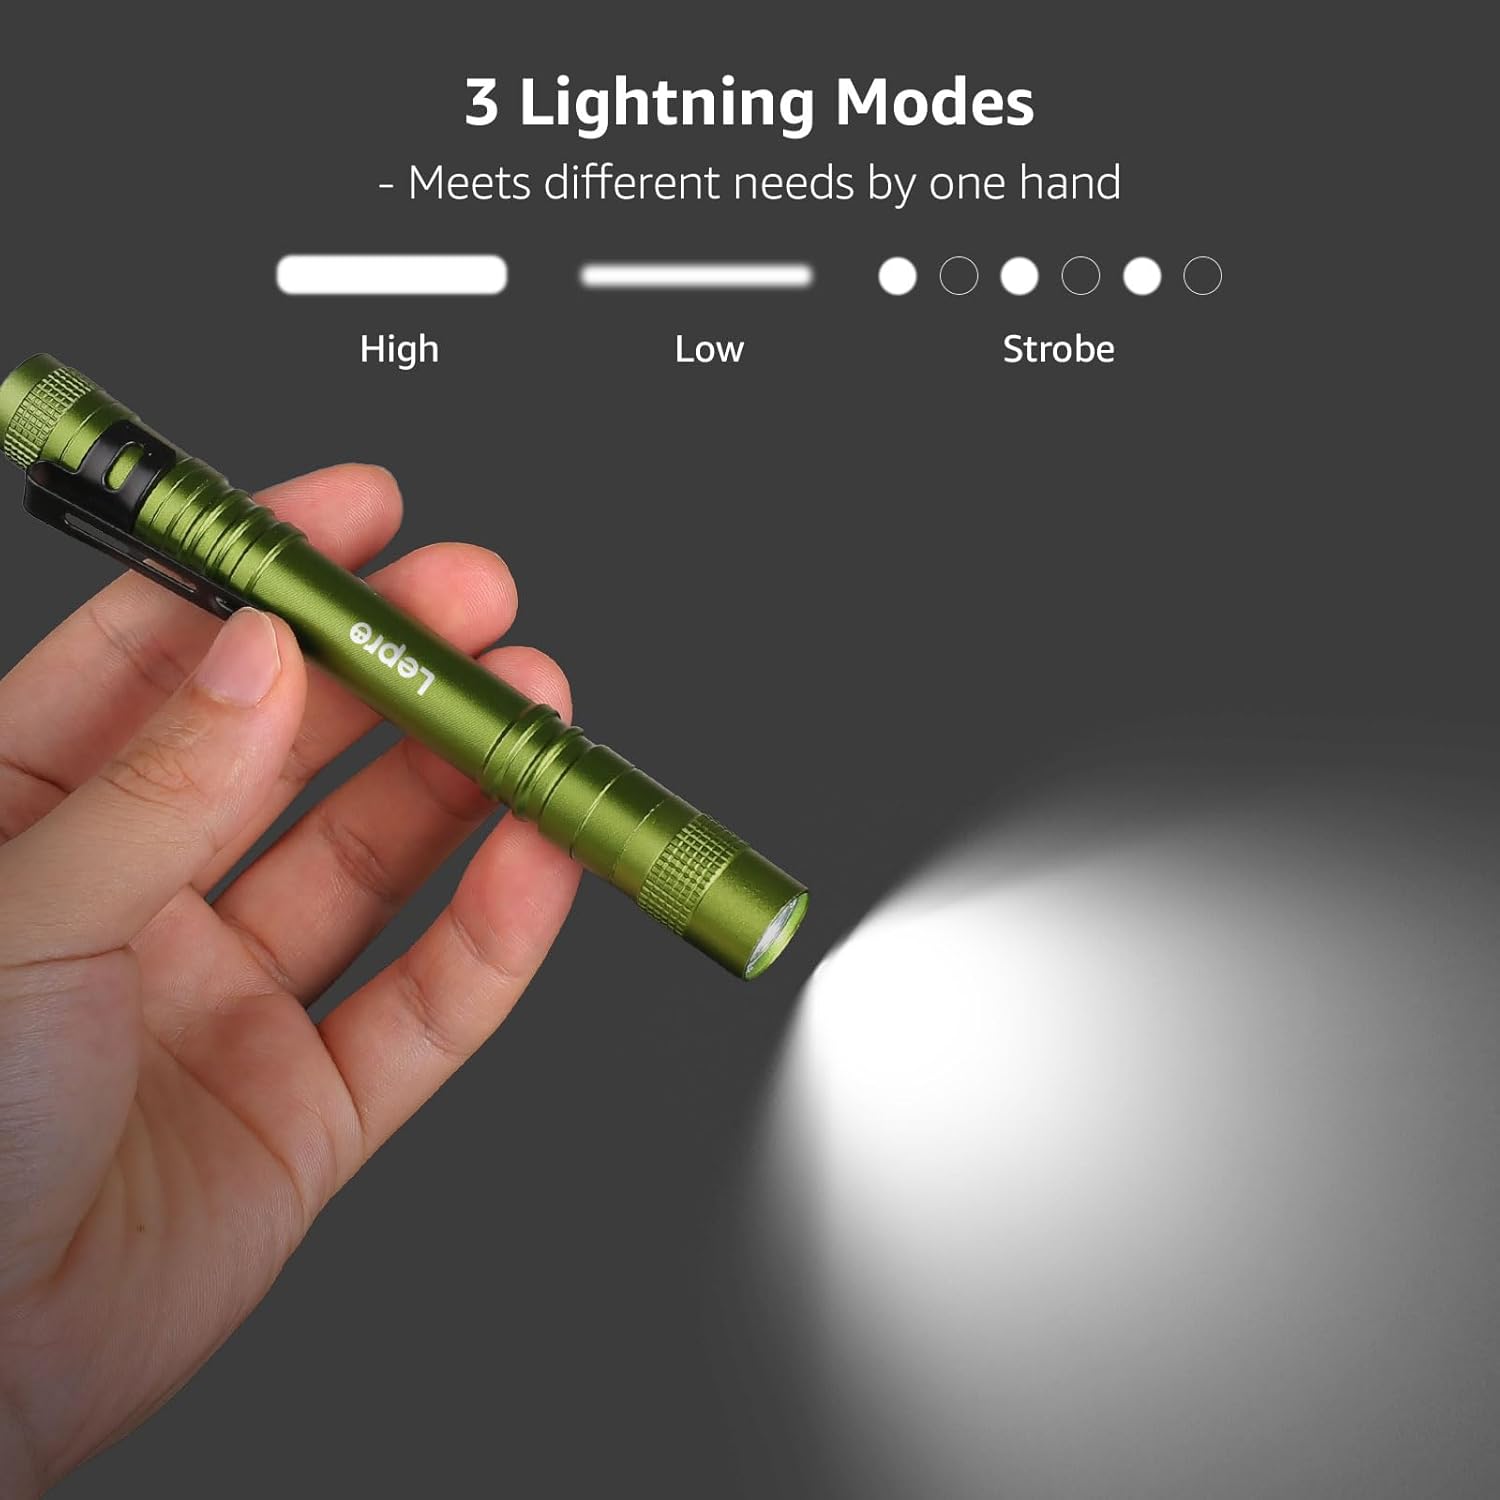
Image: Visual representation of the flashlight emitting light in High, Low, and Strobe (Flash) modes, demonstrating its versatility.
5.2 Wodoodporność
The flashlight is IPX4 water-resistant, meaning it is protected against splashing water. It is suitable for use in light rain or damp warunków, ale nie należy zanurzać go w wodzie.

Image: The flashlight standing upright amidst moss and leaves, with water droplets splashing around it, illustrating its IPX4 water-resistant feature.
6. Konserwacja
To ensure the longevity and optimal performance of your Lepro Pen LED Flashlight, please follow these maintenance guidelines:
- Czyszczenie: Wipe the flashlight with a clean, soft cloth. Avoid using abrasive cleaners or solvents that may damage the finish or internal components.
- Pielęgnacja baterii: Jeśli latarka nie będzie używana przez dłuższy czas, należy wyjąć baterie, aby zapobiec wyciekowi elektrolitu i korozji.
- Składowanie: Przechowuj latarkę w chłodnym, suchym miejscu, z dala od bezpośredniego światła słonecznego i ekstremalnych temperatur.
- O-ringi: Periodically check the O-rings for wear and tear. Lubricate them with silicone grease if necessary to maintain water resistance.
7. Rozwiązywanie Problemów
If you encounter any issues with your flashlight, please refer to the following common troubleshooting steps:
| Problem | Możliwa przyczyna | Rozwiązanie |
|---|---|---|
| Latarka się nie włącza | Wyczerpane lub nieprawidłowo zainstalowane baterie | Wymień baterie na nowe, zwracając uwagę na prawidłową biegunowość. |
| Słabe światło wyjściowe | Niski poziom naładowania baterii | Wymień baterie. |
| Praca przerywana | Loose tail cap or dirty contacts | Tighten the tail cap. Clean battery contacts with a clean cloth. |
| Water ingress (despite IPX4 rating) | Damaged O-rings or improper sealing | Check O-rings for damage and replace if necessary. Ensure tail cap is fully tightened. |
8. Informacje dotyczące bezpieczeństwa
Prosimy o zapoznanie się z poniższymi środkami ostrożności i ich przestrzeganie:
- Nie należy patrzeć bezpośrednio na włączoną diodę LED, gdyż może to spowodować chwilowe pogorszenie wzroku.
- Przechowywać w miejscu niedostępnym dla dzieci.
- Nie mieszaj starych i nowych baterii ani różnych typów baterii.
- Zużytych baterii należy pozbywać się w sposób odpowiedzialny, zgodnie z lokalnymi przepisami.
- Do not attempt to disassemble or modify the flashlight, as this may void the warranty and pose a safety risk.
9. Gwarancja i wsparcie
For warranty information or technical support, please refer to the product packaging or contact Lepro customer service through their official website or the retailer where the product was purchased. Please have your model number (120023L-GN-US-2) and purchase details ready.


