1. Informacje dotyczące bezpieczeństwa
Please read all instructions carefully before installation and use. Failure to follow these instructions may result in damage to the product or other components.
- Przed instalacją upewnij się, że komputer jest wyłączony i odłączony od gniazdka ściennego.
- Aby uniknąć uszkodzeń, należy obchodzić się z elementami ostrożnie.
- Przechowywać w miejscu niedostępnym dla dzieci.
- Nie należy podejmować prób modyfikacji chłodziarki ani jej podzespołów.
- Use only the provided mounting hardware.
2. Zawartość opakowania
Sprawdź, czy w przesyłce znajdują się wszystkie elementy:
- Ocypus Gamma A40 BK CPU Air Cooler (Heatsink and Fan assembly)
- Narzędzie montażowe
- Mounting hardware for Intel LGA 115X/1200/1700/1851
- Mounting hardware for AMD AM4/AM5
- Thermal paste packet

Image: Included accessories for the Ocypus Gamma A40 BK CPU Air Cooler, showing various mounting brackets, screws, and a thermal paste packet.
3. Specyfikacje
| Model | Ocypus Gamma A40 BK |
| Wymiary produktu (dł. x szer. x wys.) | 105 mm x 93 mm x 133 mm (4.13" dł. x 3.66" szer. x 5.24" wys.) |
| Metoda chłodzenia | Powietrze |
| Rury cieplne | 4 x Φ6mm Copper Direct Touch |
| Rozmiar wentylatora | 100mm |
| Prędkość wentylatora | 600-2400 ±10% RPM (PWM controlled) |
| Przepływ powietrza | 41 stopy sześcienne na minutę |
| Ciśnienie powietrza | 2.2 mm H2O |
| Poziom hałasu | ≤29.5 dB(A) |
| Typ złącza zasilania | 3-Pin (PWM) |
| Tomtage | 12 V (prąd stały) |
| Cotage | 1.2 watów |
| TDP Support | Do 200 W |
| Kompatybilne gniazda | Intel LGA 115X/1200/1700/1851, AMD AM4/AM5 |
| Tworzywo | Aluminium, Miedź, Plastik |
| Waga przedmiotu | 13.7 uncji |
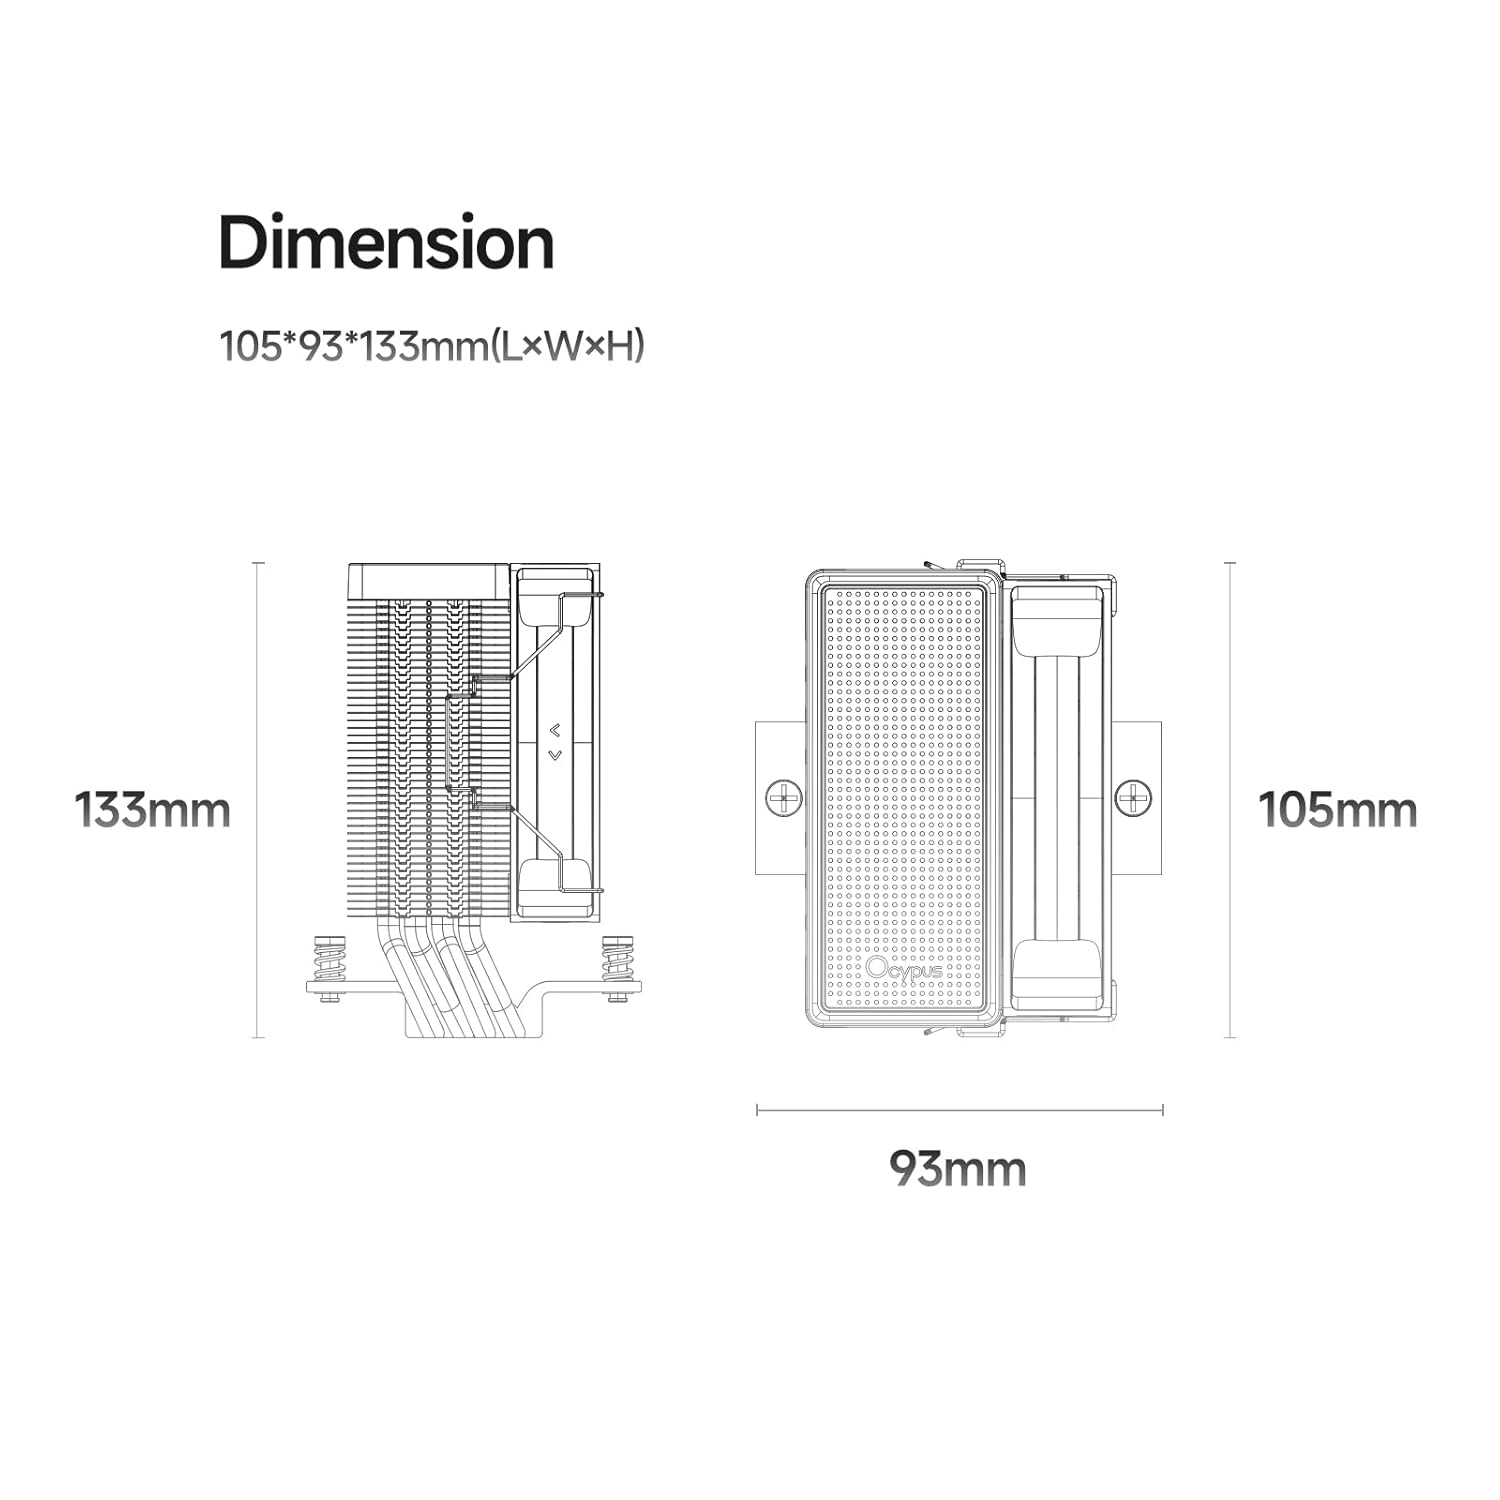
Image: Detailed dimension diagram of the Ocypus Gamma A40 BK CPU Air Cooler, showing its height of 133mm, length of 105mm, and width of 93mm.

Obraz: Zbliżenie view of the CPU cooler's base, highlighting the four Φ6mm copper direct touch heat pipes, indicating a TDP support of up to 200W.

Image: Diagram illustrating the specifications of the 100mm high-performance, low-noise fan, including 41 CFM air flow, 2.2mm H2O air pressure, ≤29.5 dB(A) noise, 600-2400 ±10% PWM speed, and a 4-pin connector.
4. Instrukcja instalacji
This section provides general installation steps. Refer to your motherboard manual for specific details regarding CPU socket preparation.
4.1 Przygotuj swój system
- Power off your computer and unplug it from the power outlet.
- Open your computer case to access the motherboard and CPU socket.
- Zdemontuj istniejące chłodzenie procesora. Dokładnie wyczyść powierzchnię procesora, usuwając starą pastę termoprzewodzącą za pomocą alkoholu izopropylowego.
4.2 Nałóż pastę termoprzewodzącą
Apply a small amount of thermal paste (pea-sized dot or a thin line) to the center of your CPU's Integrated Heat Spreader (IHS). The pressure from the cooler will spread it evenly.
4.3 Zainstaluj elementy montażowe
Select the appropriate mounting brackets for your CPU socket (Intel or AMD).

Image: Illustration of the CPU cooler being installed onto a motherboard, demonstrating the ease of installation with all-metal mounting hardware.
For Intel LGA 115X/1200/1700/1851:
- Attach the Intel backplate to the rear of the motherboard, aligning the holes with the CPU socket.
- Secure the Intel mounting standoffs through the motherboard from the front.
- Place the Intel mounting brackets onto the standoffs and secure them with the provided screws.
Dla AMD AM4/AM5:
- Remove the existing plastic retention modules from the motherboard, but keep the original backplate.
- Attach the AMD mounting standoffs to the original backplate.
- Place the AMD mounting brackets onto the standoffs and secure them with the provided screws.
4.4 Zamontuj chłodnicę
- Carefully place the heatsink assembly onto the CPU, ensuring the heat pipes make direct contact with the thermal paste.
- Align the cooler's mounting holes with the brackets.
- Using the provided mounting tool, alternately tighten the screws in a diagonal pattern until the cooler is firmly seated. Do not overtighten.
- Podłącz 3-pinowy kabel wentylatora PWM do złącza CPU_FAN na płycie głównej.
Wideo: Ponadview of the Ocypus Gamma A40 Series CPU Air Cooler, demonstrating its design and features. This video provides a visual guide to the product's components and aesthetics.
Video: A detailed look at the Ocypus Gamma A40 Series CPU Air Cooler, showcasing its construction, heat pipe design, and fan. This video helps users understand the physical aspects of the cooler.
5. Instrukcja obsługi
Once installed, the Ocypus Gamma A40 BK CPU Air Cooler operates automatically based on your motherboard's fan control settings.
- Automatyczne sterowanie wentylatorem: The 3-pin PWM fan will adjust its speed (600-2400 RPM) according to the CPU temperature, as managed by your motherboard's BIOS/UEFI settings. This ensures optimal cooling performance while minimizing noise.
- Monitorowanie: You can monitor CPU temperatures and fan speeds using motherboard utility software or within the BIOS/UEFI.
- Początkowe uruchomienie: During the first few hours of operation, the thermal paste will "cure" and achieve its full thermal conductivity. Monitor temperatures during this period.

Image: The Ocypus Gamma A40 BK CPU Air Cooler installed inside a computer case, demonstrating its compact fit and appearance.
6. Konserwacja
Regularna konserwacja zapewnia optymalną wydajność i długą żywotność chłodzenia procesora.
- Czyszczenie kurzu: Periodically (every 3-6 months, depending on environment) clean dust from the heatsink fins and fan blades using compressed air. Ensure the fan is held stationary during cleaning to prevent over-spinning.
- Kontrola wentylatora: Check the fan for any signs of wear, unusual noises, or obstructions.
- Ponowna aplikacja pasty termoprzewodzącej: If you remove the cooler for any reason, it is recommended to clean off the old thermal paste from both the CPU and the cooler base and apply new thermal paste before reinstallation.
7. Rozwiązywanie Problemów
| Problem | Możliwa przyczyna | Rozwiązanie |
|---|---|---|
| Wysokie temperatury procesora |
|
|
| Wentylator nie kręci się |
|
|
| Unusual Fan Noise |
|
|
8. Gwarancja i wsparcie
Ocypus products are designed and manufactured to the highest quality standards. For warranty information and technical support, please refer to the official Ocypus webodwiedź witrynę lub skontaktuj się bezpośrednio z działem obsługi klienta.
Zachowaj dowód zakupu na potrzeby roszczeń gwarancyjnych.
Producent: Ocypus
Webstrona: Ocypus Store on Amazon (dla ogólnych informacji o produkcie)