1. Wprowadzenie
This manual provides essential information for the installation, operation, and basic maintenance of your new Generic carburetor. This carburetor is designed as a replacement part for specific Homelite string trimmer models. Please read this manual thoroughly before attempting any installation or maintenance to ensure safe and correct usage.
2. Informacje dotyczące bezpieczeństwa
Always prioritize safety when working with power tools and fuel systems. Failure to follow these safety instructions may result in serious injury or property damage.
- Odłącz świecę zapłonową: Before beginning any work on the string trimmer, always disconnect the spark plug wire to prevent accidental starting.
- Obsługa paliwa: Work in a well-ventilated area. Avoid open flames, sparks, or smoking near fuel. Use an approved fuel container.
- Ochrona oczu: Wear safety glasses or goggles to protect your eyes from debris or fuel splashes.
- Rękawice: Aby chronić dłonie przed paliwem, olejem i ostrymi krawędziami, należy nosić odpowiednie rękawice.
- Bezpieczeństwo narzędzi: Use the correct tools for the job. Ensure all fasteners are tightened securely.
- Pomoc profesjonalna: Jeśli masz jakiekolwiek wątpliwości, skonsultuj się z wykwalifikowanym technikiem serwisowym.
3. Zawartość opakowania
Carefully unpack the box and verify that all items listed below are present and undamaged. If any parts are missing or damaged, contact your supplier immediately.
- 1 x Carburetor
- 3 x Primer Bulbs
- 2 x Uszczelki
- 1 x Filtr paliwa
- 2 x filtry powietrza
- 1 x Fuel Line
- 1 x świeca zapłonowa
4. Zgodność
This carburetor is compatible with the following Homelite string trimmer models:
- UT-20006, UT-20026, UT-20046, UT-21006, UT-29007, UT-21046, UT-2904
- UT-20004-A, UT-20004-B, UT-20024-A, UT-20024-B, UT-20044-A, UT-20044-B
- 25cc EZ Reach String Trimmer: UT-20042, UT-20042-A, UT-20043-A
- 25cc Trim 'N Edge String Trimmer: UT-20022, UT-20022-A, UT-20023-A
- 25cc TrimLite String Trimmer: UT-20002, UT-20002-A, UT-20003-A
Please verify your specific model number before installation to ensure proper fitment.
5. Instalacja (konfiguracja)
The following steps outline the general procedure for replacing a carburetor on a Homelite string trimmer. Specific steps may vary slightly depending on your trimmer model. Refer to your trimmer's original service manual for detailed instructions if available.
5.1 Przygotowanie
- Ensure the string trimmer engine is cool.
- Odłącz przewód świecy zapłonowej, aby zapobiec przypadkowemu uruchomieniu.
- Drain any fuel from the fuel tank into an approved container.
- Clean the area around the carburetor to prevent dirt from entering the engine.
5.2 Removing the Old Carburetor
- Locate the air filter cover and remove it. Then remove the air filter.
- Identify and disconnect the fuel lines from the old carburetor. Note their positions for reinstallation.
- Disconnect the throttle linkage and choke rod from the carburetor.
- Unscrew the mounting bolts or nuts that secure the carburetor to the engine manifold.
- Carefully remove the old carburetor and any old gaskets.
5.3 Installing the New Carburetor
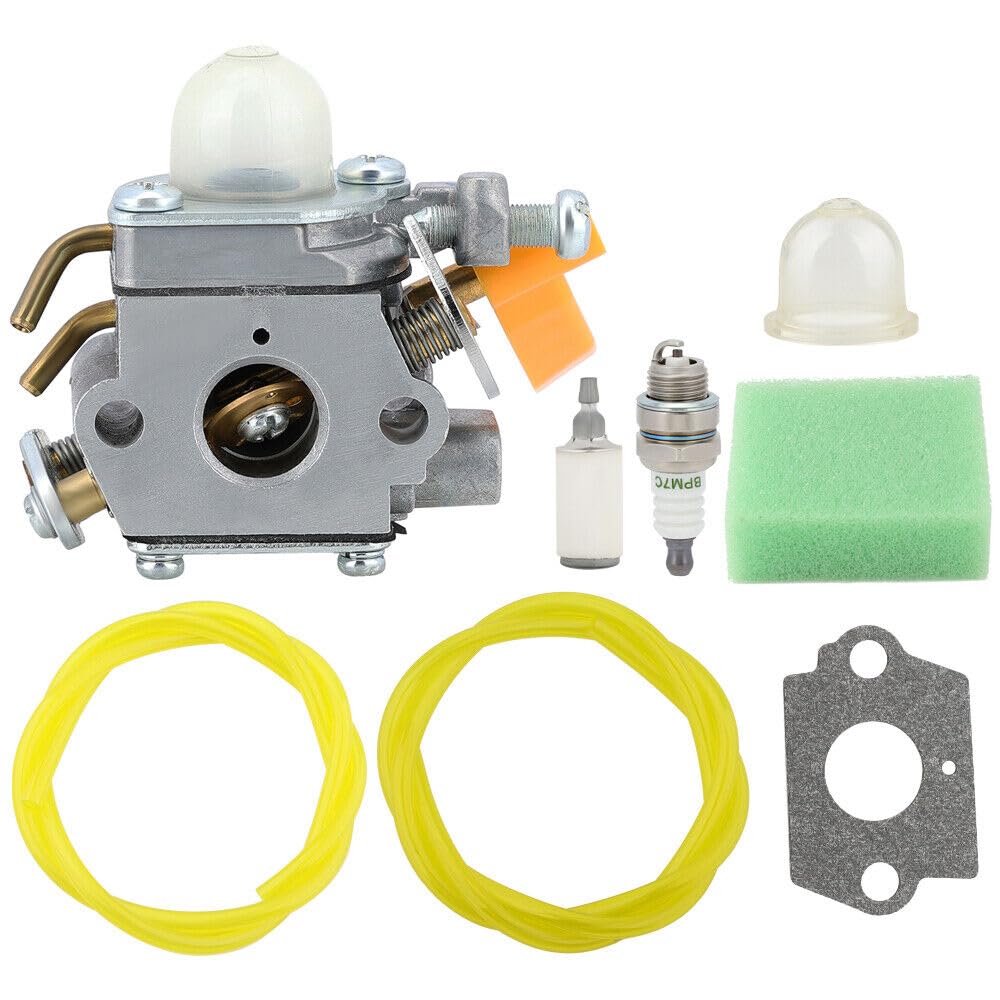
Rycina 1: Przód view of the Generic Carburetor. This image shows the general appearance of the replacement carburetor, including the primer bulb and fuel line connections.
- Place new gaskets between the carburetor and the engine manifold, ensuring they are correctly aligned.
- Position the new carburetor onto the mounting studs/bolts.
- Secure the carburetor with the mounting bolts/nuts. Tighten them evenly to prevent air leaks, but do not overtighten.
- Reconnect the throttle linkage and choke rod to the new carburetor. Ensure they move freely.
- Reconnect the fuel lines to their correct ports on the carburetor. Replace old fuel lines and fuel filter if necessary (included in package).
- Install the new air filter (included in package) and replace the air filter cover.
- Replace the spark plug with the new one provided, if desired.
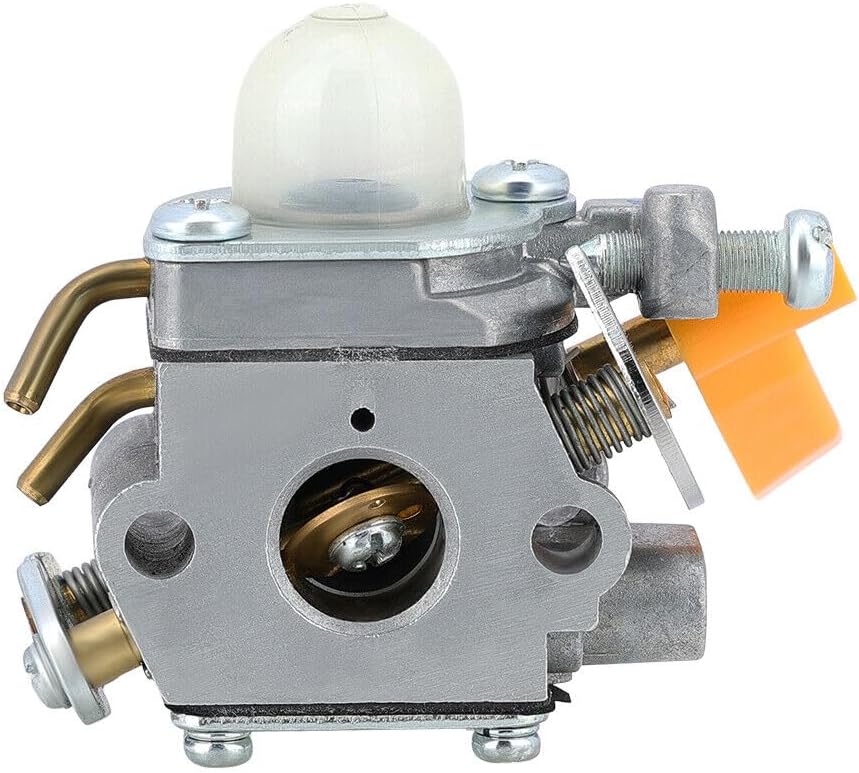
Rysunek 2: Strona view of the Generic Carburetor. This view highlights the choke lever and its connection point, crucial for proper engine starting.

Rysunek 3: Strona przeciwna view of the Generic Carburetor. This image provides a different perspective of the carburetor's body and adjustment screws.
5.4 Kontrola po instalacji
- Refill the fuel tank with the appropriate fuel mixture for your trimmer.
- Prime the carburetor by pressing the primer bulb until fuel is visible and flows freely.
- Podłącz ponownie przewód świecy zapłonowej.
- Attempt to start the engine according to your trimmer's starting procedure.
- Check for any fuel leaks around the carburetor and fuel lines.
6. Działanie
Once the carburetor is installed, the string trimmer should operate as designed. Refer to your string trimmer's original instruction manual for specific starting, operating, and stopping procedures. The carburetor's primary function is to mix air and fuel for combustion; it does not have user-adjustable operational controls beyond initial tuning.
7. Konserwacja
Proper maintenance of your carburetor and fuel system components will ensure optimal performance and longevity.
- Filtr paliwa: Regularly inspect and replace the fuel filter (included in package) to prevent contaminants from reaching the carburetor.
- Filtr powietrza: Clean or replace the air filter (included in package) as recommended by your trimmer's manual. A dirty air filter can restrict airflow and affect carburetor performance.
- Przewody paliwowe: Inspect fuel lines for cracks, hardening, or leaks. Replace them if any damage is observed.
- Jakość paliwa: Always use fresh, clean fuel mixed with the correct oil ratio for 2-stroke engines. Stale fuel can cause carburetor issues.
- Składowanie: Before long-term storage, drain the fuel tank and run the engine until it stops to clear the carburetor of fuel, or use a fuel stabilizer.
8. Rozwiązywanie Problemów
If you experience issues after installing the new carburetor, consider the following common problems and solutions:
| Problem | Możliwa przyczyna | Rozwiązanie |
|---|---|---|
| Silnik nie chce się uruchomić | No fuel, clogged fuel filter, incorrect priming, spark plug issue, air leak. | Check fuel level, replace fuel filter, prime carburetor correctly, check spark plug, ensure carburetor mounting bolts are tight. |
| Engine starts then dies | Fuel delivery issue, air filter clogged, carburetor not tuned. | Check fuel lines for kinks, replace air filter, ensure choke is off after starting. |
| Engine runs rough/poor acceleration | Dirty air filter, old fuel, minor carburetor adjustment needed. | Clean/replace air filter, use fresh fuel, consult a service manual for carburetor tuning if applicable. |
| Wycieki paliwa | Loose fuel lines, damaged gaskets, cracked primer bulb. | Dokręć przewód paliwowyamps, replace gaskets, replace primer bulb. |
Notatka: Carburetor tuning (adjusting high and low-speed mixture screws) should only be performed by experienced individuals or a qualified technician. Improper adjustment can damage the engine.
9. Specyfikacje
- Typ produktu: Zamienny gaźnik
- Zgodność: Homelite String Trimmers (various models, see Section 4)
- Tworzywo: Metal alloy, plastic
- Waga: Około 9.6 uncji (0.27 kg)
- Wymiary: Około 8 x 8 x 8 cala (20.3 x 20.3 x 20.3 cm) Note: These dimensions refer to the packaging or overall product, not the carburetor itself.
10. Gwarancja i wsparcie
As a Generic brand product, specific warranty details may vary. Please refer to the seller's return policy or contact the seller directly for information regarding warranty coverage, returns, or technical support.
For further assistance with your Homelite string trimmer, consult the original manufacturer's documentation or contact their customer service.