1. Wprowadzenie
This manual provides detailed instructions for the installation, operation, and maintenance of your ANJIELO SMART Wired Video Intercom System. This system is designed for multifamily apartments, offering secure and convenient communication with visitors. Please read this manual thoroughly before installation and use to ensure proper function and safety.
2. Koniec produktuview
The ANJIELO SMART Wired Video Intercom System is a comprehensive solution for building access control and communication. It features a robust outdoor doorbell unit and multiple indoor monitors, enabling visual and audio communication with visitors, as well as remote unlocking capabilities via RFID cards.

Figure 2.1: Multifamily Intercom System Overview. This image illustrates a typical installation in a multi-story building, showing one outdoor doorbell unit connected to multiple indoor monitors, allowing separate monitoring for each unit without interference.
Główne cechy:
- Multifamily Design: Supports 2 to 12 indoor monitors with one outdoor camera.
- Widzenie nocne: Built-in LED infrared lights for clear video in low-light conditions.
- Dwukierunkowy dźwięk: Umożliwia komunikację pomiędzy monitorami wewnętrznymi i jednostką zewnętrzną.
- Tryb cichy: Option to mute doorbell rings for undisturbed rest.
- Odporność na warunki atmosferyczne IP65: Outdoor unit is resistant to rain and dust.
- 7-calowy monitor LCD: Slim design, touch-key operation, hands-free display.
- Odblokowanie karty RFID: Convenient access control for residents.
- Połączenie 4-przewodowe: Standard wiring for reliable communication.
3. Zawartość opakowania
Sprawdź, czy w przesyłce znajdują się wszystkie elementy:
- Outdoor Doorbell Unit (Quantity: 1)
- Indoor Monitor (Quantity: 3 for this specific model)
- 5-meter 4-core connection cable (for testing purposes)
- Śruby montażowe i kotwy
- Power adapter(s)
- Instrukcja obsługi (ten dokument)
Note: Additional cables, electric locks, power supplies for locks, and exit buttons are not included and must be purchased separately if required for your installation.
4. Specyfikacje
| Funkcja | Specyfikacja |
|---|---|
| Nazwa modelu | 60120S-2+67022E |
| Łączność | Przewodowy (system 4-żyłowy) |
| Outdoor Unit Functions | Intercom, Monitor, RFID Unlock |
| Ekran monitora wewnętrznego | 7-calowy wyświetlacz TFT LCD |
| Rozdzielczość kamery | 1.0 MP |
| Kamera View Kąt | 120 stopni |
| Wizja nocna | Wbudowane światło podczerwone LED |
| Materiał jednostki zewnętrznej | ABS Plastic, Aluminum Alloy (weatherproof housing) |
| Materiał do monitorów wewnętrznych | Plastik inżynieryjny ABS |
| Stopień wodoodporności | IP65 (jednostka zewnętrzna) |
| Power Supply (Outdoor) | Prąd stały 15 V 1.2 A |
| Power Supply (Indoor) | Wejście AC100-240V |
| Typ instalacji | Surface Mounting (Outdoor & Indoor) |
| Temperatura pracy | -30°C do +60°C (jednostka zewnętrzna) |
| Wymiary jednostki zewnętrznej (2-6 jednostek) | Wymiary: 264 x 127 x 43 mm |
| Wymiary jednostki zewnętrznej (8-12 jednostek) | Wymiary: 330 x 127 x 43 mm |
| Wymiary monitora wewnętrznego | Wymiary: 218 x 123 x 22 mm |
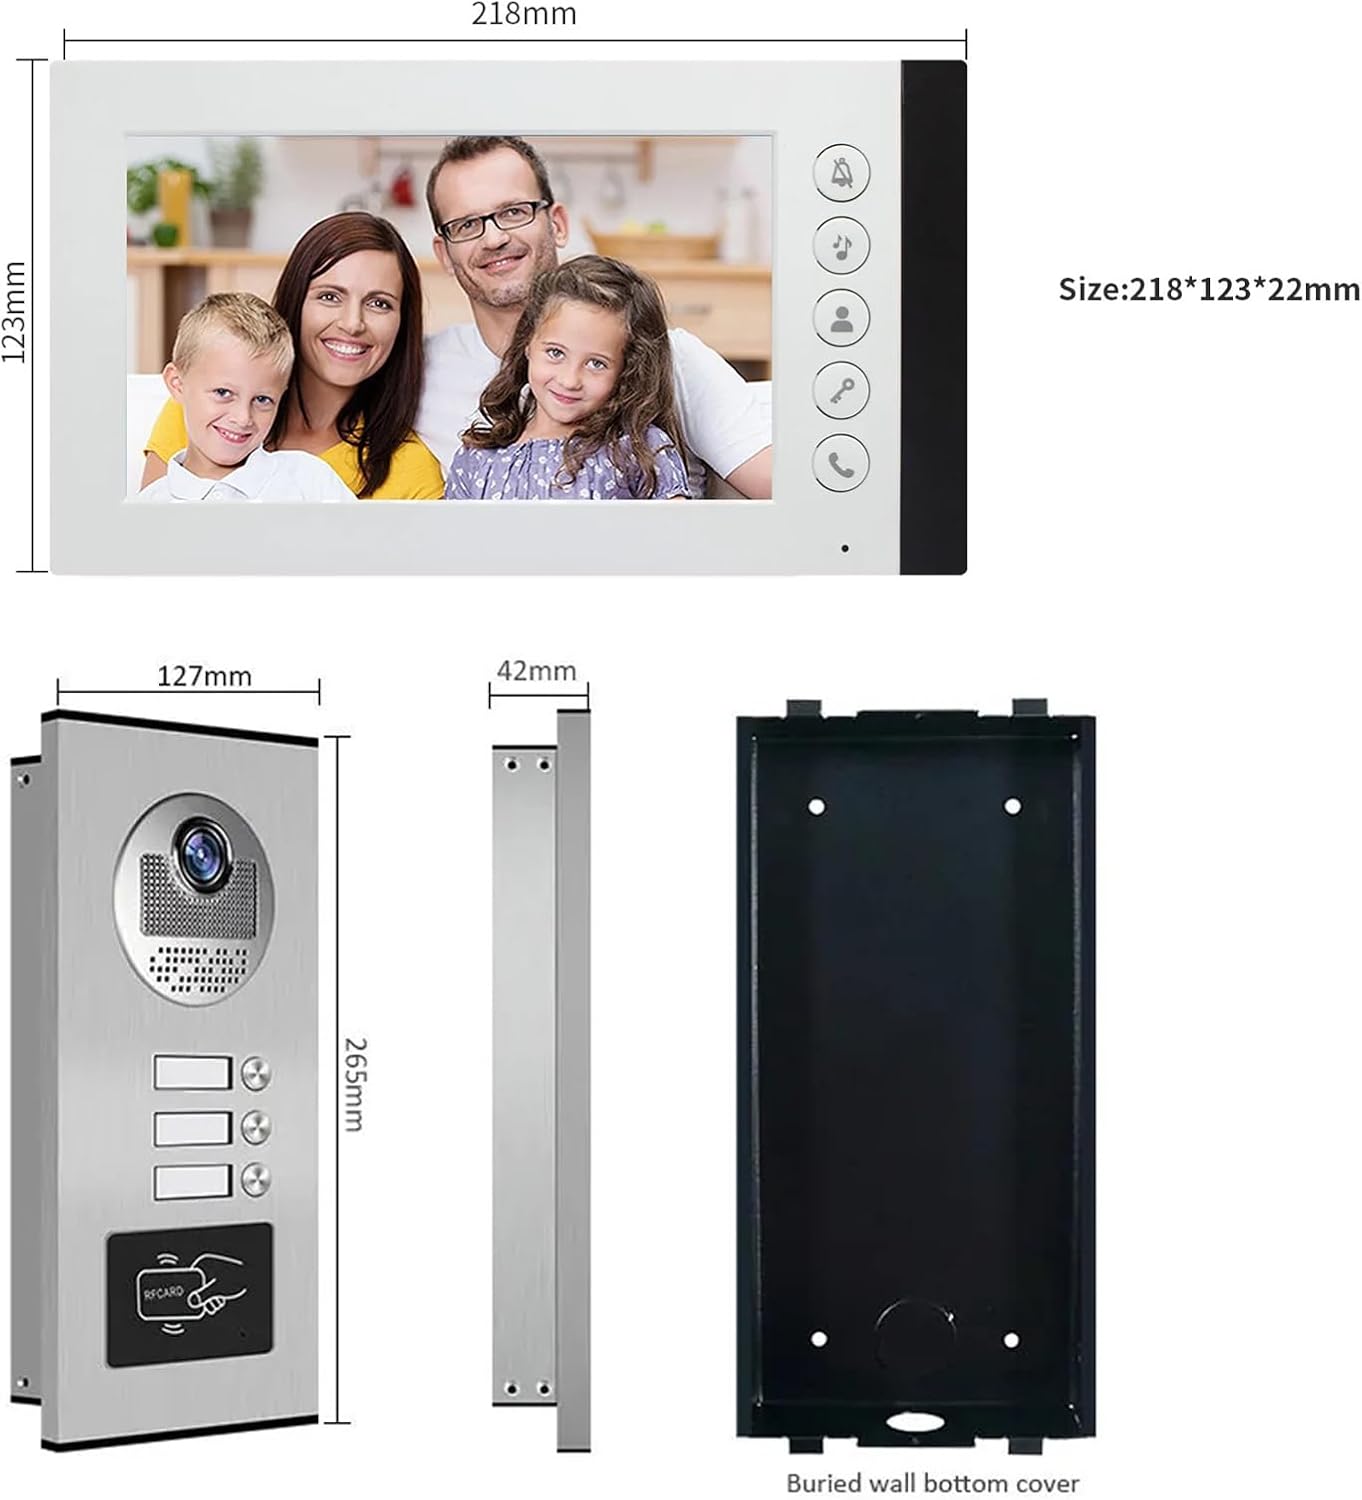
Figure 4.1: Product Dimensions. This image provides detailed measurements for both the indoor monitor and the outdoor doorbell unit, including the buried wall bottom cover for the outdoor unit.
5. Informacje dotyczące bezpieczeństwa
- Przed przystąpieniem do prac instalacyjnych lub konserwacyjnych należy zawsze odłączyć zasilanie.
- Ensure all wiring is correctly connected according to the wiring diagram to prevent damage to the system or electrical hazards.
- Do not expose the indoor monitor to water or high humidity.
- The outdoor unit is IP65 weatherproof, but avoid submerging it in water.
- Use only the provided power adapters or approved replacements.
- Keep the product away from strong magnetic fields or sources of interference.
- W przypadku skomplikowanych instalacji okablowania zaleca się zlecenie montażu profesjonaliście.
6. Konfiguracja i instalacja
6.1 instrukcje okablowania
The system uses a 4-wire connection. A 5-meter 4-core cable is included for testing. For permanent installation, you will need to purchase longer cables based on the distance between the outdoor unit and the indoor monitors. Refer to the table below for recommended cable types and distances:
| Dystans | Średnica kabla |
|---|---|
| Do 50 metrów | 0.5 mm² (AWG 20) |
| 50 - 100 metrów | 0.75 mm² (AWG 18) |
| Ponad 100 metrów | 1.0 mm² (AWG 17) or consult a professional |
Ensure all connections are secure and insulated. Incorrect wiring can damage the system.
6.2 Montaż jednostki zewnętrznej
- Choose a suitable location near your entrance, typically at eye level (around 1.5 meters or 5 feet from the ground).
- Use the included mounting bracket as a template to mark drilling points on the wall.
- Wywierć otwory i włóż kołki ścienne.
- Przymocuj uchwyt montażowy do ściany za pomocą śrub.
- Connect the 4-core wiring and power supply to the outdoor unit.
- Attach the outdoor unit to the mounting bracket, ensuring it is firmly in place.
- Verify the unit is level and the camera view jest niezakłócony.

Figure 6.1: Outdoor Unit Installation. This image shows the outdoor unit installed in an exterior environment, highlighting its weather resistance and suitable mounting location.
6.3 Montaż monitora wewnętrznego
- Select a convenient indoor location, such as a hallway or living area, where the monitor is easily accessible.
- Zaznacz punkty wiercenia za pomocą uchwytu montażowego monitora.
- Wywierć otwory i włóż kołki ścienne.
- Przymocuj wspornik montażowy do ściany.
- Connect the 4-core wiring from the outdoor unit and the power adapter to the indoor monitor.
- Carefully attach the indoor monitor to the mounting bracket.
- Podłącz zasilacz do gniazdka elektrycznego.
7. Instrukcja obsługi
7.1 Odbieranie połączenia
When a visitor presses the call button on the outdoor unit, the indoor monitor(s) will ring and automatically display the video feed from the outdoor camera.
- Aby odebrać połączenie, naciśnij Odpowiedź button (typically a phone icon) on the indoor monitor.
- You can now speak with the visitor using the two-way audio function.
- Aby zakończyć rozmowę, naciśnij Odpowiedź naciśnij przycisk ponownie.
7.2 Monitorowanie terenu zewnętrznego
Możesz ręcznie view teren zewnętrzny w dowolnym czasie:
- Naciśnij Monitor button (often an eye icon) on the indoor monitor. The screen will display the live video feed from the outdoor camera.
- Naciśnij Monitor ponownie, aby wyłączyć wyświetlacz.
7.3 Odblokowanie drzwi
If an electric lock is connected to the system, you can unlock the door remotely:
- Podczas połączenia lub monitorowania naciśnij przycisk Odblokować button (often a key icon) on the indoor monitor. The connected electric lock will disengage.
- The outdoor unit also supports RFID card unlocking. Present a pre-programmed RFID card to the reader on the outdoor unit to unlock the door.
7.4 Widzenie nocne
The outdoor unit is equipped with built-in LED infrared lights, which automatically activate in low-light conditions to provide clear black-and-white video footage.

Figure 7.1: Day and Night Vision. This image illustrates the system's ability to provide clear visuals both during the day and at night, thanks to its integrated infrared night vision.
7.5 Tryb cichy
To avoid disturbance, especially during nighttime, you can activate the silent mode:
- Naciśnij Tryb cichy button (often a bell with a slash through it) on the indoor monitor. The doorbell ringtone will be muted.
- The monitor will still display the video feed when a visitor calls, allowing you to see who is at the door without audible notification.
- Naciśnij Tryb cichy Aby dezaktywować, naciśnij przycisk ponownie.
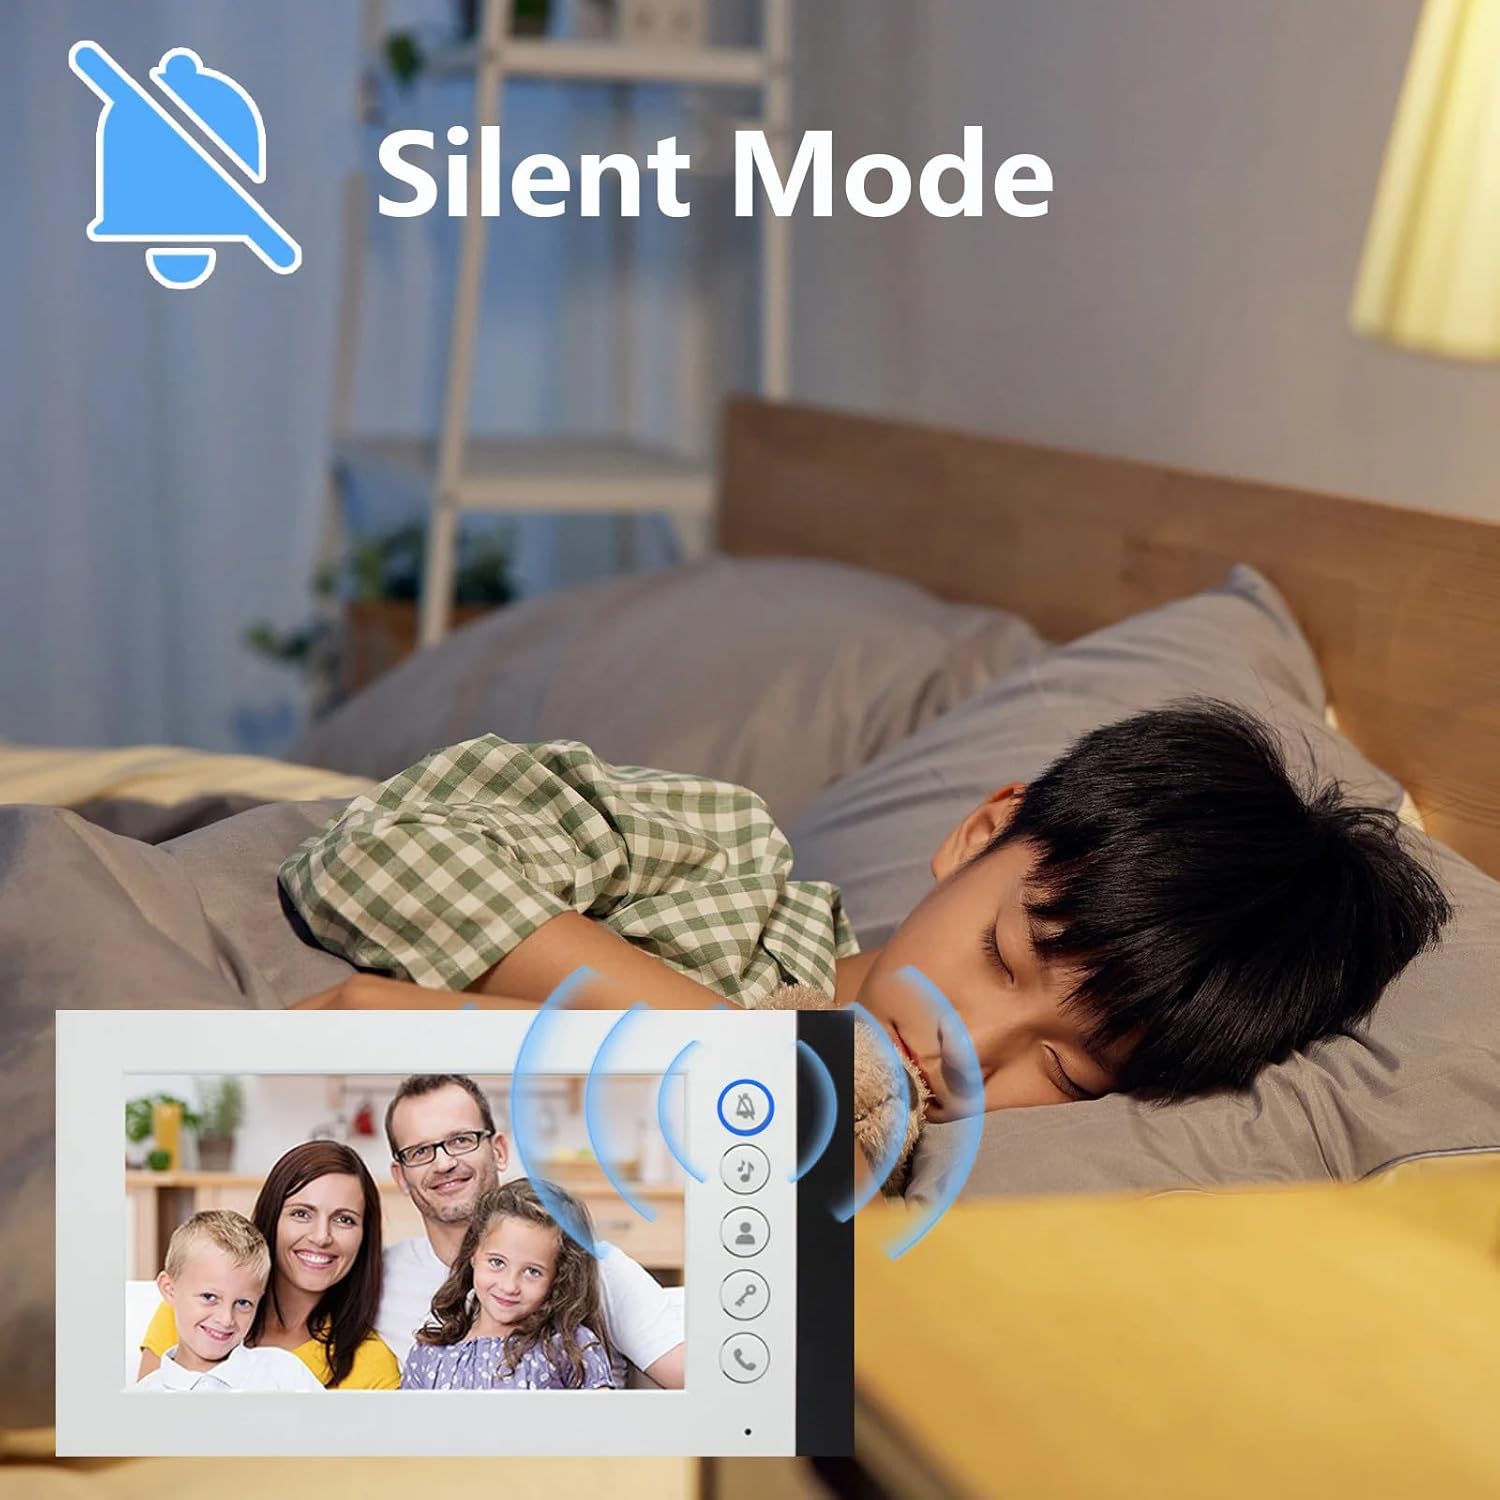
Figure 7.2: Silent Mode Activation. This image demonstrates the silent mode feature, which allows users to mute the doorbell ringtone for undisturbed rest while still being able to see visitors on the monitor.
7.6 wybór dzwonka
The indoor monitor offers 52 different ringtones. Consult the monitor's on-screen menu or specific buttons to browse and select your preferred ringtone.

Figure 7.3: Ringtone Options. This image highlights the availability of 52 different ringtones for the indoor monitor, allowing users to customize their doorbell sound.
8. Konserwacja
- Czyszczenie: Do czyszczenia monitora wewnętrznego i jednostki zewnętrznej należy używać miękkiej, suchej ściereczki. W przypadku uporczywych zabrudzeń należy użyć delikatnego detergentu.amp cloth can be used, but ensure no liquid enters the devices. Do not use abrasive cleaners or solvents.
- Kontrola kabla: Periodically check all wiring connections for signs of wear, damage, or loose connections. Repair or replace damaged cables immediately.
- Outdoor Unit Lens: Keep the camera lens on the outdoor unit clean and free from obstructions (e.g., dirt, spiderwebs) to ensure clear video quality.
- Zasilanie: Ensure power adapters are not damaged and are securely plugged into outlets.
9. Rozwiązywanie Problemów
| Problem | Możliwa przyczyna | Rozwiązanie |
|---|---|---|
| Brak obrazu i dźwięku na monitorze |
|
|
| Monitor not ringing when doorbell is pressed |
|
|
| Słaba jakość wideo (rozmazany, ciemny) |
|
|
| Funkcja odblokowania drzwi nie działa |
|
|
10. Gwarancja i wsparcie
ANJIELO SMART products are designed for reliability and performance. For warranty information, technical support, or service inquiries, please refer to the contact information provided with your purchase documentation or visit the official ANJIELO SMART website. Please have your model number (60120S-2+67022E) and purchase date ready when contacting support.