1. Wprowadzenie
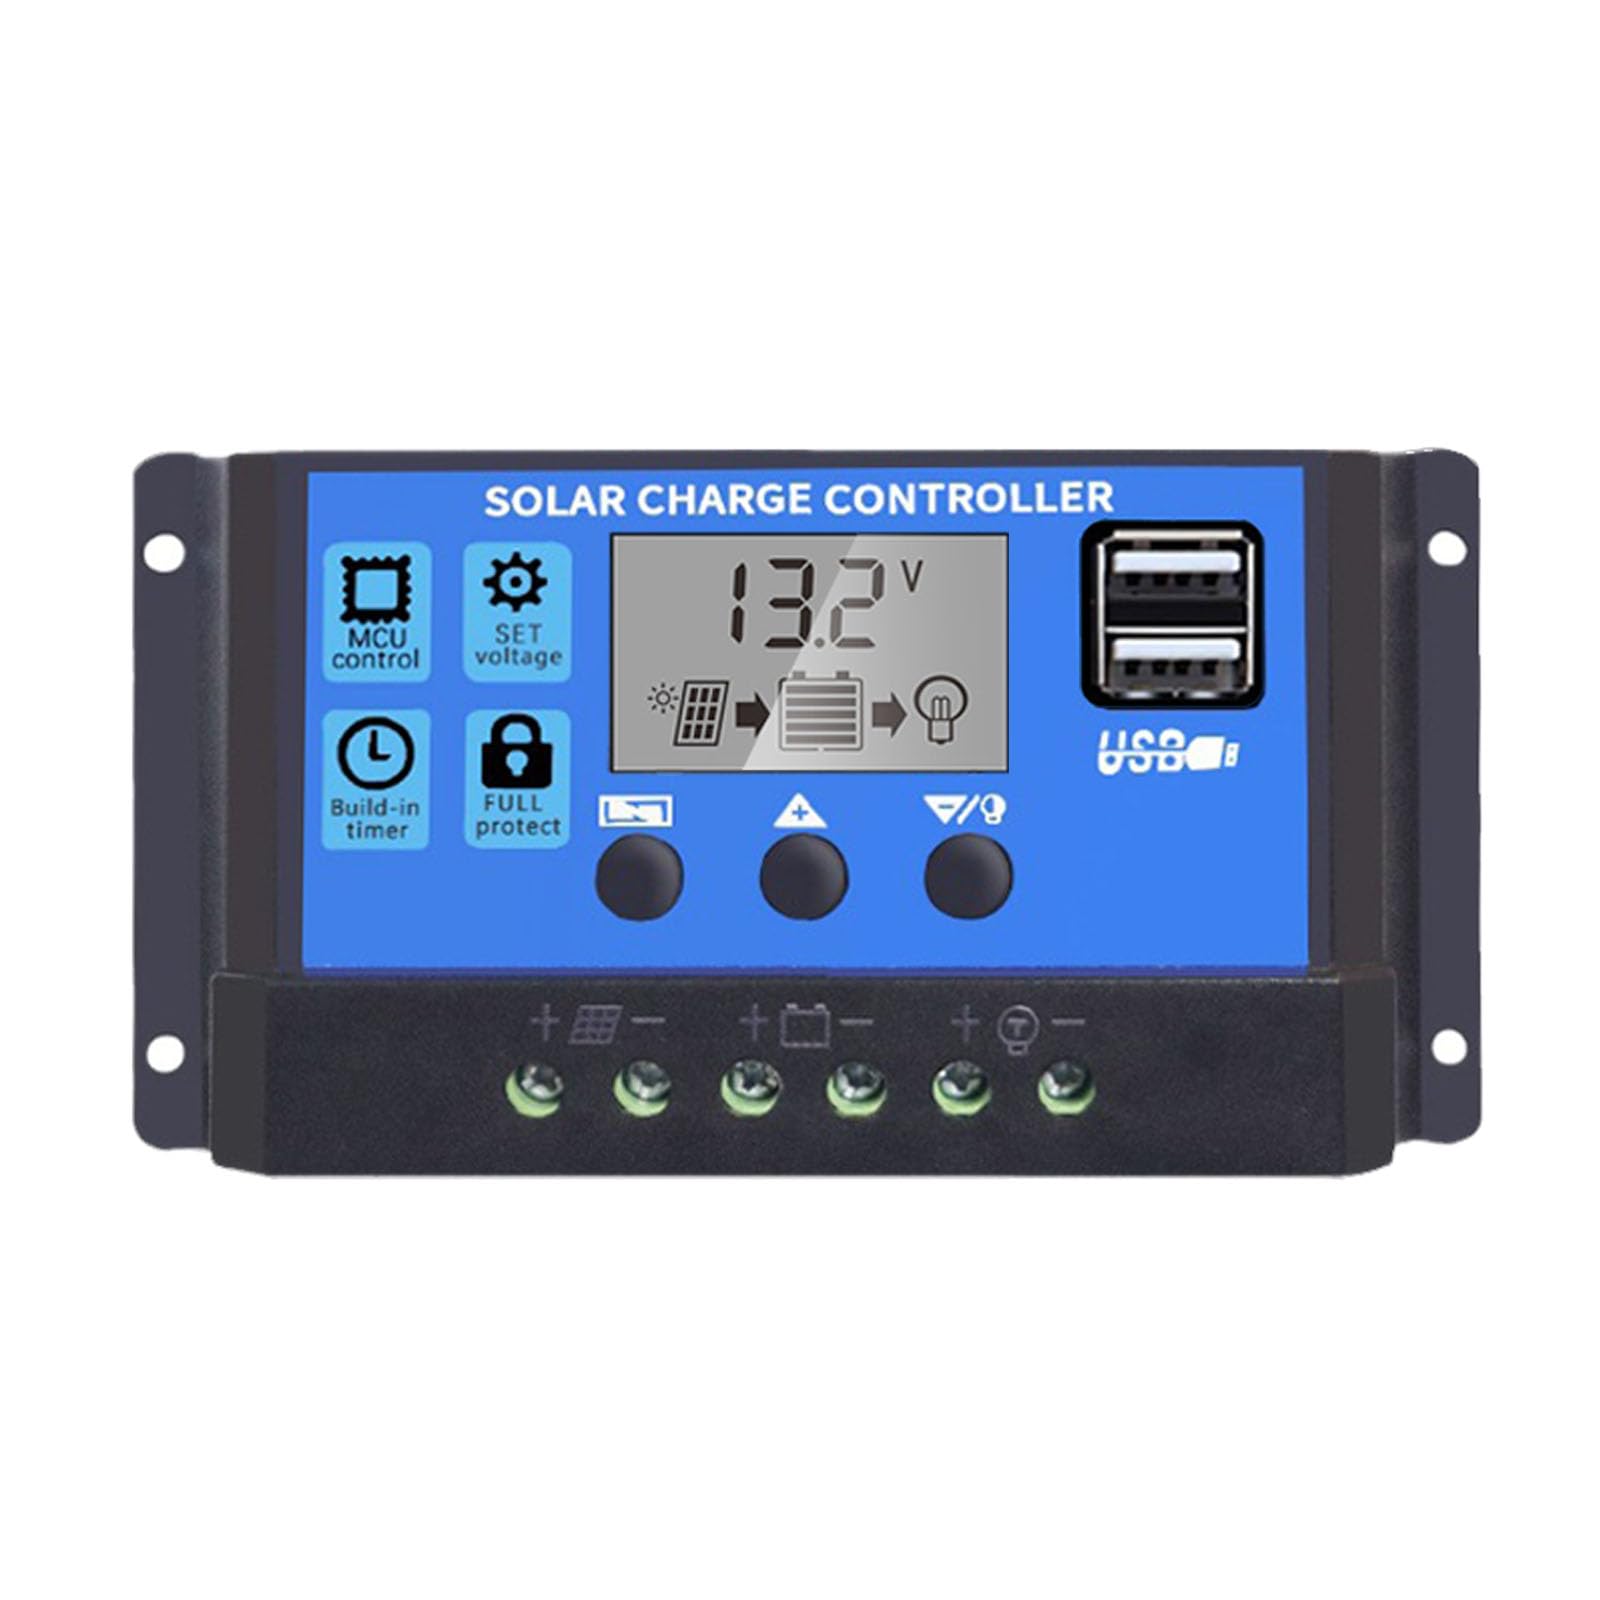
This manual provides essential instructions for the safe and efficient operation of your Saooer Solar Charge Controller. This device is designed to manage the power flow from your solar panel to your battery, ensuring optimal charging and protecting your battery from overcharge and over-discharge. It is compatible with both 12V and 24V solar systems and features a 30A discharge current capacity.
2. Instrukcje bezpieczeństwa
Please read all safety instructions carefully before installation and operation. Failure to follow these instructions may result in damage to the controller, battery, or other components, and may cause personal injury.
- Upewnij się, że pojemność bateriitage is sufficient for the controller to recognize the battery type before the first installation.
- The charge controller is suitable for lead-acid batteries (OPEN, AGM, GEL) and lithium-ion batteries. Do not use it for other battery types.
- Install the charge controller indoors, away from direct sunlight, high temperatures, and humid environments.
- Kontroler nagrzewa się w trakcie pracy, należy zapewnić odpowiednią wentylację.
- The controller's positive and negative terminals should be connected correctly. Reverse connection may damage the device.
- Zawsze podłączaj najpierw akumulator, następnie panel słoneczny, a na końcu obciążenie. Odłączaj w odwrotnej kolejności: obciążenie, następnie panel słoneczny, a na końcu akumulator.
3. Funkcje produktu
- Objętość systemutage Kompatybilność: Automatically detects 12V or 24V systems.
- Prąd rozładowania: Pojemność 30A.
- Integrated Micro Controller: Manages solar panel and battery operation efficiently.
- Podwójne porty USB: Supports mobile phone charging (5V/2A output).
- Kompleksowa ochrona: Includes short-circuit protection, open-circuit protection, reverse polarity protection, and over-load protection to enhance system efficiency and battery lifespan.
- Wyświetlacz LCD: Provides clear indication of status and data, allowing for convenient mode switching and parameter configuration.
- Regulowane parametry: User-configurable settings for various battery types and operational needs.
- Wbudowany timer: For load control.
4. Zawartość opakowania
- 1x Saooer Solar Charge Controller (30A)
5. Konfiguracja i instalacja
Follow these steps for proper installation of the solar charge controller. Incorrect connection order can damage the controller.
- Podłącz akumulator: Connect the battery to the charge regulator first. Ensure correct polarity (positive to positive, negative to negative). This allows the controller to recognize the battery voltage.
- Podłącz panel słoneczny: Connect the solar panel to the solar charge controller. Ensure correct polarity.
- Podłącz obciążenie: Connect the consumer or load to the charge controller regulator. Ensure correct polarity.
Important Disconnection Note:
When disconnecting the system, always remove the solar panel connection first, then the load connection, and finally the battery connection. This prevents potential damage to the controller.

6. Instrukcja obsługi
The controller features an LCD display and three buttons for operation: MENU, UP, I W DÓŁ.
6.1. Wyświetlacz LCD
The LCD display shows real-time system status and data, including battery voltage, charging current, discharging current, and various parameter settings.
6.2. Funkcje przycisków
- Przycisk MENU: Press to cycle through different display modes and enter parameter setting mode. Long press to exit setting mode.
- Przycisk W GÓRĘ: In setting mode, press to increase the parameter value.
- Przycisk DÓŁ: In setting mode, press to decrease the parameter value.
6.3. Ustawienia parametrów
To adjust parameters (e.g., battery type, charge/discharge voltage limits, load timer settings):
- Naciśnij MENU button until the desired parameter display appears.
- Naciśnij i przytrzymaj MENU button until the displayed value starts flashing.
- Użyj UP I W DÓŁ przyciski, aby dostosować wartość.
- Once the desired value is set, long press the MENU button again to save the setting and exit the flashing state.
Refer to the specific icons on the LCD for detailed parameter identification.

7. Konserwacja
Regularna konserwacja zapewnia długowieczność i optymalną wydajność regulatora ładowania słonecznego.
- Czystość: Utrzymuj kontroler w czystości, bez kurzu i zanieczyszczeń. Do czyszczenia używaj suchej ściereczki.
- Znajomości: Periodically check all wiring connections to ensure they are tight and free from corrosion. Loose connections can cause power loss and overheating.
- Wentylacja: Aby zapobiec przegrzaniu się kontrolera, należy upewnić się, że miejsce instalacji ma odpowiednią wentylację.
- Kontrola: Sprawdź, czy na kontrolerze nie ma śladów uszkodzeń fizycznych lub nietypowego działania.
8. Rozwiązywanie Problemów
Jeśli napotkasz problemy z regulatorem ładowania słonecznego, rozważ poniższe typowe kroki rozwiązywania problemów:
- Brak wyświetlacza/brak zasilania: Sprawdź połączenia akumulatora i upewnij się, że akumulator ma wystarczającą pojemność.tage. Verify all wiring is correct and secure.
- Akumulator nie ładuje się: Sprawdź połączenia panelu słonecznego i upewnij się, że panel otrzymuje odpowiednią ilość światła słonecznego. Sprawdź pojemność panelu słonecznego.tage and current. Ensure the controller's charging parameters are correctly set for your battery type.
- Ładowanie nie działa: Check load connections. Ensure the load is not exceeding the controller's rated current. Check the load timer settings if applicable. The controller may have entered protection mode due to over-discharge or over-load; check the display for error codes or indicators.
- Over-voltage/Under-ttage Alarmy: Sprawdź pojemność akumulatoratage. Ensure solar panel open-circuit voltage nie przekracza maksymalnej objętości wejściowej kontroleratage.
Jeśli po wykonaniu tych czynności problem nadal występuje, skontaktuj się z działem obsługi klienta.
9. Specyfikacje
| Funkcja | Specyfikacja |
|---|---|
| Marka | Saooer |
| Model | Regulator ładowania słonecznego 30A |
| Objętość systemutage | 12V / 24V Automatyczne wykrywanie |
| Prąd rozładowania | 30A |
| Tworzywo | Metal, Plastik |
| Typ wyświetlacza | LCD |
| Wyjście USB | Podwójne USB, 5 V/2 A |
| Zawarte komponenty | 1x Solar Charge Controller |

10. Gwarancja i wsparcie
For warranty information, please refer to the documentation provided with your purchase or contact your retailer. For technical support or inquiries, please contact Saooer customer service through their official channels.