1. Wprowadzenie
This manual provides detailed instructions for the installation, operation, and maintenance of your BUNGPUNG 4K@30Hz HDMI Multiviewer 4x1. This device allows you to connect up to four HDMI source devices and display them simultaneously on a single HDMI display, offering various display modes and control options.

Obraz 1: Przód view of the BUNGPUNG 4K@30Hz HDMI Multiviewer 4x1.
2. Informacje dotyczące bezpieczeństwa
- Zapewnij odpowiednią wentylację wokół urządzenia.
- Nie wystawiaj urządzenia na działanie wody, wilgoci ani ekstremalnych temperatur.
- Używaj wyłącznie dołączonego zasilacza.
- Unikaj demontażu urządzenia; wszelkie czynności serwisowe zleć wykwalifikowanemu personelowi.
- Przechowywać w miejscu niedostępnym dla dzieci.
3. Zawartość opakowania
Sprawdź, czy w przesyłce znajdują się wszystkie elementy:
- BUNGPUNG 4K@30Hz HDMI Multiviewer 4x1 Unit
- Zasilacz 5V DC
- Pilot zdalnego sterowania IR
- Kabel odbiornika podczerwieni
- Instrukcja obsługi (ten dokument)
4. Koniec produktuview
4.1. Funkcje urządzenia
- Supports up to 4K@30Hz resolution for combined HDMI sources.
- Offers 8 multi-view display modes, including full-screen, Picture-by-Picture (PBP), Picture-in-Picture (PIP), and Quad views.
- Compatible with HDMI 1.4 and HDCP 1.4, supporting HDR.
- Features L/R analog audio output for external audio distribution.
- Control options include front panel buttons, IR remote, and RS-232 commands.
- Durable metal body with built-in ESD protection.
4.2. Opis panelu przedniego
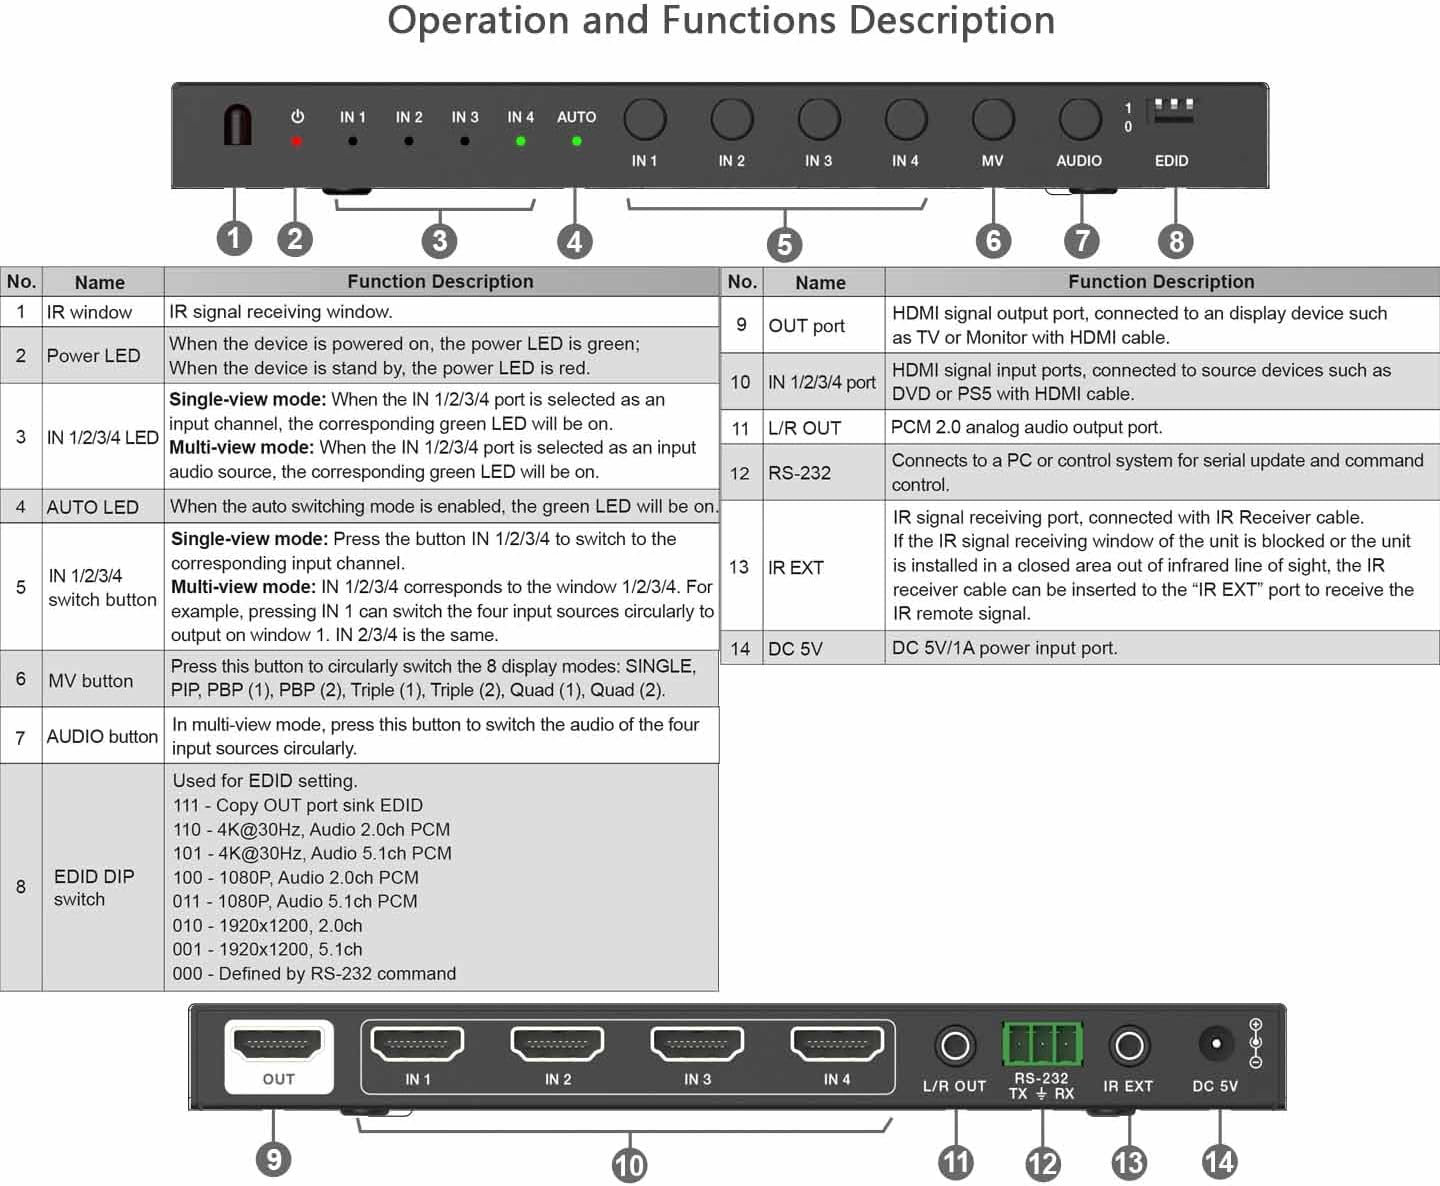
Image 2: Front panel layout and functions.
| NIE. | Nazwa | Opis funkcji |
|---|---|---|
| 1 | Okno podczerwieni | Odbiera sygnały IR z pilota. |
| 2 | Power LED | Świeci na zielono, gdy urządzenie jest włączone. |
| 3 | Dioda LED IN 1/2/3/4 | Indicates the currently selected input in single-view mode (green). In multi-view mode, indicates the active audio source. |
| 4 | AUTOMATYCZNA DIODA | Illuminates when auto-switching mode is enabled. |
| 5 | IN 1/2/3/4 Switch Button | Press to switch between HDMI inputs 1-4 in single-view mode. In multi-view mode, cycles through audio sources. |
| 6 | MV Button | Press to cycle through the 8 display modes: SINGLE, PBP (1), PBP (2), Triple (1), Triple (2), Quad (1), Quad (2). |
| 7 | Przycisk AUDIO | W wieluview mode, press this button to switch the audio of the four input sources circularly. |
| 8 | Przełącznik DIP EDID | Used for EDID settings. Refer to the table on the device for specific configurations (e.g., 111 = Copy OUT port sink EDID, 110 = 4K@30Hz Audio 2.0ch PCM). |
4.3. Opis panelu tylnego
The rear panel contains all input and output ports:
- OUT Port (HDMI): HDMI output port, connects to your display (TV, monitor, projector).
- IN 1/2/3/4 Ports (HDMI): HDMI input ports, connect to your source devices (Blu-ray player, game console, PC, etc.).
- WYJŚCIE L/P: 3.5mm analog audio output for connecting to external audio systems.
- RS-232 (TX + RX): Serial port for control via RS-232 commands.
- ZEWN. IR: Port for connecting the external IR receiver cable.
- 5V DC: Power input port for the 5V DC power adapter.
5. Konfiguracja
Follow these steps to connect your HDMI Multivieweee:
- Wyłącz urządzenia: Ensure all HDMI source devices and your display are powered off before making connections.
- Podłącz źródła HDMI: Connect up to four HDMI source devices (e.g., Blu-ray player, game console, PC) to the HDMI IN 1, IN 2, IN 3, and IN 4 ports on the multiviewer using HDMI cables.
- Podłącz wyświetlacz: Connect your HDMI display (TV, monitor, projector) to the HDMI OUT port on the multiviewer using an HDMI cable.
- Podłącz dźwięk (opcjonalnie): If you wish to extract analog audio, connect external speakers or an audio system to the L/R OUT port using a 3.5mm audio cable.
- Podłącz odbiornik podczerwieni (opcjonalnie): If using the external IR receiver, plug the IR EXT cable into the IR EXT port on the multiviewer and place the receiver in a location where it can receive signals from the remote control.
- Podłącz zasilanie: Plug the 5V DC power adapter into the DC 5V port on the multiviewer, then plug the adapter into a power outlet.
- Włączanie: Power on your display, then power on your HDMI source devices. The multiviewer will power on automatically when connected to power.
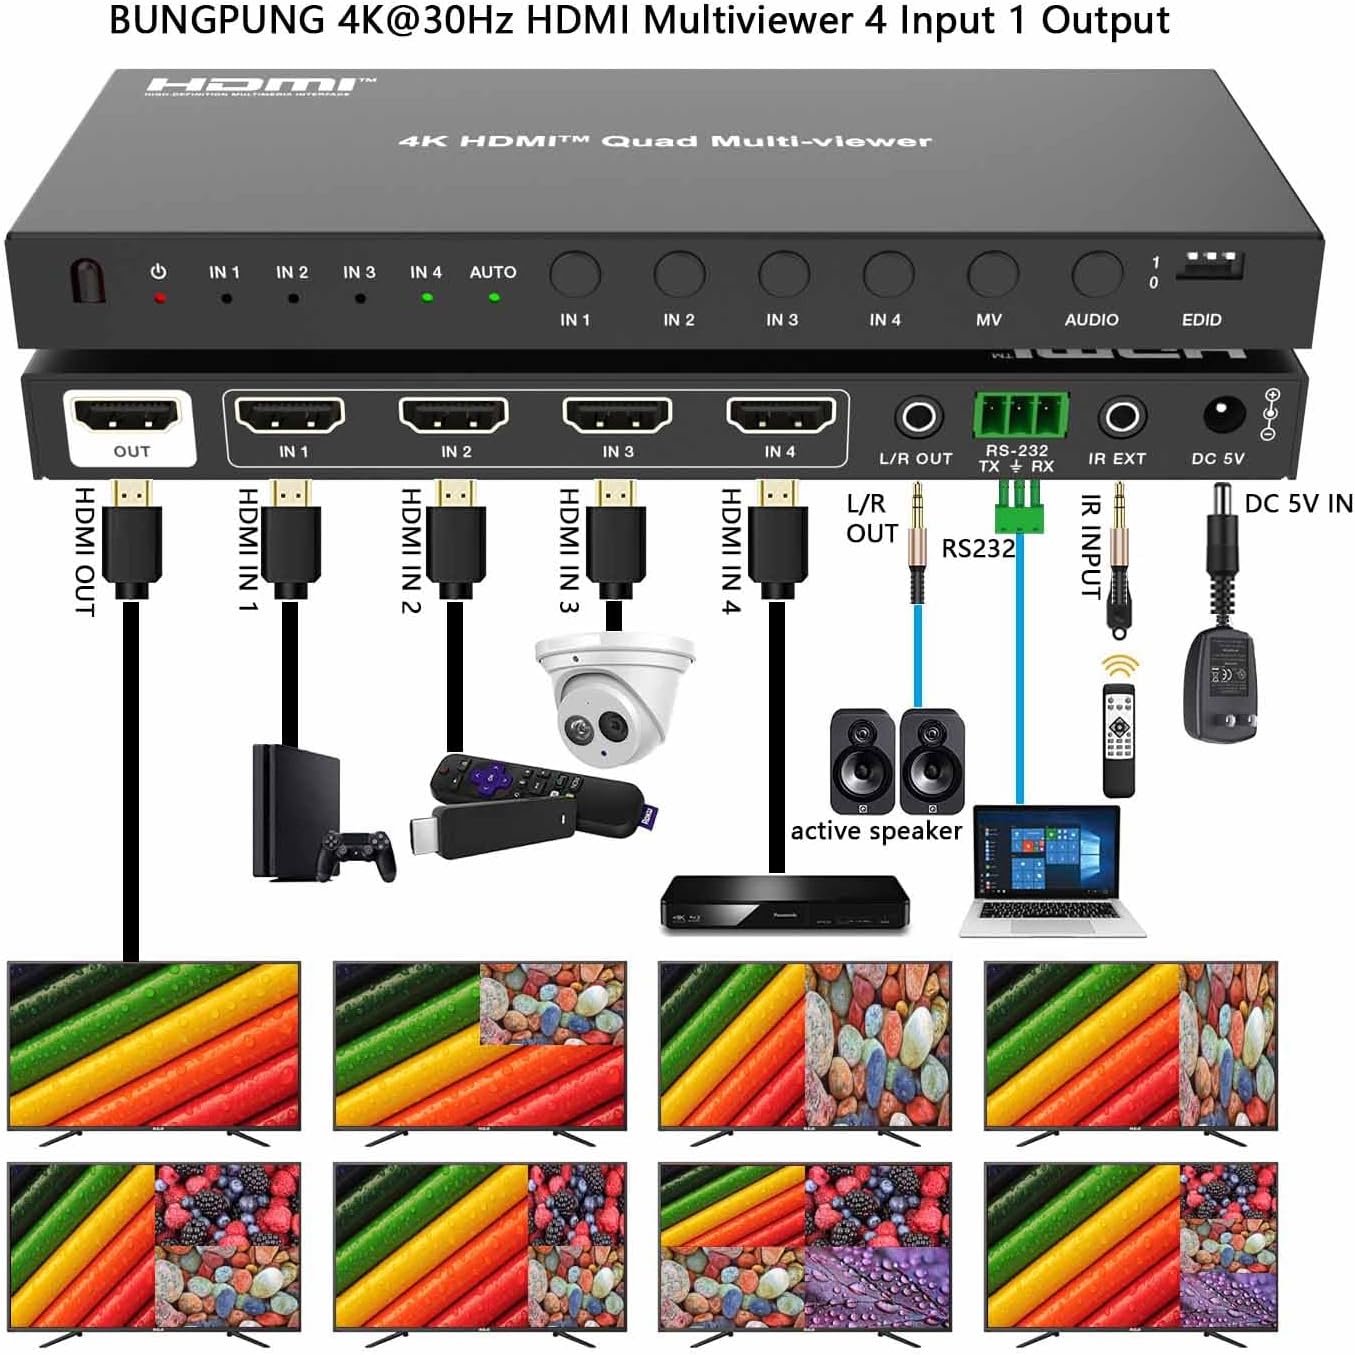
Image 3: Connection diagram illustrating typical setup.
6. Instrukcja obsługi
6.1. Włączanie/wyłączanie zasilania
The device powers on automatically when the 5V DC power adapter is connected. There is no dedicated power button on the unit. Disconnect the power adapter to power off the device.
6.2. Input Selection (Single-View Tryb)
In single-view mode, you can switch between the four HDMI inputs using the front panel buttons or the IR remote control.
- Panel przedni: Naciśnij IN 1/2/3/4 Switch Button (No. 5 in Image 2) repeatedly to cycle through inputs IN 1, IN 2, IN 3, and IN 4. The corresponding IN LED will illuminate green.
- Pilot na podczerwień: Use the dedicated input buttons (IN1, IN2, IN3, IN4) on the IR remote control to directly select an input.
6.3. Display Mode Selection (Multi-View tryby)
Multiviewer supports 8 display modes. Press the MV Button (No. 6 in Image 2) on the front panel or the "MV" button on the IR remote to cycle through these modes:
- Pojedynczy-View Tryb: Displays one HDMI input in full screen.
- Left-Right Split PBP (1): Displays two inputs side-by-side.
- Left-Right Split PBP (2): Another variation of two inputs side-by-side.
- PIP (obraz w obrazie): Displays one main input with a smaller secondary input window.
- 3-Screen Split (Triple 1): Displays three inputs simultaneously.
- 3-Screen Split (Triple 2): Another variation of three inputs simultaneously.
- 4-Screen Split (Quad 1): Displays all four inputs in a quad layout.
- 4-Screen Split (Quad 2): Another variation of four inputs in a quad layout.
6.4. Audio Selection in Multi-View Tryb
When in any multi-view display mode, you can select which input's audio is outputted:
- Panel przedni: Naciśnij Przycisk AUDIO (No. 7 in Image 2) to cycle through the audio sources of the four inputs. The corresponding IN LED will indicate the active audio source.
- Pilot na podczerwień: Use the dedicated audio selection buttons on the IR remote.
6.5. Zarządzanie EDID
The EDID DIP switch (No. 8 in Image 2) allows you to manage the Extended Display Identification Data (EDID) settings. This helps ensure compatibility between your source devices and display. Refer to the label on the device for specific DIP switch configurations. For exampna:
- 111: Copies EDID from the OUT port sink (connected display).
- 110: Sets EDID to 4K@30Hz, Audio 2.0ch PCM.
- 011: Sets EDID to 1080P, Audio 5.1ch PCM.
- 010: Sets EDID to 1920x1200, 2.0ch.
- 001: Sets EDID to 1920x1200, 5.1ch.
- 000: Defined by RS-232 command.
Note: After changing EDID settings, it is recommended to power cycle the multiviewer and connected devices for the changes to take effect.
6.6. Sterowanie RS-232
The device can be controlled via RS-232 commands for integration into professional control systems. Consult the separate RS-232 command protocol document (if provided by the manufacturer) for detailed commands and syntax.
7. Konserwacja
- Czyszczenie: Do czyszczenia urządzenia należy używać miękkiej, suchej ściereczki. Nie należy używać środków czyszczących w płynie ani aerozolu.
- Składowanie: Przechowuj urządzenie w chłodnym, suchym miejscu, z dala od bezpośredniego światła słonecznego i ekstremalnych temperatur, jeśli nie będziesz go używać przez dłuższy czas.
- Zarządzanie kablami: Ensure HDMI cables are not excessively bent or strained to prevent damage.
8. Rozwiązywanie Problemów
| Problem | Możliwa przyczyna | Rozwiązanie |
|---|---|---|
| Brak obrazu na wyświetlaczu. | No power to multivieweee. Loose HDMI connections. Wybrano nieprawidłowe wejście. EDID incompatibility. |
Sprawdź podłączenie zasilacza i gniazdko elektryczne. Sprawdź, czy wszystkie kable HDMI są solidnie podłączone. Verify the correct input is selected on the multiviewer and display. Adjust EDID settings using the DIP switch (Section 6.5). Try power cycling all devices. |
| Bez dźwięku. | Audio not selected in multi-view tryb. Loose audio cable. Display/speaker volume too low. |
Press the AUDIO button to select the desired audio source. Check the 3.5mm audio cable connection to L/R OUT and external speakers. Increase volume on your display or external audio system. |
| Image flickering or distorted. | Poor quality HDMI cable. Resolution incompatibility. EDID issue. |
Use high-quality HDMI 1.4 or higher cables. Ensure source device output resolution is compatible with the display and multiviewer (up to 4K@30Hz). Adjust EDID settings (Section 6.5). |
| Pilot na podczerwień nie działa. | Baterie są rozładowane. Obstruction to IR sensor. IR receiver cable not connected. |
Replace CR2 batteries in the remote. Ensure a clear line of sight to the IR window or external IR receiver. Verify the IR EXT cable is securely connected. |
9. Specyfikacje

Image 4: Device dimensions and key features.
| Funkcja | Szczegół |
|---|---|
| Wymiary produktu | 2.68 x 6.93 x 0.71 cala (68 x 176 x 18 mm) |
| Waga przedmiotu | 0.021 uncji (ok. 0.6 gramy) - Note: This weight seems incorrect, actual device weight is closer to 300g as per Image 4. |
| Zgodność z HDMI | HDMI 1.4 |
| Zgodność z HDCP | HDCP1.4 jest standardem, który umożliwia: |
| Obsługiwane rozdzielczości | Up to 4K@30Hz RGB 4:4:4, backward compatible with 480i/p, 720p, 1080i/p@60Hz. |
| Obsługa HDR | Tak |
| Wyjście audio | L/R Analog Audio (3.5mm jack) |
| Metody kontroli | Front Panel Buttons, IR Remote, RS-232 |
| Zasilacz | Prąd stały 5 V |
| Baterie (do pilota) | 1 bateria CR2 (w zestawie) |
10. Gwarancja i wsparcie
This BUNGPUNG product is guaranteed for one year from the date of purchase. This warranty covers defects in materials and workmanship under normal use.
If you encounter any issues with compatibility, initial defects, or require technical assistance, please contact BUNGPUNG customer support. Please have your purchase details and product model number (BP-HDC-SW941MV) ready when contacting support.