
SANITMAX Sm1050b
SANITMAX 41.3" Battery-Powered Walk-Behind Floor Sweeper User Manual
Model: Sm1050b
1. Wprowadzenie
This manual provides essential information for the safe and efficient operation, maintenance, and troubleshooting of your SANITMAX 41.3" Battery-Powered Walk-Behind Floor Sweeper, Model Sm1050b. Please read this manual thoroughly before operating the machine to ensure proper use and to prevent injury or damage.
2. Instrukcje bezpieczeństwa
Always adhere to the following safety guidelines to prevent accidents and ensure safe operation.
Bezpieczeństwo ogólne
- Przed użyciem należy przeczytać wszystkie instrukcje.
- Do not operate the sweeper in hazardous environments or near flammable liquids/gases.
- Trzymać dzieci i osoby nieupoważnione z dala od obszaru roboczego.
- Wear appropriate personal protective equipment (PPE) such as safety glasses and non-slip footwear.
- Przed rozpoczęciem użytkowania należy sprawdzić, czy wszystkie zabezpieczenia i urządzenia zabezpieczające są na swoim miejscu i działają prawidłowo.
Bezpieczeństwo elektryczne
- Use only the provided battery charger.
- Do not operate the sweeper with a damaged power cord or plug.
- Keep the charger and battery dry. Do not expose to rain or wet conditions.
- Unplug the charger from the outlet before performing any maintenance or cleaning.
Bezpieczeństwo baterii
- Nie wolno zwierać zacisków akumulatora.
- Nie wystawiaj baterii na działanie ekstremalnych temperatur lub bezpośredniego światła słonecznego.
- Zutylizuj baterie zgodnie z lokalnymi przepisami.
3. Identyfikacja komponentów i części
Familiarize yourself with the main components of your SANITMAX floor sweeper.

Rysunek 3.1: Ogólnie view of the SANITMAX floor sweeper with its included battery charger.
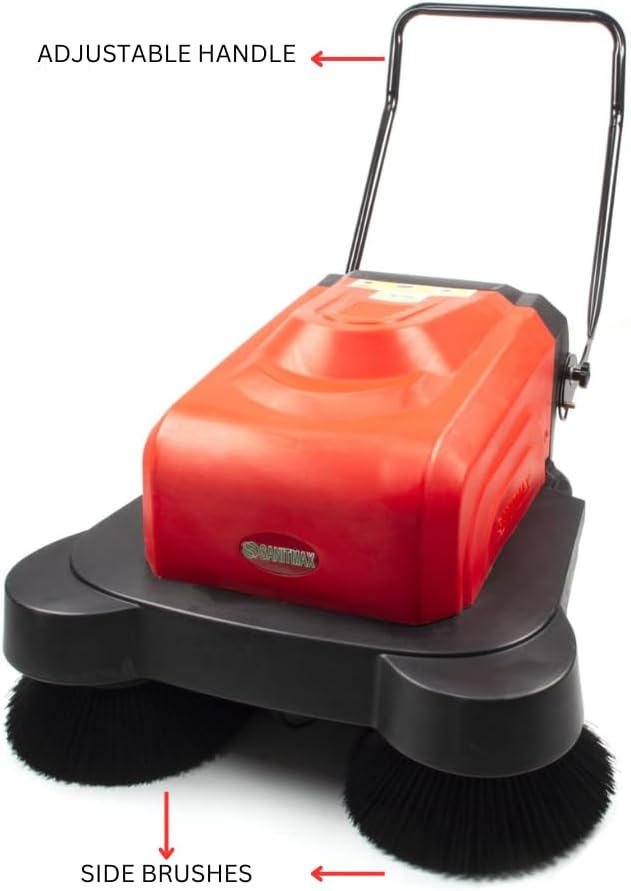
Figure 3.2: Key external components including the adjustable handle and side brushes.

Rysunek 3.3: Szczegółowy view of the control panel with battery capacity display, main brush switch, side brush switch, watering switch, and key ignition.

Rysunek 3.4: Strona view highlighting the overload protection switches, charger interface, removable trash can, and water tank inlet.

Rysunek 3.5: Spód view showing the side brushes and the integrated water spray nozzles for dust suppression.
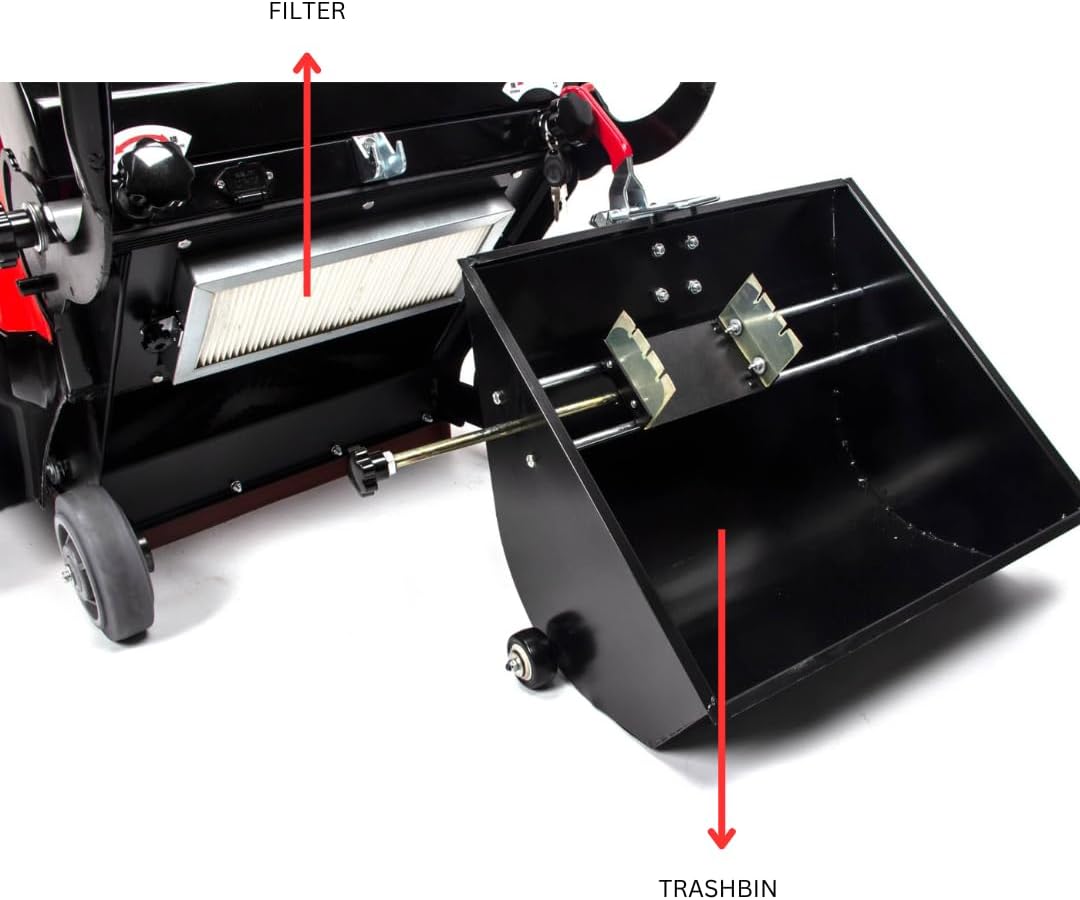
Rysunek 3.6: Wewnętrzne view revealing the air filter and the large capacity trashbin.
4. Konfiguracja
Wstępny montaż
- Rozpakuj wszystkie elementy z opakowania.
- Attach the adjustable handle to the main body of the sweeper, securing it with the provided fasteners. Ensure it is firmly in place.
- Verify that the side brushes are correctly installed and rotate freely.
- Ensure the trashbin is properly seated within its compartment.
Ładowanie akumulatora
- Locate the charger interface on the side of the sweeper (refer to Figure 3.4).
- Connect the provided battery charger to the charger interface.
- Podłącz ładowarkę do standardowego gniazdka elektrycznego.
- Allow the battery to charge fully before first use. The battery capacity display on the control panel (Figure 3.3) will indicate the charge level. A full charge typically takes approximately 4 hours.
- Once fully charged, disconnect the charger from both the sweeper and the outlet.
Napełnianie zbiornika na wodę
- Locate the water tank inlet (refer to Figure 3.4).
- Open the cap and fill the tank with clean water. Do not overfill.
- Po napełnieniu dokładnie zamknij korek.
5. Instrukcja obsługi
Starting the Sweeper
- Upewnij się, że akumulator jest wystarczająco naładowany.
- Insert the key into the ignition on the control panel (Figure 3.3) and turn it to the "ON" position.
- Press the "Main Brush" switch to activate the main sweeping brush.
- Press the "Side Brush" switch to activate the side brushes, which help sweep debris from edges and corners into the path of the main brush.
- If dust suppression is desired, press the "Watering" switch to activate the water spray nozzles.
Operacja zamiatania
- Push the sweeper forward at a steady, comfortable pace.
- Aby zapewnić całkowite pokrycie, należy każdą warstwę nakładać stopniowo.
- For heavily soiled areas, a slower pace or multiple passes may be required.
- The sweeper is designed for hard floor surfaces such as concrete, tile, hardwood, and linoleum.
Stopping the Sweeper
- Turn off the "Watering" switch, then the "Side Brush" switch, and finally the "Main Brush" switch.
- Turn the key to the "OFF" position and remove it.
6. Konserwacja
Regular maintenance ensures optimal performance and extends the lifespan of your sweeper.
Emptying the Trashbin
- Empty the trashbin after each use or when it is full (refer to Figure 3.6).
- Pull out the trashbin, dispose of collected debris, and reinsert it securely.
Czyszczenie filtra
- Regularly inspect and clean the air filter (refer to Figure 3.6).
- Remove the filter and gently tap it to dislodge dust. For deeper cleaning, use compressed air or wash with water if the filter type allows (consult product specifications for filter type). Ensure it is completely dry before reinstallation.
Brush Inspection and Replacement
- Periodically check the main and side brushes for wear or damage.
- Replace brushes when bristles are significantly worn or damaged to maintain effective sweeping performance.
Pielęgnacja baterii
- Zawsze po każdym użyciu należy całkowicie naładować akumulator.
- If storing the sweeper for an extended period, ensure the battery is fully charged and recharge it every 1-2 months to prevent deep discharge.
Ogólne sprzątanie
- Wipe down the exterior of the sweeper with a damp płótno.
- Nie używaj żrących chemikaliów ani ściernych środków czyszczących.
7. Rozwiązywanie Problemów
W tej sekcji znajdziesz informacje o typowych problemach i ich rozwiązaniach.
| Problem | Możliwa przyczyna | Rozwiązanie |
|---|---|---|
| Zamiatarka się nie włącza. | Akumulator jest rozładowany. Key not fully inserted/turned. Aktywowane zabezpieczenie przed przeciążeniem. | Naładuj baterię. Ensure key is fully inserted and turned to "ON". Check overload protection switches (Figure 3.4) and reset if tripped. |
| Brushes not rotating. | Wyłącznik szczotki. Obstruction in brushes. Kwestia silnika. | Ensure main/side brush switches are "ON". Inspect brushes for tangled debris and remove. Contact customer support if motor issue is suspected. |
| Water spray not working. | Zbiornik na wodę jest pusty. Watering switch off. Dysze zatkane. | Uzupełnij zbiornik na wodę. Ensure watering switch is "ON". Clean water spray nozzles (Figure 3.5) to remove blockages. |
| Poor sweeping performance. | Trashbin full. Brushes worn or dirty. Zatkany filtr. | Empty trashbin. Clean or replace brushes. Wyczyść lub wymień filtr. |
8. Specyfikacje
Key technical specifications for the SANITMAX Sm1050b Floor Sweeper.
| Funkcja | Szczegół |
|---|---|
| Nazwa modelu | Sm1050b |
| Ścieżka czyszczenia | 41.3 cali |
| Źródło zasilania | Zasilany bateryjnie |
| Czas działania | Do 4 godzin (ciągłej pracy) |
| Efektywność czyszczenia | Up to 64,500 sq ft/hr |
| Pojemność pojemnika na śmieci | 9.25 galony |
| Cechy specjalne | Triple Brushes, Water Sprinklers For Dust Control |
| Zalecane powierzchnie | Hardwood, Tile and Grout, Vinyl and Linoleum, Concrete, Marble and Natural Stone, Laminated Floors |
| Wymiary produktu | 41.3" szer. x 55" wys. |
| Waga przedmiotu | 178.5 funtów |
| Tworzywo | Plastik, Metal |
| Zawarte komponenty | Ładowarka baterii |
9. Gwarancja i wsparcie
For warranty information and customer support, please contact SANITMAX directly or refer to your purchase documentation.
- Zwroty: This product typically offers a 30-day easy return policy. Please refer to your retailer's return policy for specific details.
- Producent: Sanitmax
- Obsługa klienta: For technical assistance, parts, or service, please visit the official SANITMAX store on Amazon or contact their customer support channels.
Ask a question about this manual
Ask about setup, troubleshooting, compatibility, parts, safety, or missing instructions. Manuals+ will review the question and use this page’s manual context to help answer it.