BUNGPUNG BP-HDC-MC02
Instrukcja obsługi adaptera ekstraktora dźwięku HDMI eARC BUNGPUNG 8K@60Hz
Model: BP-HDC-MC02
Brand: BUNGPUNG
1. Koniec produktuview
The BUNGPUNG 8K@60Hz HDMI eARC Audio Extractor Adapter (Model: BP-HDC-MC02) is designed to extract audio signals from an HDMI source or a TV with ARC/eARC functionality. This allows the audio to be outputted to an AV receiver or amplifier, providing enhanced sound experiences while maintaining high-quality video passthrough.
This adapter supports video resolutions up to 8K@60Hz (4:2:0 12bit) and 4K@120Hz (4:4:4 12bit), with backward compatibility for lower resolutions. It is compatible with HDMI 2.1, HDCP 2.3, and HDR, supporting deep color (30/36/48 bit). The device ensures high performance with no noticeable lag or loss in image and sound quality.

Obraz: Przód view of the BUNGPUNG 8K@60Hz HDMI eARC Audio Extractor Adapter, showcasinze względu na kompaktową konstrukcję i oznakowanie.
2. Główne cechy
- HDMI eARC Audio Extraction: Extracts audio from HDMI sources or eARC/ARC enabled TVs to an AV receiver.
- Obsługa wysokiej rozdzielczości: Supports 8K@60Hz (4:2:0 12bit) and 4K@120Hz (4:4:4 12bit) video resolutions.
- Advanced Compatibility: Fully compatible with HDMI 2.1, HDCP 2.3, and HDR. Supports deep color (30/36/48 bit).
- Szeroka kompatybilność urządzeń: Works with Blu-ray players, DVDs, HD players, gaming consoles (PS3/4 Pro, Xbox), PCs, streaming devices (Fire TV, Apple TV, Chromecast, Roku), and outputs to Full HD TVs, monitors, projectors, speakers, amplifiers, and soundbars.
- Trwała konstrukcja: Features a robust metal body for rapid heat absorption and dissipation, reducing EMI/RFI noise interference.
- Podłącz i graj: Kompaktowy rozmiar i łatwa instalacja.
- Stabilne zasilanie: Independent power supply ensures stable operation.
3. Zawartość opakowania
Sprawdź, czy w przesyłce znajdują się wszystkie elementy:
- 1 x BUNGPUNG 8K@60Hz HDMI eARC Audio Extractor Adapter (Model: BP-HDC-MC02)
- 1 x zasilacz prądu stałego 5 V
- 1 x Instrukcja obsługi (ten dokument)
4. Diagram produktu i jego komponenty
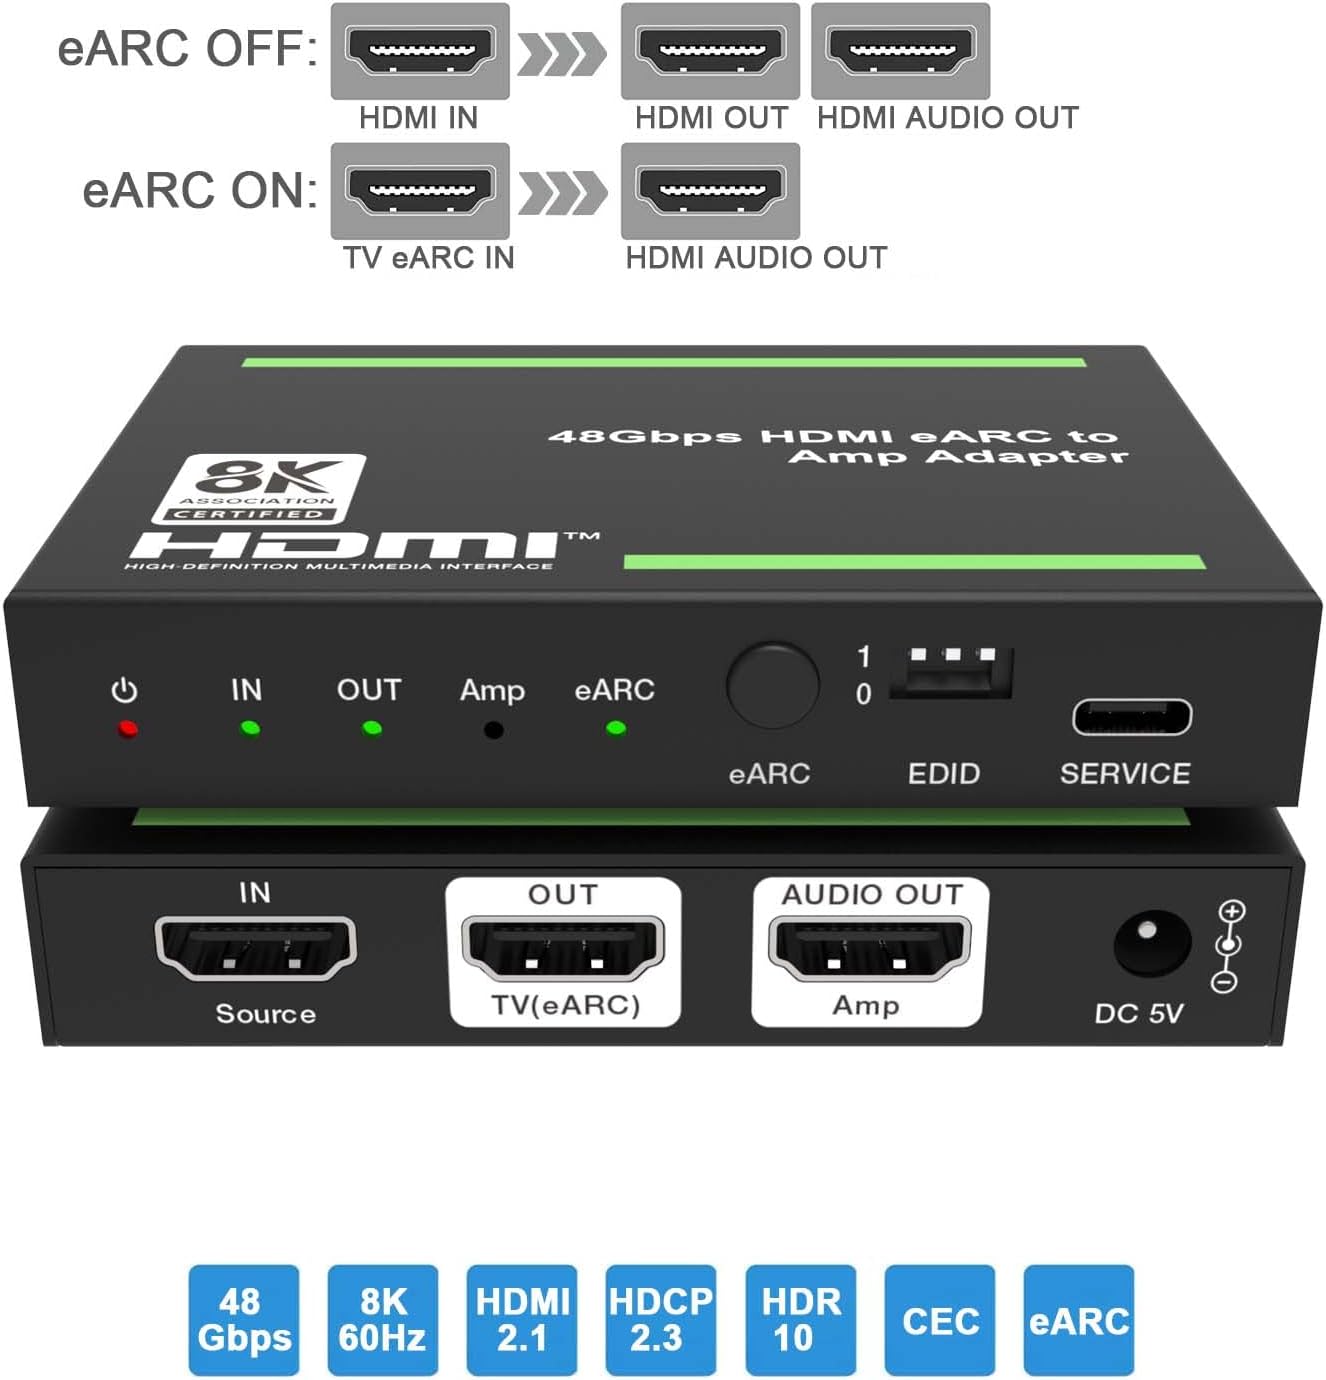
Obraz: góra i dół views of the adapter, highlighting the input/output ports and control elements.
Elementy sterujące i wskaźniki na panelu przednim:
- Dioda LED zasilania: Red indicator, illuminates when the device is powered on.
- W LED: Green indicator, illuminates when an input signal is detected.
- WYJŚCIE LED: Green indicator, illuminates when the HDMI OUT port is connected to a TV.
- Amp PROWADZONY: Green indicator, illuminates when the AUDIO OUT port is connected to an ampliyfikator.
- Dioda LED eARC: Flashes when ARC/eARC function is enabled and CEC communication is working. Off when ARC/eARC is disabled.
- Przycisk eARC: Press to enable or disable the eARC function.
- Przełącznik DIP EDID: Used to set the EDID mode (see Section 6 for details).
- Port serwisowy: For firmware updates and debugging.
Porty na tylnym panelu:
- IN (Source): HDMI input port for connecting source devices (e.g., Blu-ray player, gaming console, PC).
- OUT (TV(eARC)): HDMI output port for connecting to a TV or display. This port also functions as an ARC/eARC audio channel when the eARC function is enabled.
- AUDIO OUT (Amp): HDMI audio output port for connecting to an ampwzmacniacz lub amplituner AV.
- 5V DC: Port wejściowy zasilania dla dołączonego zasilacza 5 V DC.
5. Instrukcje konfiguracji
Follow these steps to set up your HDMI eARC Audio Extractor Adapter:
- Podłącz urządzenie źródłowe: Connect an HDMI cable from your source device (e.g., Blu-ray player, game console, PC) to the IN (Source) portu na adapterze.
- Podłącz urządzenie wyświetlające: Podłącz kabel HDMI do OUT (TV(eARC)) port on the adapter to the HDMI input of your TV or display.
- Connect Audio Receiver: Podłącz kabel HDMI do AUDIO OUT (Amp) port on the adapter to an HDMI input on your AV receiver or ampliyfikator.
- Podłącz zasilanie: Podłącz dołączony zasilacz 5 V DC do Prąd stały 5 V port on the adapter, then plug the adapter into a power outlet. The Power LED will illuminate.
- Configure eARC (Optional): If you wish to extract audio from your TV's eARC/ARC channel to your AV receiver, ensure your TV's eARC/ARC function is enabled. Then, press the eARC Button on the adapter to enable eARC mode. The eARC LED will flash.
- Set EDID (Optional): Dostosuj Przełącznik DIP EDID according to your audio and video requirements. Refer to Section 6 for detailed EDID settings.

Image: Diagram illustrating typical connection scenarios for the HDMI eARC Audio Extractor, showing connections from a Blu-ray player to the adapter, then to a TV and a 7.1 channel audio ampliyfikator.
Scenariusze połączeń:

Image: Diagram showing eARC OFF mode, where HDMI IN provides video to HDMI OUT and audio to HDMI AUDIO OUT.

Image: Diagram showing eARC ON mode, where TV eARC IN provides audio to HDMI AUDIO OUT.
6. Instrukcja obsługi
Wskaźniki LED:
| NIE. | Nazwa | Opis funkcji |
|---|---|---|
| 1 | Power LED | Gdy urządzenie jest włączone, czerwona dioda LED będzie się świecić. |
| 2 | W LED | Po wykryciu sygnału wejściowego zaświeci się zielona dioda LED. |
| 3 | WYJŚCIE LED | Gdy port OUT zostanie podłączony do telewizora, zaświeci się zielona dioda LED. |
| 4 | Amp PROWADZONY | Gdy port AUDIO OUT łączy się z amplifier, zielona dioda LED będzie włączona. |
| 5 | Dioda eARC | NA: Funkcja ARC/eARC jest włączona. Komunikacja CEC i ARC/eARC działają prawidłowo. Błyskowy: Funkcja ARC/eARC jest włączona. Komunikacja CEC i ARC/eARC nie działają prawidłowo. Wyłączony: Funkcja ARC/eARC jest wyłączona. |
eARC Button Operation:
Naciśnij przycisk eARC on the front panel to toggle the eARC function on or off. When eARC is enabled, the adapter can extract audio from the TV's eARC/ARC channel and send it to the connected AV receiver via the AUDIO OUT port.
7. Zarządzanie EDID
The EDID (Extended Display Identification Data) DIP switch allows you to manually configure the audio and video capabilities reported by the adapter to the source device. This can be useful for resolving compatibility issues or forcing specific audio formats.

Image: Detailed diagram explaining the function of each LED indicator and the settings for the EDID DIP switch.
EDID DIP Switch Settings:
| DIP Switch Setting (1-0) | Opis |
|---|---|
| [DIP]=111 | Copy OUT port sink video and audio EDID (Default) |
| [DIP]=110 | Copy AUDIO OUT port sink video and audio EDID |
| [DIP]=101 | FRL12G_8K_HDR, 2.0CH |
| [DIP]=100 | FRL12G_8K_HDR, 5.1CH |
| [DIP]=011 | FRL12G_8K_HDR, 7.1CH |
| [DIP]=010 | FRL10G_8K_HDR, 2.0CH |
| [DIP]=001 | FRL10G_8K_HDR, 5.1CH |
| [DIP]=000 | FRL10G_8K_HDR, 7.1CH |
Notatka: "FRL" refers to Fixed Rate Link, a signaling method used in HDMI 2.1 for higher bandwidths. "12G" and "10G" indicate the data rate per lane (12 Gbps or 10 Gbps). "HDR" indicates High Dynamic Range support. "CH" indicates audio channels.
8. Konserwacja
Aby zapewnić długą żywotność i optymalną wydajność adaptera, należy przestrzegać poniższych wskazówek dotyczących konserwacji:
- Keep the device in a cool, dry place, away from direct sunlight, high temperatures, and humidity.
- Unikaj wystawiania urządzenia na działanie wody lub innych płynów.
- Czyść urządzenie miękką, suchą ściereczką. Nie używaj środków czyszczących o właściwościach ściernych ani rozpuszczalników.
- Zapewnij odpowiednią wentylację wokół urządzenia, aby zapobiec przegrzaniu.
- Odłącz urządzenie od zasilania, jeśli nie będziesz go używać przez dłuższy czas.
9. Rozwiązywanie Problemów
If you encounter issues with your HDMI eARC Audio Extractor Adapter, please refer to the following common problems and solutions:
| Problem | Możliwa przyczyna / rozwiązanie |
|---|---|
| No video output on TV/display. |
|
| No audio output from AV receiver/ampliyfikator. |
|
| Dźwięk jest zniekształcony lub przerywany. |
|
| eARC function not working or eARC LED is flashing. |
|
10. Specyfikacje
| Funkcja | Szczegół |
|---|---|
| Numer modelu | BP-HDC-MC02 |
| Wersja HDMI | HDMI 2.1 |
| Wersja HDCP | HDCP2.3 jest standardem, który umożliwia: |
| Obsługa maksymalnej rozdzielczości | 8K@60Hz (4:2:0 12bit), 4K@120Hz (4:4:4 12bit) |
| Color Depth Support | 30 bitów, 36 bitów, 48 bity |
| Obsługa HDR | Tak |
| eARC/ARC Support | Tak |
| Wsparcie CEC | Tak |
| Wymiary produktu (dł. x szer. x wys.) | 3.94 x 2.76 x 0.79 cala (95 x 68 x 18 mm) |
| Waga przedmiotu | 0.007 uncji (około 0.2 gramów) |
| Zasilacz | Prąd stały 5 V |
| Kompatybilne urządzenia | Amplifier, Speaker, Blu-ray player, DVD, HD player, Amazon Fire TV, Apple TV, PS3/4 Pro, Xbox, PC/Laptop, HD camera, Chromecast, Fire Stick, Roku, HDDVR, Full HD TV, monitor, projector, soundbars. |
11. Gwarancja i wsparcie
This BUNGPUNG product is covered by a one-year warranty from the date of purchase. This warranty covers manufacturing defects and initial defects.
If you have any questions regarding product compatibility, setup, operation, or encounter any initial defects, please do not hesitate to contact BUNGPUNG customer support. Please refer to the product packaging or the seller's information on the purchase platform for specific contact details.
Ask a question about this manual
Ask about setup, troubleshooting, compatibility, parts, safety, or missing instructions. Manuals+ will review the question and use this page’s manual context to help answer it.