1. Informacje dotyczące bezpieczeństwa
Please read all safety instructions carefully before installing or operating the AORUS WATERFORCE X II 360 ICE Liquid CPU Cooler. Failure to follow these instructions may result in damage to the product, other components, or personal injury.
- Przed przystąpieniem do instalacji lub konserwacji należy zawsze odłączyć komputer od zasilania.
- Ostrożnie obchodź się z elementami, aby uniknąć wyładowań elektrostatycznych (ESD). Rozważ użycie antystatycznej opaski na nadgarstek.
- Do not open the liquid cooler's pump or radiator. It contains a sealed liquid cooling solution.
- Ensure all cables are connected securely and correctly to prevent electrical shorts or malfunctions.
- Trzymać produkt z dala od ekstremalnych temperatur, wilgoci i bezpośredniego światła słonecznego.
- This product is designed for use in desktop computer systems only.
2. Zawartość opakowania
Sprawdź, czy w Twoim opakowaniu znajdują się wszystkie wymienione poniżej elementy:
- 1x AORUS WATERFORCE X II 360 ICE Liquid CPU Cooler (includes 360mm radiator, pump/waterblock, and pre-attached tubing)
- 3x 120mm Low Noise ARGB Fans
- Mounting Hardware Kit (for Intel LGA1851, LGA1700, 1200, 115x and AMD AM5, AM4, TR4, sTR5 sockets)
- Kabel USB
- Kabel zasilający SATA
- Fan and ARGB Connection Cables
- Instrukcja obsługi (ten dokument)

Figure 2.1: AORUS WATERFORCE X II 360 ICE Liquid CPU Cooler and its retail packaging.
3. Specyfikacje
| Funkcja | Specyfikacja |
|---|---|
| Numer modelu | GP-AORUS WATERFORCE X II 360I G2 |
| Rozmiar grzejnika | 360mm |
| Rozmiar wentylatora | 120mm |
| Poziom hałasu | 37.5dB |
| Maximum Rotational Speed (Pump) | 9200 obr./min. |
| Metoda chłodzenia | Woda |
| Typ złącza zasilania | 3-stykowy |
| Tomtage | 12 wolty |
| Cotage | 100 watów |
| Kompatybilne urządzenia | Pulpit |
| Zgodność gniazda procesora | Intel 115x, 1200, 1700, 1851; AMD TR4, AM5, AM4, sTR5 |
4. Konfiguracja i instalacja
Follow these steps to properly install your AORUS WATERFORCE X II 360 ICE Liquid CPU Cooler. Ensure your computer is powered off and unplugged before beginning.
4.1. Przygotuj swój system
- Wyłączone: Wyłącz całkowicie komputer i odłącz przewód zasilający od gniazdka ściennego.
- Dostęp do płyty głównej: Open your computer case to gain access to the motherboard and CPU area.
- Remove Existing Cooler: If an existing CPU cooler is installed, carefully remove it and clean any old thermal paste from the CPU's integrated heat spreader (IHS) using isopropyl alcohol and a lint-free cloth.
4.2. Zainstaluj elementy montażowe
The AORUS WATERFORCE X II 360 ICE supports a wide range of CPU sockets. Identify your CPU socket type (Intel or AMD) and use the corresponding mounting hardware from the kit.
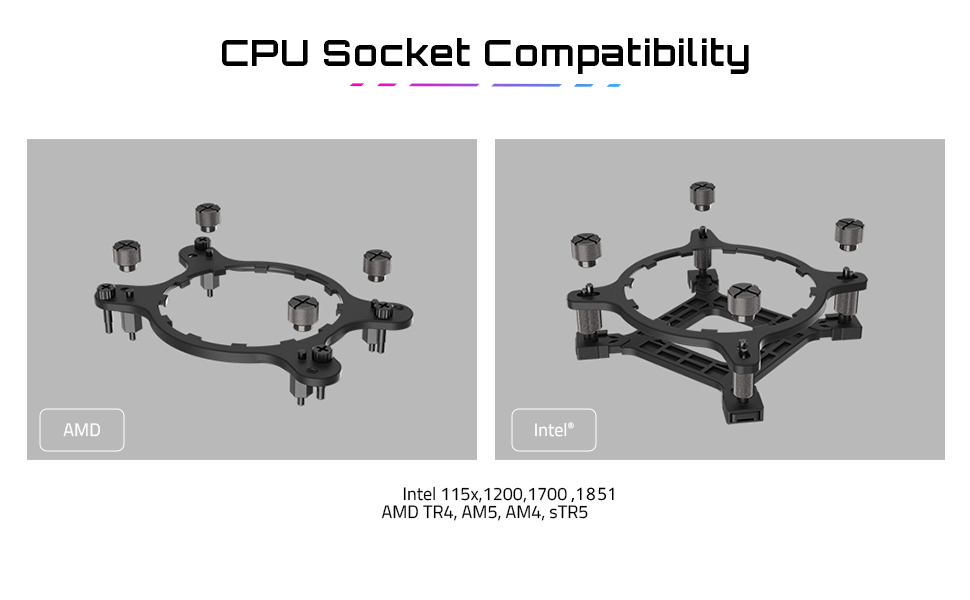
Rysunek 4.1: Zgodność gniazd procesora i uchwyty montażowe.
- Montaż płyty tylnej: For Intel sockets, install the appropriate backplate behind the motherboard. For AMD sockets, use the existing motherboard backplate if applicable, or install the provided one.
- Zamontuj dystanse: Screw the correct standoffs into the backplate or motherboard mounting holes around the CPU socket.
4.3. Mount Radiator and Fans
The 360mm radiator requires sufficient space in your PC case. The fans feature an EZ-Chain Magnet design for simplified installation.

Rysunek 4.2: Koniecview of the AORUS WATERFORCE X II 360 ICE Liquid CPU Cooler.

Rysunek 4.3: Góra view of the 120mm ARGB fans.

Figure 4.4: EZ-Chain Magnet fan design for simplified wiring.
- Montaż wentylatorów do chłodnicy: Secure the three 120mm ARGB fans to the radiator using the provided screws. Ensure the fan airflow direction is as desired (typically blowing air through the radiator and out of the case, or into the case for positive pressure). The EZ-Chain Magnet design allows fans to interlock and transmit power/signals, reducing cable clutter.
- Montaż grzejnika: Install the radiator assembly into your chosen mounting location within the PC case (e.g., top, front). Secure it with the appropriate screws.
4.4. Install Waterblock/Pump
- Nałóż pastę termoprzewodzącą: If the waterblock's cold plate does not have pre-applied thermal paste, apply a small pea-sized amount to the center of your CPU's IHS.
- Position Waterblock: Carefully place the waterblock onto the CPU, aligning the mounting holes with the standoffs.
- Secure Waterblock: Use the provided thumb screws or nuts to secure the waterblock evenly to the standoffs. Tighten in a cross pattern until snug, but do not overtighten.
4.5. Podłącz kable
- Moc pompy: Connect the pump's 3-pin power cable to an available CPU_FAN or AIO_PUMP header on your motherboard. Consult your motherboard manual for the correct header.
- Fan Power/ARGB: Connect the fan power and ARGB cables. Thanks to the EZ-Chain Magnet design, the fans can be daisy-chained. Connect the main fan cable to an available fan header (e.g., SYS_FAN) and the ARGB cable to a 3-pin 5V ARGB header on your motherboard.
- Połączenie USB: Connect the cooler's USB cable to an available internal USB 2.0 header on your motherboard. This is essential for the LCD display and software control.
- Moc SATA: Connect the SATA power cable from the cooler to a SATA power connector from your power supply.
5. Instrukcja obsługi
Once installed, the AORUS WATERFORCE X II 360 ICE is ready to operate. For full functionality and customization, install the GIGABYTE Control Center (GCC) software.
5.1. Pierwsze włączenie zasilania
After ensuring all connections are secure and your PC case is closed, plug in your computer's power cord and power on the system. The cooler's fans and pump should begin operating, and the LCD display on the waterblock will initialize.
5.2. GIGABYTE Control Center (GCC) Software
The GCC software is crucial for managing your cooler's performance and aesthetics:
- Pobierać: Download the latest version of GIGABYTE Control Center from the official GIGABYTE webstrona.
- Instalacja: Zainstaluj oprogramowanie, postępując zgodnie z instrukcjami wyświetlanymi na ekranie.
- Cechy: Within GCC, you can:
- Monitor CPU temperature, pump speed, and fan speed.
- Adjust fan curves and pump speeds for optimal cooling and noise levels.
- Customize the ARGB lighting effects of the fans and waterblock.
- Manage the LCD Edge View wyświetlacz.
5.3. LCD Edge View Personalizacja
The circular full-color LCD on the waterblock is highly customizable:

Figure 5.1: LCD Edge View features and customization.
- Monitorowanie: Display real-time information such as CPU clock frequencies, utilization, temperatures, fan RPM, and pump RPM.
- Default Animations: Choose from 5 meticulously crafted default animations.
- Personalizacja: Upload your own text, GIF, JPEG, or MP4 files to personalize the display. The cooler has 40MB of integrated storage capacity for custom content.
- Orientacja wyświetlacza: The display orientation can be software-controlled for a 360-degree rotation, allowing for flexible installation.
6. Konserwacja
Regularna konserwacja pomaga zapewnić optymalną wydajność i długą żywotność układu chłodzenia procesora cieczą.
- Czyszczenie kurzu: Okresowo czyść żeberka chłodnicy i łopatki wentylatora sprężonym powietrzem lub miękką szczotką z kurzu. Upewnij się, że wentylatory nie obracają się podczas czyszczenia.
- Sprawdź rury: Inspect the tubing for any signs of kinks, damage, or leaks. While rare, addressing these issues promptly is important.
- Aktualizacje oprogramowania: Keep your GIGABYTE Control Center (GCC) software updated to the latest version to benefit from performance improvements, bug fixes, and new features.
7. Rozwiązywanie Problemów
If you encounter issues with your AORUS WATERFORCE X II 360 ICE, refer to the following common problems and solutions:
| Problem | Możliwa przyczyna | Rozwiązanie |
|---|---|---|
| Wysokie temperatury procesora | Improper waterblock contact, insufficient thermal paste, pump not running, fans not spinning, dust buildup. | Ensure waterblock is securely mounted. Reapply thermal paste if necessary. Check pump and fan cable connections. Clean radiator and fans. Verify pump and fan speeds in GCC. |
| Wentylatory/pompa nie obracają się | Loose power connection, incorrect motherboard header, software issue. | Check SATA power cable connection. Ensure pump is connected to CPU_FAN/AIO_PUMP header. Verify fan connections. Restart GCC or reinstall if necessary. |
| Oświetlenie ARGB nie działa | Incorrect ARGB header, loose connection, software conflict. | Ensure ARGB cable is connected to a 3-pin 5V ARGB header (not 4-pin 12V RGB). Check connections. Adjust lighting settings in GCC. |
| LCD Display Not Working/Frozen | Loose USB connection, software issue, power issue. | Check internal USB 2.0 cable connection. Ensure SATA power is connected. Restart GCC. Update GCC software. |
8. Gwarancja i wsparcie
GIGABYTE products are manufactured to the highest quality standards. This product is covered by a limited warranty. For specific warranty terms and conditions, please refer to the warranty card included with your product or visit the official GIGABYTE webstrona.
Aby uzyskać pomoc techniczną, pobrać sterowniki i uzyskać dalszą pomoc, odwiedź oficjalną stronę pomocy technicznej GIGABYTE webstrona:
Please have your product model number (GP-AORUS WATERFORCE X II 360I G2) and serial number ready when contacting support.