1. Koniec produktuview
This manual provides essential information for the safe assembly, operation, and maintenance of your Captiva Designs 4-Burner Propane Gas BBQ Grill. Please read all instructions carefully before use.

Image 1.1: The Captiva Designs 4-Burner Propane Gas BBQ Grill, featuring a main cooking area, side burner, and storage cabinet.
The Captiva Designs 4-Burner Propane Gas BBQ Grill is designed for outdoor cooking, offering a total of 46,700 BTU output. It features porcelain-enameled cast iron grates for even heat distribution and durability, a side burner for additional cooking flexibility, and a built-in thermometer for temperature monitoring.
2. Informacje dotyczące bezpieczeństwa
OSTRZEŻENIE: Wyłącznie do użytku na zewnątrz. Nie przechowywać ani nie używać benzyny ani innych łatwopalnych oparów i cieczy w pobliżu tego ani żadnego innego urządzenia.
- Grilla należy zawsze używać na równej i stabilnej powierzchni.
- Keep the grill area clear and free from combustible materials, gasoline, and other flammable vapors and liquids.
- Maintain a minimum clearance of 10 inches from the back and sides of the grill to any combustible construction.
- Nie utrudniaj przepływu powietrza do spalania i wentylacji.
- Nigdy nie pozostawiaj grilla bez nadzoru podczas jego używania.
- Trzymaj dzieci i zwierzęta z dala od grilla przez cały czas.
- Podczas pracy z gorącymi elementami należy zawsze nosić rękawice ochronne.
- Ensure the propane tank is securely connected and checked for leaks before each use.
- Turn off all burner controls and the propane tank valve when the grill is not in use.
3. Zawartość opakowania
Before assembly, ensure all parts are present and undamaged. The package should include:
- Pokrywka grilla
- Main Grill Body
- Zespół palnika bocznego
- Porcelain-Enameled Cast Iron Grates
- Stojak na ocieplenie
- Pogromcy płomieni
- Grease Tray and Grease Box
- Wąż propanowy i regulator (wąż przejściowy)
- Uchwyt na narzędzia
- Caster Wheels (2 locking, 2 non-locking)
- Hardware Pack (screws, bolts, washers)
- Instrukcja obsługi
4. Instrukcja montażu
Assembly is required for this grill. It is recommended to have two people for assembly. Follow the detailed instructions provided in the included user manual. Ensure all connections are secure before proceeding to setup.

Image 4.1: Overall dimensions of the grill: 48.6"W x 19.1"D x 45.1"H, with a cooking height of 35.5 inches.
5. Konfiguracja
5.1 Podłączenie zbiornika propanu
- Upewnij się, że wszystkie pokrętła palnika są ustawione w pozycji „WYŁĄCZONE”.
- Place the propane tank (not included) into the designated storage area within the grill cabinet.
- Connect the regulator hose to the propane tank valve. Hand-tighten firmly. Do not use tools.
- Open the propane tank valve slowly, turning counter-clockwise.
- Perform a leak test: Apply a soapy water solution to the hose and connections. If bubbles appear, there is a leak. Tighten connections or replace parts as necessary. Do not use the grill if a leak is detected.

Image 5.1: The internal cabinet provides secure storage for a standard propane tank.
5.2 Początkowe wypalenie
Before cooking for the first time, perform an initial burn-off to remove any manufacturing residues:
- With the lid open, turn one main burner control knob to 'HIGH'.
- Once lit, turn on the remaining main burners to 'HIGH'.
- Close the lid and allow the grill to heat for 10-15 minutes.
- Turn all burners to 'OFF' and close the propane tank valve.
6. Instrukcja obsługi
6.1 Lighting the Main Burners
- Sprawdź, czy zawór zbiornika propanu jest otwarty.
- Otwórz pokrywę grilla.
- Push and turn one main burner control knob to the 'HIGH' position. You should hear an ignition click.
- Verify the burner is lit by looking through the cooking grates. If it does not light within 5 seconds, turn the knob to 'OFF', wait 5 minutes, and repeat the process.
- Once one burner is lit, you can light the adjacent burners by turning their control knobs to 'HIGH'.

Image 6.1: Control knobs for individual burners, allowing precise temperature adjustment.
6.2 Using the Side Burner
- Otwórz pokrywę palnika bocznego.
- Naciśnij i obróć pokrętło sterujące palnikiem bocznym do pozycji „WYSOKA”.
- Verify the burner is lit. If it does not light, turn the knob to 'OFF', wait 5 minutes, and repeat.
- Dostosuj płomień według potrzeb.

Image 6.2: The integrated side burner provides additional cooking capacity for sauces or side dishes.
6.3 Kontrola temperatury
The grill features a built-in thermometer on the lid to monitor the internal temperature. Adjust individual burner control knobs to achieve desired cooking temperatures. The porcelain-enameled cast iron grates ensure even heat distribution across the 360 sq. in. primary cooking area.

Image 6.3: The lid-mounted thermometer displays the internal temperature of the grill.
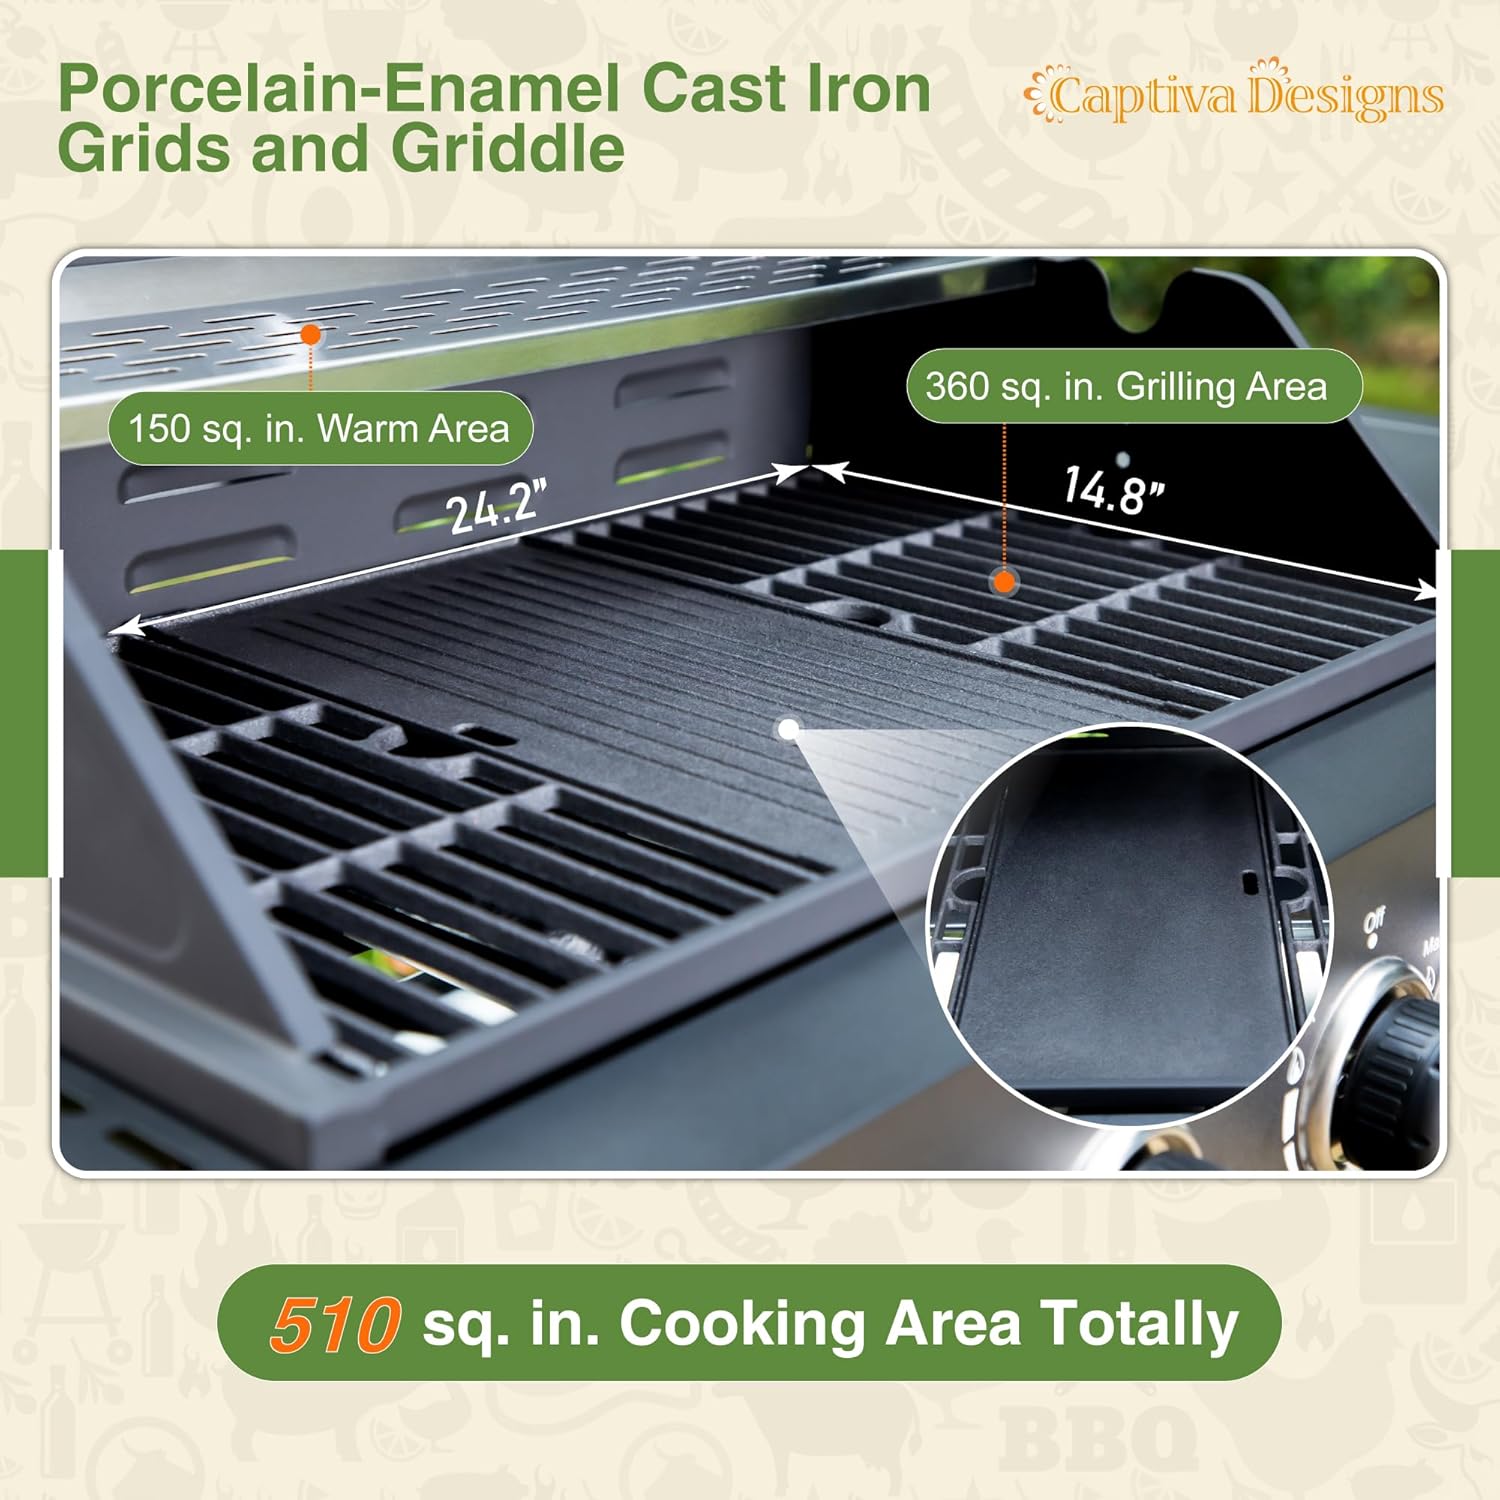
Image 6.4: The grill offers a 360 sq. in. primary grilling area and a 150 sq. in. warm rack, totaling 510 sq. in. of cooking space.
6.4 Rotisserie Cooking Area
This grill includes fixed slots on both sides of the cooking area to accommodate an optional rotisserie kit or rotisserie basket (not included). This feature allows for a wider variety of cooking methods, such as roasting large cuts of meat.

Image 6.5: Designated slots for installing an optional rotisserie kit or basket.
7. Konserwacja i czyszczenie
7.1 Cleaning the Cooking Grates
After each use, once the grill has cooled, clean the porcelain-enameled cast iron grates with a grill brush. For stubborn residue, use warm soapy water and a non-abrasive sponge.

Image 7.1: The grill features heavy-duty porcelain-enameled cast iron grates, designed for durability and even heating.
7.2 Grease Management
The grill is equipped with a full-sized slide-out grease tray and a hanging grease box. This design facilitates easy cleaning by allowing grease to flow directly into the removable box.

Image 7.2: The slide-out grease tray and removable grease box simplify post-cooking cleanup.
7.3 Czyszczenie zewnętrzne
Clean exterior surfaces with mild soap and water. Avoid abrasive cleaners or pads that could damage the finish.
8. Rozwiązywanie Problemów
| Problem | Możliwa przyczyna | Rozwiązanie |
|---|---|---|
| Palnik nie zapala się | Brak przepływu gazu; Zatkany otwór palnika; Wadliwy zapłonnik | Check propane tank valve; Clean burner ports; Contact customer service |
| Nierównomierne ogrzewanie | Clogged burner ports; Improper flame tamers placement | Clean burner ports; Ensure flame tamers are correctly positioned |
| Zapach gazu | Wyciek gazu | Immediately turn off gas supply. Perform leak test. Do not use if leak persists. |
9. Specyfikacje
- Marka: Projekty Captivy
- Numer modelu: GR022
- Wymiary produktu: 48.6" szer. x 19.1" gł. x 45.1" wys.
- Typ paliwa: Propane Gas (LPG)
- Całkowita moc wyjściowa BTU: 46,700 BTU (14 KW)
- Liczba głównych palników: 4
- Liczba palników bocznych: 1
- Główny obszar gotowania: 360 cali kw.
- Powierzchnia stojaka do podgrzewania: 150 cali kw.
- Całkowita powierzchnia gotowania: 510 cali kw.
- Materiał kratki: Porcelain-Enameled Cast Iron
- Cechy szczególne: Built-In Thermometer, Removable Grease Tray, Warming Rack, Rotisserie Kit Ready
- Wymagany montaż: Tak
- Kolor: Czarny
- Tworzywo: Alloy Steel, Cast Iron, Iron, Metal, Porcelain, Stainless Steel
10. Gwarancja i wsparcie
Captiva Designs provides professional customer service for your propane gas grill. If you encounter any problems or have questions, please contact us. We aim to respond within 24 hours to ensure your satisfaction and protect your investment.
For support, please refer to the contact information provided with your purchase documentation or visit the official Captiva Designs webstrona.