1. Wprowadzenie
This manual provides detailed instructions for the installation, operation, maintenance, and troubleshooting of the Fydun ZL-7901A Incubator Controller. This device is designed for precise and automatic control of temperature and humidity in various incubation environments, ensuring optimal conditions for successful hatching.
2. Koniec produktuview
The Fydun ZL-7901A is a high-precision digital incubator controller capable of managing both temperature and humidity. It features a clear display and intuitive controls for easy programming and monitoring.
Główne cechy:
- Precyzyjna kontrola: High-accuracy temperature and humidity regulation for stable incubator environments.
- Silna odporność na zakłócenia: Designed for reliable operation in various conditions.
- High Stability and Accuracy: Ensures consistent performance for critical incubation processes.
- Szerokie zastosowanie: Suitable for a variety of eggs including chicken, duck, goose, pigeon, quail, parrot, and peacock.
- Działanie automatyczne: Fully automatic control reduces manual intervention.
Składniki:

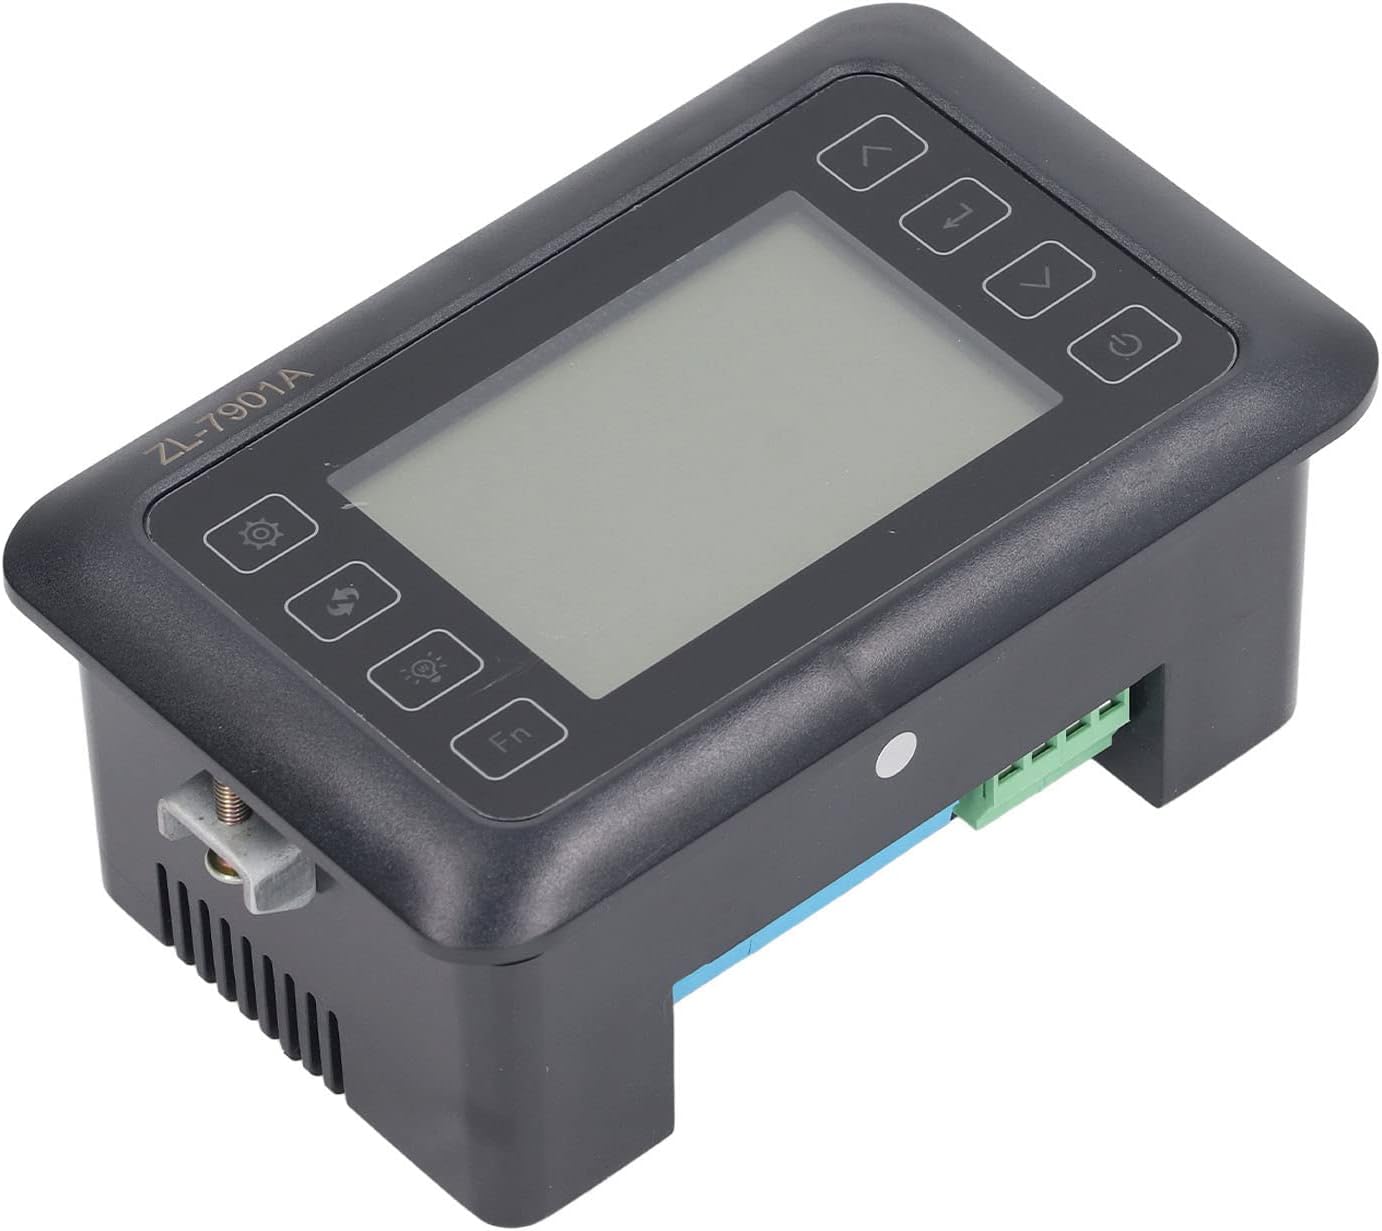
Rysunek 2.1: Przód view of the Fydun ZL-7901A Incubator Controller, showing the display and control buttons.

Rysunek 2.2: The ZL-7901A controller packaged with its temperature and humidity sensors and connecting cables.

Rysunek 2.3: The ZL-7901A controller shown in an incubator environment, demonstrating its application for egg incubation.
3. Informacje dotyczące bezpieczeństwa
- Przeczytaj uważnie wszystkie instrukcje przed instalacją i obsługą.
- Upewnij się, że napięcie zasilaniatage matches the controller's requirements (100V-240V).
- Aby zapobiec zagrożeniom elektrycznym, wszelkie prace związane z okablowaniem powinny być wykonywane przez wykwalifikowanego specjalistę.
- Nie wystawiaj kontrolera na działanie wody ani nadmiernej wilgoci.
- Trzymaj urządzenie z dala od materiałów łatwopalnych.
- Przed przystąpieniem do prac konserwacyjnych lub zmian w okablowaniu należy odłączyć zasilanie.
- To urządzenie nie jest zabawką. Trzymać poza zasięgiem dzieci.
4. Konfiguracja i instalacja
4.1 Montaż kontrolera
The ZL-7901A controller is designed for panel mounting. Ensure a secure and stable location within your incubator setup.

Rysunek 4.1: Strona view illustrating the mounting bracket for panel installation.
4.2 połączeń przewodów
Carefully connect the power supply, sensors, and output devices (heater, humidifier, fan, egg turner) to the appropriate terminals on the back of the controller. Refer to the wiring diagram provided with your product for specific connections. Ensure all connections are tight and secure.

Rysunek 4.2: Tył view of the controller, showing the terminal blocks for electrical connections.
Rysunek 4.3: Kątowy view highlighting the various connection points on the controller's side.
After all connections are made, double-check them for correctness before applying power.
5. Instrukcja obsługi
5.1 Włączanie/wyłączanie zasilania
Naciśnij Przycisk zasilania to turn the controller on or off. The display will illuminate upon power-on. The power button is located on the right side of the controller's front panel.
5.2 Wyświetl ponadview
The main display shows the current temperature and humidity readings. Additional indicators may show the status of heating, humidifying, and turning functions.
5.3 Ustawianie parametrów
- Naciśnij Przycisk Ustawienia (gear icon) to enter the parameter setting mode. This button is on the left side of the controller's front panel.
- Użyj Up (strzałka w górę) i W dół (down arrow) buttons to navigate through different parameters (e.g., target temperature, target humidity, egg turning interval). These buttons are on the right side of the controller's front panel.
- Naciśnij Przycisk Enter (return arrow icon) to select a parameter for editing. This button is on the right side of the controller's front panel.
- Użyj Up I W dół przyciski, aby dostosować wartość.
- Naciśnij Przycisk Enter ponownie, aby potwierdzić nową wartość.
- Repeat for all desired parameters.
- Wyjdź z trybu ustawień, naciskając przycisk Przycisk Ustawienia again or waiting for a timeout.
Notatka: Consult the full product manual (if provided separately) for a complete list of parameters and their functions.
5.4 przyciski funkcyjne
- Przycisk światła (light bulb icon): Controls the internal light of the incubator (if connected). This button is on the left side of the controller's front panel.
- Przycisk Fn: Activates special functions or enters advanced settings. Refer to the detailed manual for specific Fn button operations. This button is on the left side of the controller's front panel.
6. Konserwacja
6.1 Czyszczenie
- Ensure the controller is powered off and disconnected from the power source before cleaning.
- Wipe the exterior of the controller with a soft, dry cloth.
- Nie należy używać środków czyszczących o właściwościach ściernych ani rozpuszczalników, ani zanurzać urządzenia w wodzie.
- Keep the sensor probes clean and free from debris to ensure accurate readings.
6.2 Pielęgnacja czujnika
Handle the temperature and humidity sensors with care. Avoid bending or damaging the cables. If readings appear inaccurate, gently clean the sensor tips. Do not attempt to disassemble the sensors.
7. Rozwiązywanie Problemów
| Problem | Możliwa przyczyna | Rozwiązanie |
|---|---|---|
| Kontroler nie włącza się. | Brak zasilania, luźne połączenie, uszkodzony kabel zasilający. | Check power outlet; ensure all connections are secure; test power cable. |
| Niedokładne odczyty temperatury/wilgotności. | Sensor dirty or damaged; sensor not properly placed; calibration needed. | Clean sensor; reposition sensor away from direct airflow/heat; refer to advanced settings for calibration (if available). |
| Heater/Humidifier not activating. | Output device not connected; setpoint not reached; faulty output device. | Verify wiring connections; check setpoint values; test heater/humidifier independently. |
| Wyświetlacz pokazuje kod błędu. | Sensor fault; internal error. | Note the error code and consult the full product manual or contact support. |
8. Specyfikacje
| Funkcja | Szczegół |
|---|---|
| Model | ZL-7901A |
| Marka | Fydun |
| Wejście Voltage | Prąd zmienny 100V-240V |
| Typ sterowania | Fully Automatic Digital Temperature and Humidity Control |
| Dokładność | High precision for both temperature and humidity |
| Aplikacja | Incubators for various poultry and bird eggs |
| Montowanie | Montaż na panelu |
9. Gwarancja i wsparcie
Fydun is committed to providing quality products and excellent customer service. If you encounter any issues or have questions regarding your ZL-7901A Incubator Controller, please contact our customer service team.
For support, please refer to the contact information provided with your purchase or visit the official Fydun store on Amazon: Fydun Amazon Store.
Our professional customer service team is ready to assist you promptly.