JCROBOT L7C Pro Plus +
Instrukcja obsługi gimbala telefonicznego JCROBOT 3-osiowego
Model: L7C Pro Plus +
1. Wprowadzenie
Thank you for choosing the JCROBOT 3-Axis Phone Gimbal. This device is designed to provide stable and smooth video recording for smartphones, featuring an innovative magnetic AI active tracker that operates without the need for a dedicated application. This manual will guide you through the setup, operation, and maintenance of your gimbal to ensure optimal performance.
2. Zawartość opakowania
Sprawdź, czy w przesyłce znajdują się wszystkie elementy wymienione poniżej:
- JCROBOT 3-Axis Phone Gimbal
- Magnetic AI Active Tracker
- Miniaturowy statyw
- Kabel ładujący USB
- Torebka do przechowywania
- Instrukcja obsługi (ten dokument)

3. Konfiguracja
3.1 Ładowanie gimbala
Before first use, fully charge the gimbal. Connect the provided USB charging cable to the gimbal's charging port and to a USB power source. The indicator lights will show charging status.

3.2 Podłączanie smartfona
- Rozłóż stabilizator do pozycji roboczej.
- Przedłuż telefonamp i bezpiecznie umieść smartfon na środku.
- Attach the magnetic AI Active Tracker to the designated magnetic area on the phone clamp. Ensure it clicks into place. The AI tracker can be powered by the gimbal or can power the gimbal in reverse.
This gimbal is designed for immediate use without complex balancing. Simply clip your phone in the center, and it's ready.

3.3 Mocowanie statywu
For stable tabletop use or extended shooting, screw the mini tripod into the 1/4-inch thread at the bottom of the gimbal handle.
4. Obsługa gimbala
4.1 Włączanie/wyłączanie zasilania
Press and hold the power button located on the handle to turn the gimbal on or off. Indicator lights will illuminate when the device is active.
4.2 Stabilizacja 3-osiowa
The gimbal features advanced 3-axis stabilization to ensure your footage remains smooth and free of shake, regardless of hand movement. This technology automatically compensates for motion, providing professional-grade stability.

4.3 Magnetic AI Active Tracker
The AI Active Tracker provides intelligent face and body tracking without requiring any external application. It ensures the subject remains in focus and centered within the frame. The tracker can rotate 180 degrees for forward and reverse tracking.

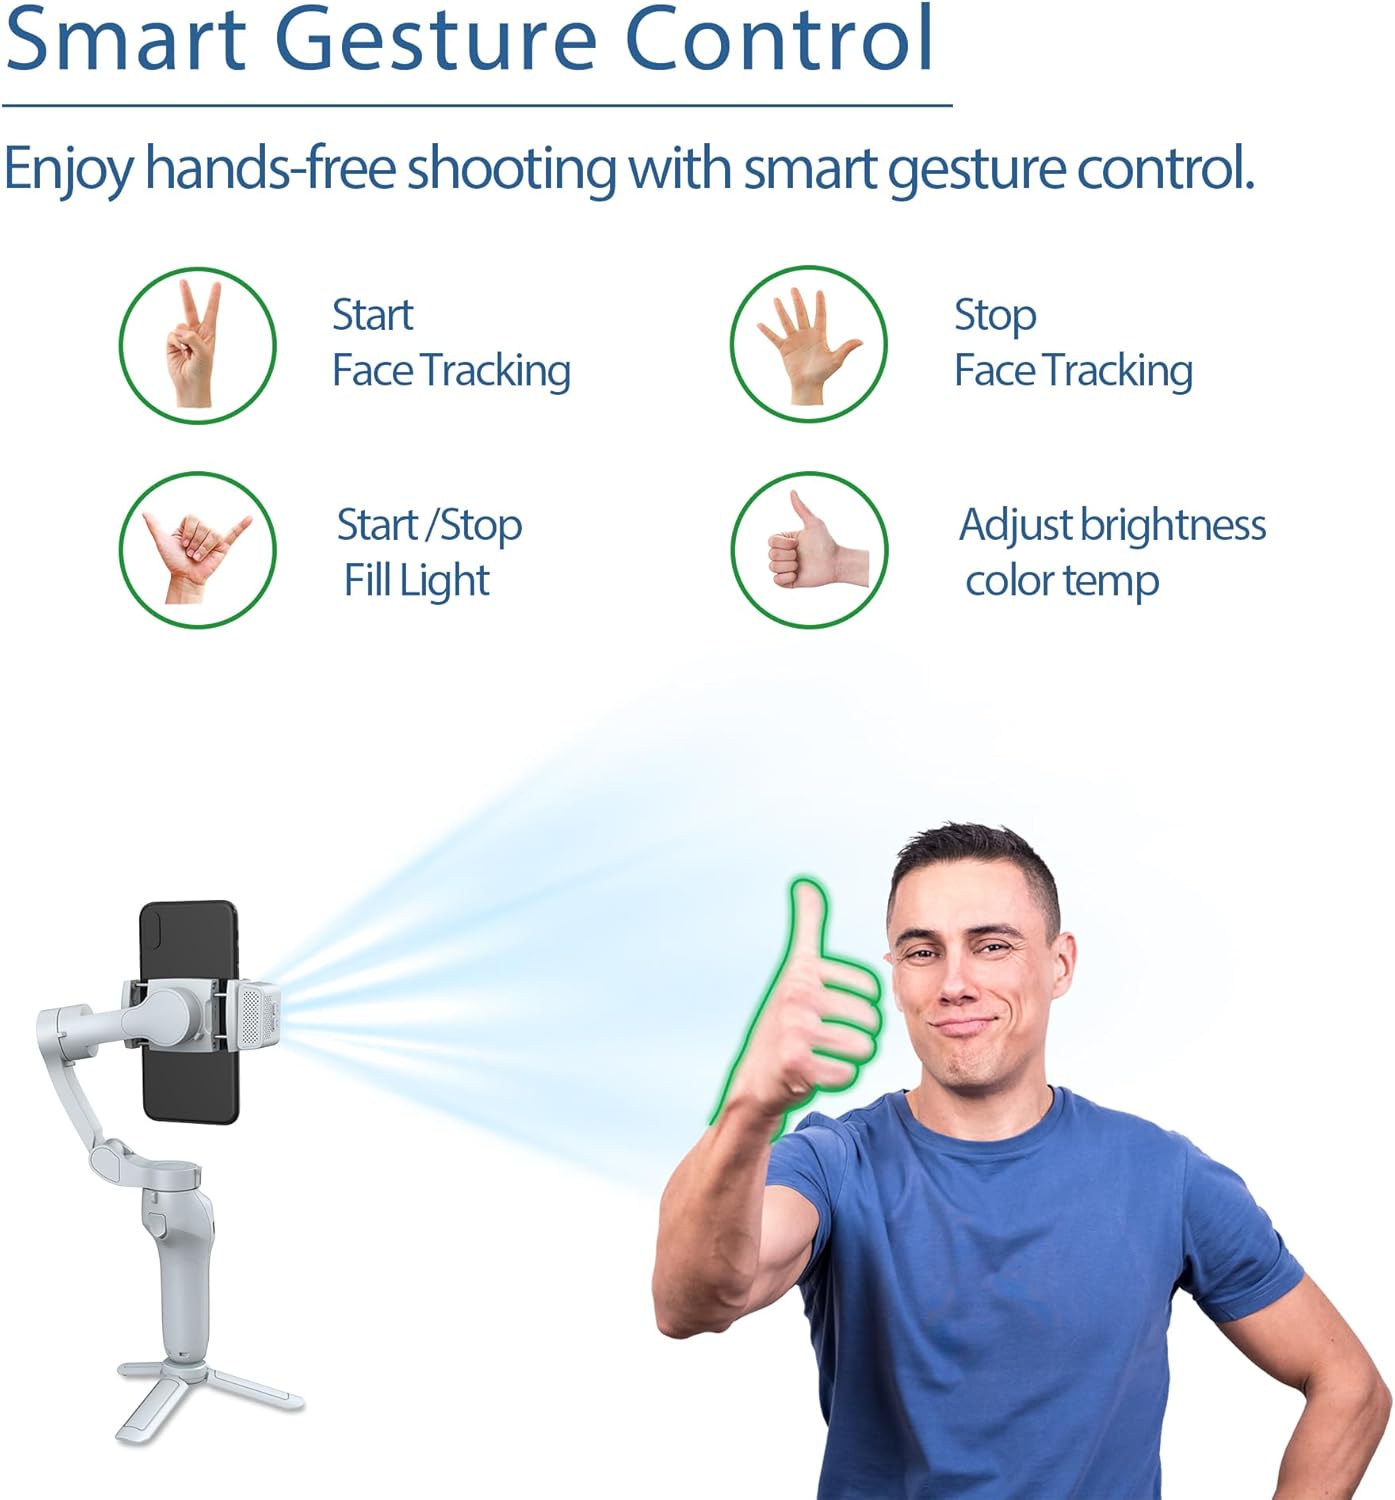
4.4 Sterowanie gestami
The AI tracking unit supports gesture control for hands-free operation:
- Start Face Tracking: Make a 'V' sign with your fingers.
- Stop Face Tracking: Show an open palm.
- Start/Stop Fill Light: Make an 'OK' sign.
- Adjust Brightness/Color Temperature: Give a 'thumbs up' gesture.
4.5 Wypełnij światłem
The AI tracking unit integrates a fill light with 3 different color temperatures and 9 levels of brightness settings. This allows you to customize lighting for various shooting conditions and enhance your video quality.
4.6 Multiple Shooting Angles
The gimbal supports a variety of shooting angles to capture dynamic shots:
- Pan (Horizontal Rotation): 340°
- Tilt (Vertical Rotation): 160°
- Roll (Rotation along lens axis): 325°

5. Konserwacja
5.1 Czyszczenie
Przetrzyj gimbal miękką, suchą ściereczką. Nie używaj płynnych środków czyszczących ani rozpuszczalników, ponieważ mogą one uszkodzić urządzenie.
5.2 Przechowywanie
When not in use, fold the gimbal to its compact size and store it in the provided storage pouch. Keep it in a cool, dry place away from direct sunlight and extreme temperatures.

5.3 Pielęgnacja baterii
To prolong battery life, avoid fully discharging the battery frequently. Charge the gimbal regularly, even if not in use for extended periods.
6. Rozwiązywanie Problemów
6.1 Gimbal nie włącza się
- Ensure the gimbal is fully charged. Connect it to a power source and wait for the charging indicator to show sufficient charge.
- Naciśnij i przytrzymaj przycisk zasilania przez kilka sekund, aby upewnić się, że sygnał został zarejestrowany.
6.2 Niestabilna wersja Footage
- Upewnij się, że Twój smartfon jest bezpiecznie podłączonyamped in the center of the phone holder.
- Check for any obstructions preventing the gimbal motors from moving freely.
- Verify the gimbal is powered on and properly initialized.
6.3 AI Tracker Not Responding
- Ensure the AI Active Tracker is securely attached to the magnetic mount.
- Check if the AI tracker's indicator light is on.
- Ensure you are performing the gestures correctly and within the tracker's detection range.
6.4 Problemy z ładowaniem
- Wypróbuj inny kabel ładujący USB i zasilacz.
- Ensure the charging port on the gimbal is clean and free of debris.
7. Specyfikacje
| Funkcja | Szczegół |
|---|---|
| Producent | JCROBOT |
| Numer modelu | L7C Pro Plus + |
| Wymiary produktu | Wymiary 11 x 4.65 x 15.19 cm |
| Waga przedmiotu | 353.8 g (0.78 funta) |
| Maksymalna zalecana waga | 0.66 funtów |
| Rozmiar po złożeniu | 5.98 x 4.33 x 1.83 cala |
| Baterie | 1 bateria litowo-jonowa (w zestawie) |
| Kompatybilne urządzenia | Telefon komórkowy |
| Kolor | Szary |
8. Gwarancja i wsparcie
For warranty information and detailed support, please refer to the official JCROBOT website or the warranty card included with your product. If you encounter issues not covered in this manual, please contact JCROBOT customer service for assistance.
Obsługa klienta: Proszę odwiedzić oficjalną stronę producenta webstrona dla danych kontaktowych.
Ask a question about this manual
Ask about setup, troubleshooting, compatibility, parts, safety, or missing instructions. Manuals+ will review the question and use this page’s manual context to help answer it.