1. Wprowadzenie
Thank you for choosing the AVATTO WT400-16A-B Smart WiFi Thermostat. This device is designed to provide intelligent temperature control for your water heater and gas boiler systems, offering convenience through programmable schedules, app control, and voice commands. Please read this manual carefully before installation and operation to ensure proper use and optimal performance.
2. Informacje dotyczące bezpieczeństwa
- Always disconnect power to the heating system before installing or servicing the thermostat.
- Instalację powinien wykonać wykwalifikowany elektryk lub technik ogrzewania.
- Nie wystawiaj termostatu na działanie wody i nadmiernej wilgoci.
- Upewnij się, że wszystkie połączenia przewodów są solidne i zgodne z lokalnymi przepisami elektrycznymi.
- Trzymaj baterie poza zasięgiem dzieci. Zużyte baterie utylizuj w sposób odpowiedzialny.
3. Zawartość opakowania
Sprawdź, czy w przesyłce znajdują się wszystkie elementy:
- AVATTO WT400-16A-B Thermostat Unit
- Instrukcja obsługi
- Śruby montażowe (2 szt.)
- NTC Sensor Cable (3 meters)
4. Koniec produktuview
4.1 Główne cechy
- Inteligentne sterowanie WiFi: Connects directly to 2.4 GHz Wi-Fi for remote control via smartphone app.
- Sterowanie głosowe: Kompatybilny z Amazon Alexa i Google Assistant, co umożliwia obsługę bez użycia rąk.
- Programowalne harmonogramy: Offers 6 distinct heating programs for weekdays and 2 for weekends, optimizing energy use.
- Funkcjonalność ogrzewania i chłodzenia: Supports both heating and cooling modes for year-round comfort.
- Duży wyświetlacz LCD: A 4.6-inch screen clearly shows room temperature, set temperature, operating status, battery level, day, and time.
- Łatwa instalacja: Designed for surface mounting with potential-free output (NO, NC, COM).
- Opcje podwójnego zasilania: Operates on AAA batteries with an optional Type-C power input.
4.2 Wyświetlacz i elementy sterujące
The thermostat features a clear LCD screen and an intuitive rotary knob for adjustments.
4.3 Zgodność
This thermostat is designed for use with water heaters and gas boilers that have dry contact connections. To jest not compatible with electric underfloor heating systems or instantaneous electric water heaters.

Image: This diagram illustrates the thermostat's compatibility. It is compatible with gas boilers featuring dry contact connections (indicated by a checkmark) and is not compatible with electric heating systems or actuator valves (indicated by cross marks).
5. Konfiguracja
5.1 Instalacja
The thermostat is designed for surface mounting. Choose a suitable location on an interior wall, away from direct sunlight, drafts, or heat sources that could affect temperature readings.
- Odłącz zasilanie: Wyłącz główne zasilanie systemu grzewczego za pomocą wyłącznika automatycznego.
- Zamontuj płytę tylną: Detach the front panel of the thermostat from its backplate. Secure the backplate to the wall using the provided screws.
- Okablowanie: Connect the heating system wires to the NO (Normally Open), NC (Normally Closed), and COM (Common) terminals on the backplate. Refer to your heating system's manual for specific wiring diagrams. The thermostat provides a potential-free output.
- Zamontuj panel przedni: Once wiring is complete and secure, reattach the front panel to the backplate.
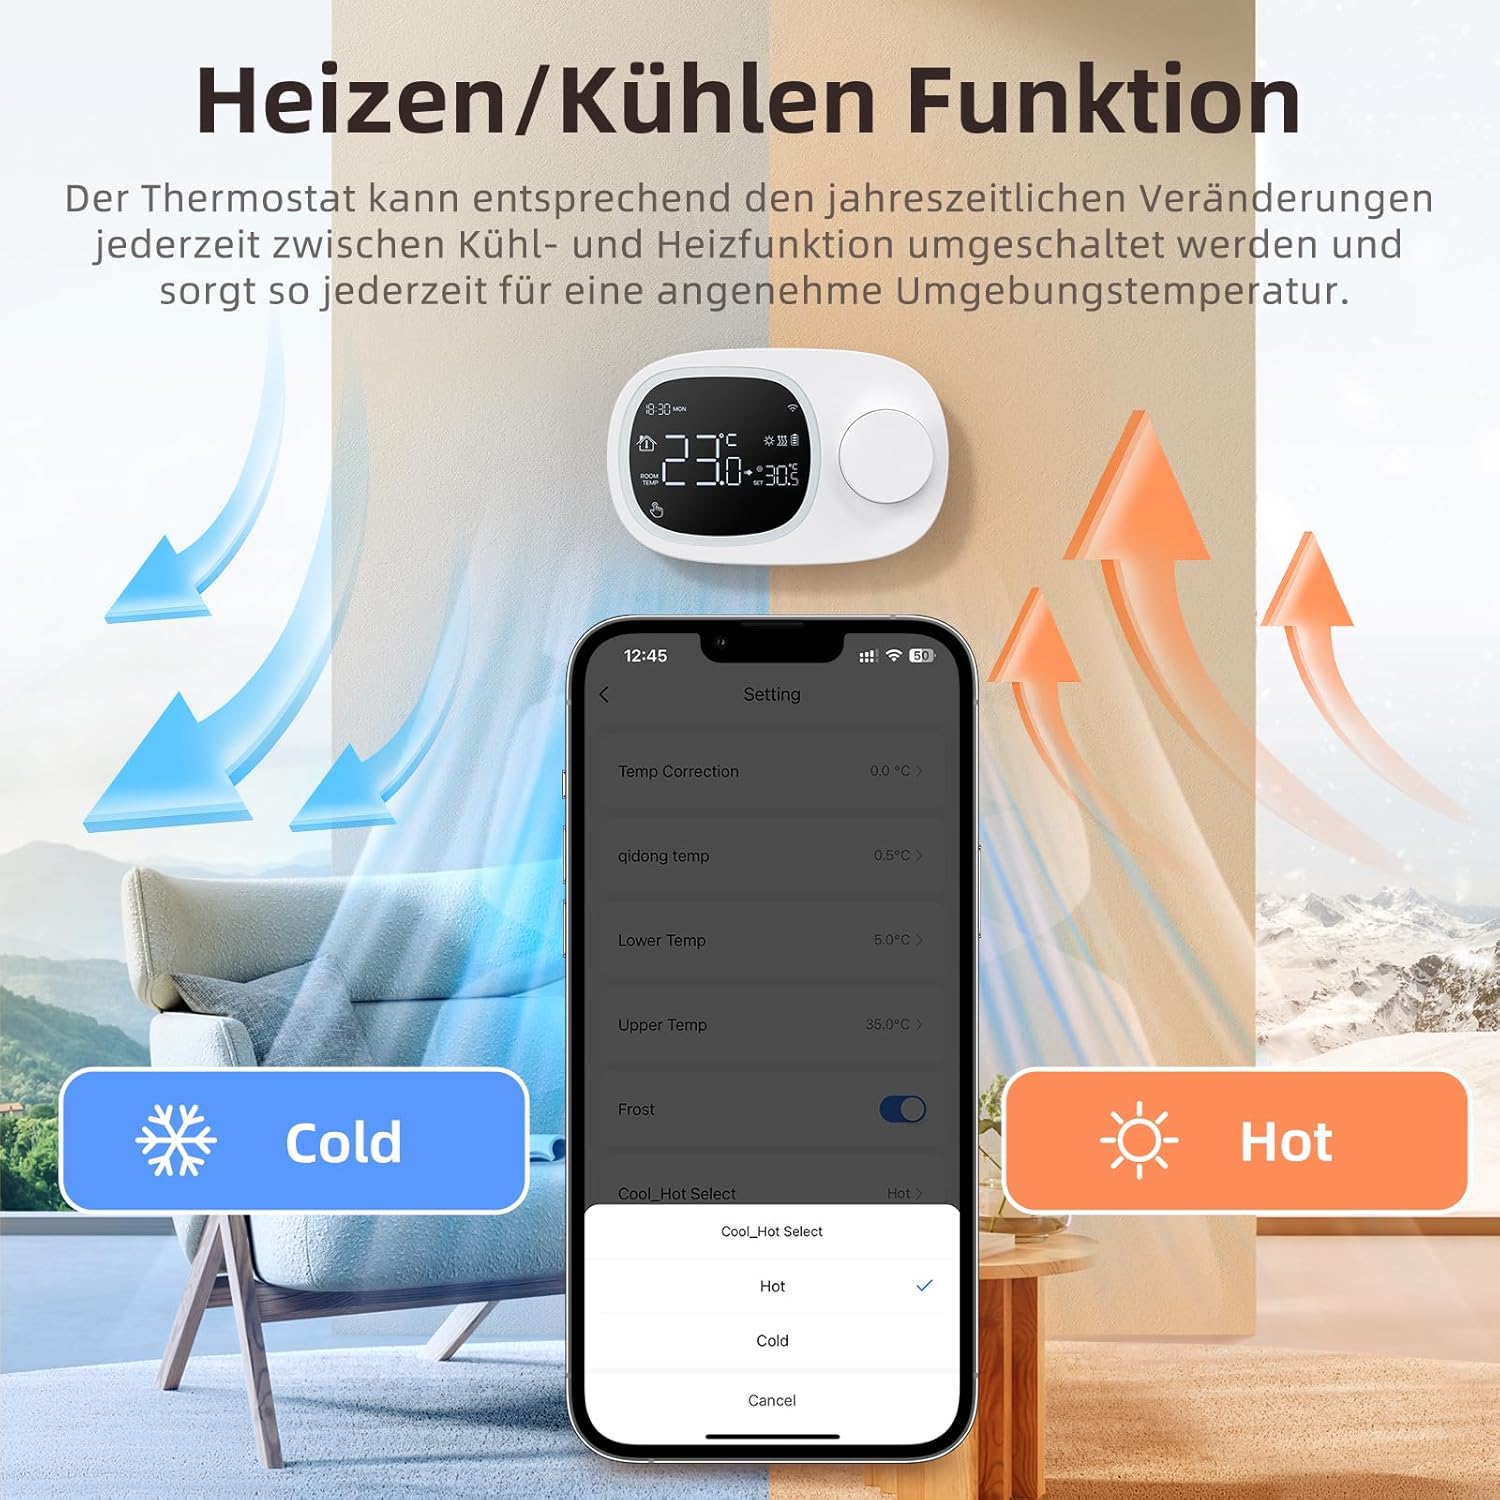
Image: This image shows the thermostat's backplate with wiring terminals and its physical dimensions (13.3 cm width, 8.6 cm height, 2.5 cm depth).
5.2 Zasilanie
The thermostat can be powered by three AAA batteries or via a Type-C USB connection.
- Montaż baterii: Open the battery compartment on the back of the thermostat and insert three AAA batteries, observing the correct polarity. The screen will display the battery level. Under normal operation, batteries typically last about 6 months.
- Type-C Power (Optional): For continuous power, you can connect a Type-C USB cable to the designated port.

Image: This image illustrates the battery compartment for AAA batteries and the Type-C port for alternative power input.
5.3 Połączenie Wi-Fi
To enable smart features, connect your thermostat to your home's 2.4 GHz Wi-Fi network.
- Pobierz aplikację: Download and install the 'Smart Life' or 'AVATTO' app from your smartphone's app store.
- Zarejestruj się/Zaloguj: Utwórz konto lub zaloguj się do aplikacji.
- Dodaj urządzenie: In the app, select 'Add Device' or the '+' icon. Choose 'Thermostat' or 'Heating Control'.
- Tryb parowania: Follow the in-app instructions to put the thermostat into pairing mode (usually involves pressing and holding a button on the thermostat until a Wi-Fi icon flashes).
- Połącz się z Wi-Fi: Ensure your mobile phone is connected to your home's 2.4 GHz Wi-Fi network. Enter your Wi-Fi password in the app.
- Pełna konfiguracja: The app will guide you through the final steps to connect the thermostat.
6. Instrukcja obsługi
6.1 Podstawowa obsługa
- Włączanie/wyłączanie: Naciśnij przycisk zasilania, aby włączyć lub wyłączyć termostat.
- Dostosuj temperaturę: Rotate the knob to set your desired room temperature. The display will show both the current room temperature and the set temperature.
6.2 Tryby programowalne
The thermostat allows you to set a weekly schedule to automatically adjust the temperature.
- Weekday Programs: Set up to 6 different heating periods for Monday to Friday.
- Weekend Programs: Set up to 2 heating periods per day for Saturday and Sunday.
- Setting Schedule: Access the programming menu via the thermostat's interface or the Smart Life/AVATTO app to configure your desired times and temperatures for each period.

Image: This image displays the app interface for setting a weekly programmable schedule, showing different time slots and temperatures for each day.
6.3 Kontrola aplikacji
Control your thermostat remotely using the Smart Life or AVATTO app.
- Zdalna regulacja temperatury: Zmień ustawioną temperaturę z dowolnego miejsca.
- Zarządzanie harmonogramem: Easily create, modify, or disable heating schedules.
- Przełączanie trybu: Switch between heating and cooling modes.
- Udostępnianie urządzenia: Podziel się kontrolą nad termostatem z członkami rodziny.
6.4 Sterowanie głosowe
Integrate your thermostat with Amazon Alexa or Google Assistant for convenient voice commands.
- Łączenie kont: Follow the instructions in the Smart Life/AVATTO app to link your account with Alexa or Google Assistant.
- Polecenia głosowe: Użyj poleceń takich jak:
- „Alexa, ustaw [Nazwa termostatu] na 22 stopnie”.
- "Hey Google, what is the temperature in [Room Name]?"

Image: This image demonstrates remote control via the Smart Life app and voice control using an Alexa device, showing a command to set the room temperature.
6.5 Funkcja grzania i chłodzenia
The thermostat supports both heating and cooling modes. You can switch between these functions as needed to maintain a comfortable ambient temperature throughout the year.
- Wybór trybu: The mode can typically be changed through the thermostat's menu settings or directly within the Smart Life/AVATTO app.
- Histereza temperatury: The thermostat features precise temperature control with adjustable hysteresis (0.5-10°C) to prevent rapid cycling of your heating/cooling system.
- Ograniczenia temperatur: Set minimum and maximum temperature limits (e.g., 5-35°C) to ensure safe and efficient operation.

Image: This image illustrates the heating and cooling functions, showing temperature arrows and the app interface for selecting 'Hot' or 'Cold' modes.
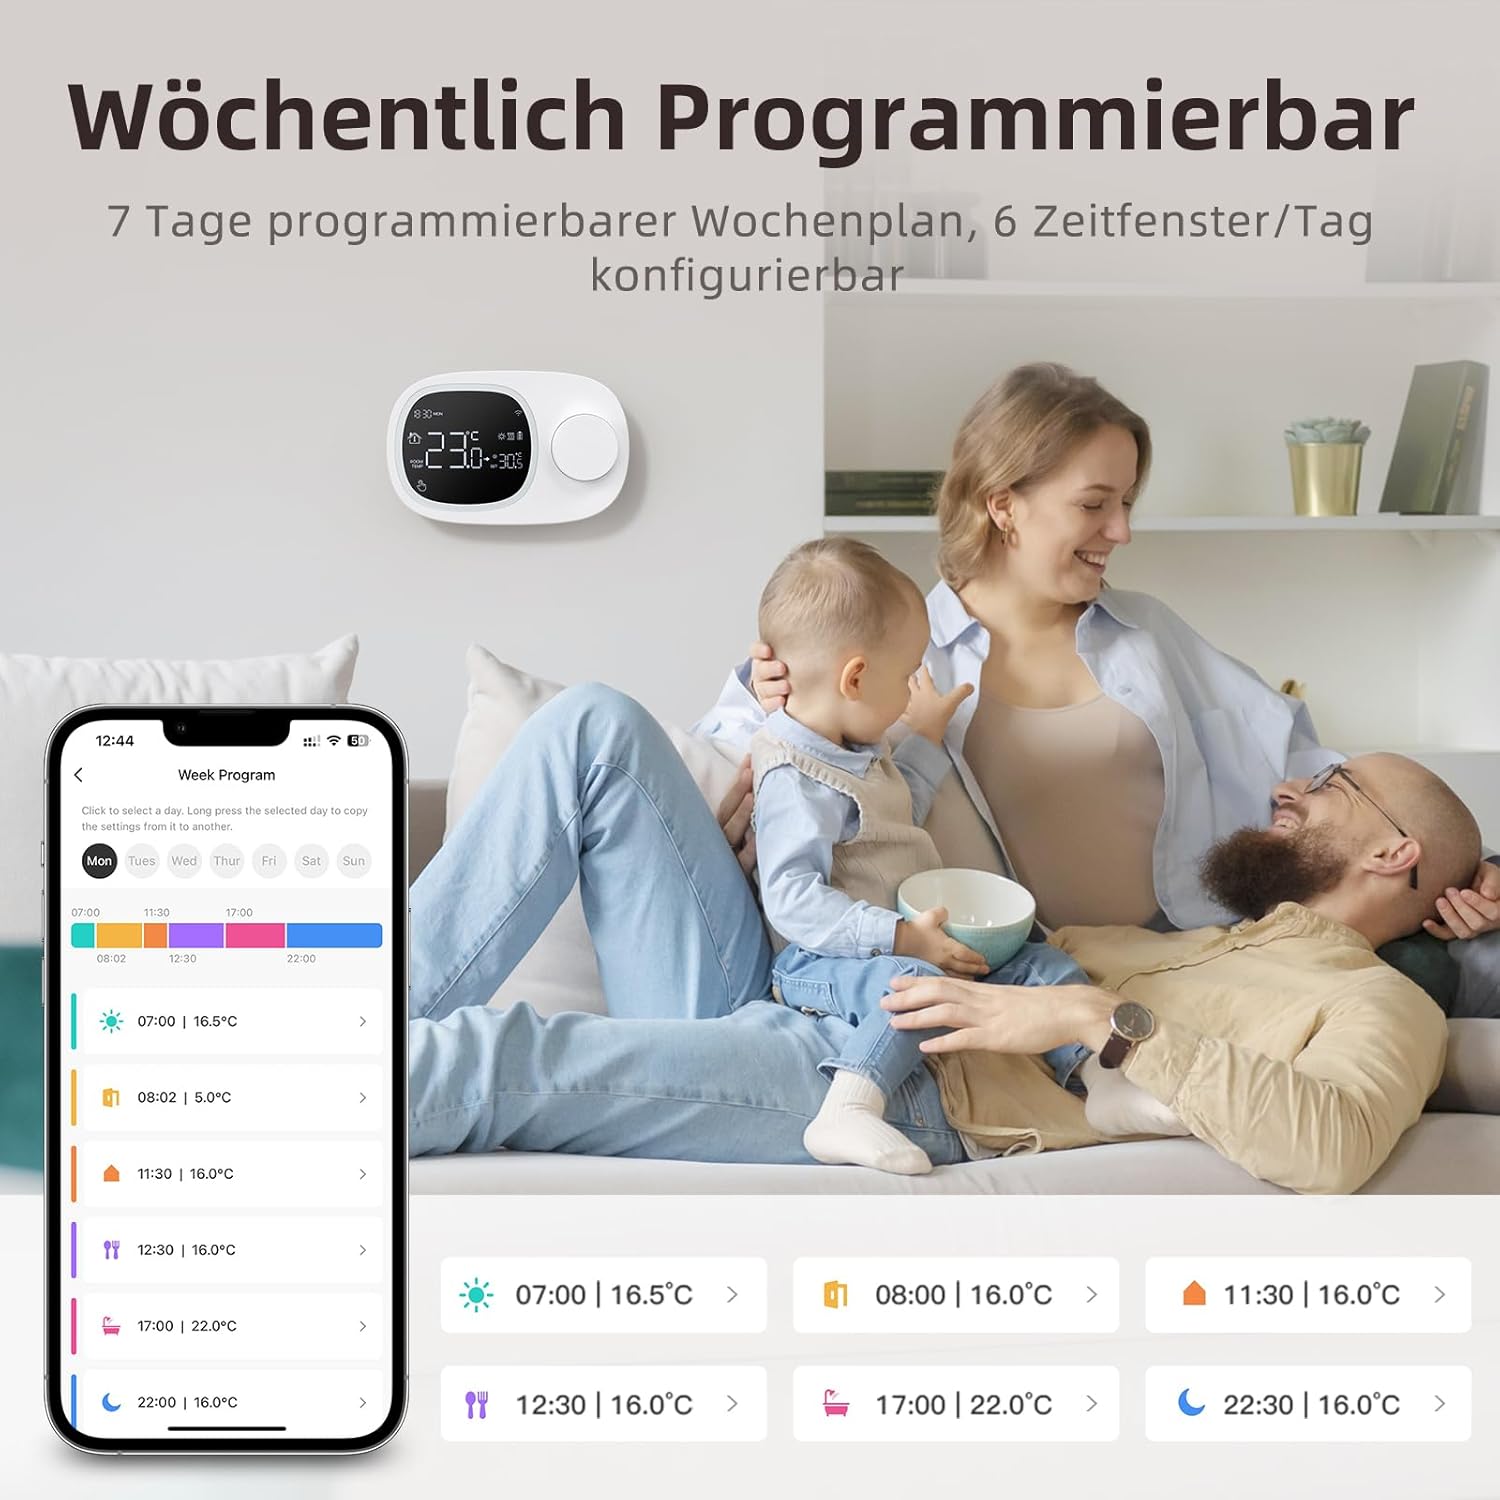
Image: This image highlights the precise temperature control features, including temperature hysteresis (0.5-10°C), minimum temperature setting (0.5°C), and upper/lower temperature limits (5-35°C).
7. Konserwacja
7.1 Wymiana baterii
When the battery level indicator on the screen shows low power, replace the three AAA batteries promptly to ensure continuous operation. Refer to section 5.2 for battery installation instructions.
8. Rozwiązywanie Problemów
Jeśli masz problemy z termostatem, zapoznaj się z poniższymi typowymi problemami i rozwiązaniami:
| Problem | Możliwa przyczyna / rozwiązanie |
|---|---|
| Termostat się nie włącza. | Check if the AAA batteries are correctly inserted and charged. Ensure the power button is functioning. If using Type-C power, verify the cable connection. |
| Confused characters appear on the screen. | This may indicate an installation issue. Reinstall the device, ensuring all connections are secure. |
| Displayed temperature is inaccurate. | Access the advanced menu mode on the thermostat or the calibration menu in the Smart Life/Tuya app to adjust temperature settings. |
| Device starts normally, but screen does not show output temperature. | Check the connection between the main control board and the power board. Verify that all wiring is correct according to the markings on the device connector. |
| Nie można połączyć się z siecią Wi-Fi. | Ensure your router is broadcasting a 2.4 GHz Wi-Fi signal. Confirm your mobile phone is connected to the 2.4 GHz network during pairing. Check Wi-Fi password. |
9. Specyfikacje
- Marka: ZAPRASZAM
- Numer modelu: WT400-16A-B (also referred to as WT580)
- Kolor: Czarny
- Wymiary (termostat): Około 13.3 x 8.6 x 2.5 cm
- Waga przedmiotu: 270 gramów
- Power Output (Heating System): Do 3800 watów
- Tomtage: 240 V (AC)
- Tworzywo: Plastikowy
- Power Source (Thermostat): 3 x AAA Batteries (sold separately), optional Type-C USB
- Łączność: Wi-Fi (2.4 GHz), Bluetooth
- Rodzaj kontrolera: Amazon Alexa, Asystent Google
- Cechy szczególne: Voice control, LCD display (temperature, weather, time, date, room temp, heating icon), 0.5°C temperature increments, Silent operation, Smart Life/Tuya Smart remote control.
- Konkretne zastosowania produktu: Water heaters and gas boilers with dry contact.
10. Gwarancja i wsparcie
Information regarding specific warranty details is not available in this document. For technical assistance, troubleshooting, or any questions not covered in this manual, please contact AVATTO customer support. You may also find additional support resources through the Smart Life or AVATTO application.