1. Wprowadzenie
Thank you for choosing the Chihiros A Series LED Aquarium Light. This light is specifically designed to promote healthy growth of aquatic plants in your aquarium. Featuring 5730 LED chips and an 8000K color temperature, it provides optimal lighting conditions for a vibrant aquatic environment. Please read this manual carefully before installation and operation to ensure safe and efficient use.

Obraz 1: Widok z góry na dół view of the Chihiros A Series LED Aquarium Light.
2. Instrukcje bezpieczeństwa
- Przed przystąpieniem do prac konserwacyjnych lub instalacyjnych należy zawsze odłączyć zasilanie elektryczne.
- Do not immerse the light unit or power adapter in water. This product is not submersible.
- Ensure your hands are dry when handling the power plug and socket.
- Trzymaj lampę z dala od materiałów łatwopalnych.
- Do not attempt to disassemble or modify the light unit. Refer all servicing to qualified personnel.
- Upewnij się, że objętośćtage and frequency of your power supply match the specifications of the light.
- This product is intended for indoor aquarium use only.
3. Zawartość opakowania
Sprawdź, czy wszystkie komponenty są obecne i w dobrym stanie:
- Chihiros A Series LED Aquarium Light Unit
- Zasilacz
- Acrylic Stands (pre-attached or separate, depending on model)
- Wired Dimmer (included with some models)
Notatka: Additional accessories such as remote controllers, metal brackets, and hanging kits are sold separately.
4. Specyfikacje
The Chihiros A Series LED Aquarium Light is available in various models with different lengths, power outputs, LED counts, and lumen ratings. Refer to the table below for detailed specifications.
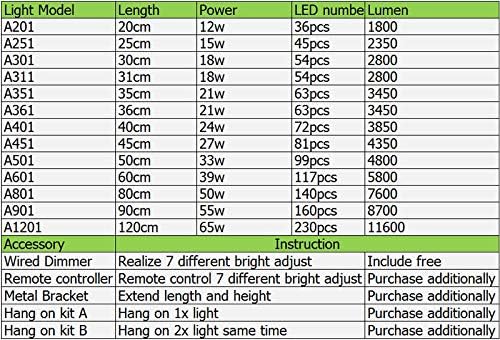
Image 2: Detailed specifications for various Chihiros A Series LED light models and available accessories.
| Model światła | Długość | Moc | Numer LED | Lumen |
|---|---|---|---|---|
| A201 | 20cm | 12 W | 36 szt. | 1800 |
| A251 | 25cm | 15 W | 45 szt. | 2350 |
| A301 | 30cm | 18 W | 54 szt. | 2800 |
| A311 | 31cm | 18 W | 54 szt. | 2800 |
| A351 | 35cm | 21 W | 63 szt. | 3450 |
| A361 | 36cm | 21 W | 63 szt. | 3450 |
| A401 | 40cm | 24 W | 72 szt. | 3850 |
| A451 | 45cm | 27 W | 81 szt. | 4350 |
| A501 | 50cm | 33 W | 99 szt. | 4800 |
| A601 | 60cm | 39 W | 117 szt. | 5800 |
| A801 | 80cm | 50 W | 140 szt. | 7600 |
| A901 | 90cm | 55 W | 160 szt. | 8700 |
| A1201 | 120cm | 65 W | 230 szt. | 11600 |
Dodatkowe informacje o produkcie:
- Temperatura barwowa: 8000 tys.
- Typ diody LED: 5730 dioda LED
- Rodzaj wykończenia: Błyszczący
- Materiał klosza: Poliwęglan
- Styl: Nowoczesny
- Zawartość zestawu: Lamp jednostka
- Metoda oświetlenia: Możliwość ściemniania
Informacje o akcesoriach:
- Wired Dimmer: Allows 7 different brightness adjustments. Included with some models.
- Pilot zdalnego sterowania: Enables 7 different brightness adjustments via remote. Purchase additionally.
- Wspornik metalowy: Used to extend light length and height. Purchase additionally.
- Hang on Kit A: For hanging one light unit. Purchase additionally.
- Hang on Kit B: For hanging two light units simultaneously. Purchase additionally.
5. Konfiguracja
5.1 Rozpakowanie
Carefully remove all components from the packaging. Inspect the light unit and accessories for any signs of damage. Keep the packaging for future storage or transport.
5.2 Montaż światła
The Chihiros A Series LED light typically comes with acrylic stands for placement directly on the aquarium rim. Ensure the stands are securely attached to the light unit and positioned stably on the aquarium edges.

Image 3: Close-up of the light unit showing the acrylic stands.
If using optional accessories like metal brackets or hanging kits, follow their specific installation instructions. Ensure the light is positioned centrally over the aquarium for even light distribution.

Image 4: Chihiros A Series LED Aquarium Light installed over an aquarium.
5.3 Podłączanie zasilania
Connect the power adapter to the light unit. Then, plug the power adapter into a suitable electrical outlet. Ensure the connection is secure and dry.
6. Instrukcja obsługi
6.1 Włączanie/wyłączanie
Once connected to power, the light can be turned on or off using the switch on the power cord or the wired dimmer, if included.
6.2 Regulacja jasności
If your light includes a wired dimmer, you can adjust the brightness through 7 different levels. Press the buttons on the dimmer to cycle through the brightness settings. If you have purchased a remote controller, refer to its specific instructions for brightness adjustment.
6.3 Recommended Usage for Aquatic Plants
For optimal aquatic plant growth, a photoperiod of 6-10 hours per day is generally recommended. The ideal brightness level will depend on the specific plant species, tank size, and CO2 injection. Start with a moderate brightness and duration, then gradually adjust based on plant response.
7. Konserwacja
- Czyszczenie: Regularly wipe the light unit and acrylic stands with a soft, damp cloth to remove dust, water spots, and algae. Ensure the light is unplugged before cleaning. Do not use harsh chemicals or abrasive materials.
- Kontrola: Periodically check the power cord and adapter for any signs of damage or wear. Ensure all connections are secure.
- Wentylacja: Ensure the light unit has adequate ventilation to prevent overheating. Do not cover the light.
8. Rozwiązywanie Problemów
- Światło się nie włącza:
- Sprawdź, czy zasilacz jest prawidłowo podłączony do lampy i gniazdka elektrycznego.
- Sprawdź, czy gniazdko elektryczne działa prawidłowo, podłączając do niego inne urządzenie.
- Ensure the switch on the power cord or dimmer is in the 'On' position.
- Światło jest słabe lub migocze:
- Check the dimmer settings to ensure it's not set to the lowest brightness.
- Ensure all connections are secure. Loose connections can cause flickering.
- Jeśli używasz pilota, sprawdź jego baterię.
- Excessive heat from the light:
- Ensure there is proper ventilation around the light unit.
- Verify that the light is not covered by any objects.
Jeśli napotkasz problemy, które nie zostały tutaj wymienione lub jeśli wykonanie czynności rozwiązywania problemów nie pomoże, skontaktuj się z obsługą klienta.
9. Gwarancja i wsparcie
9.1 Polityka gwarancyjna
Ten produkt jest dostarczany z 12-miesięczna gwarancja from the date of purchase. During this period, if you experience any quality issues with the product, you are eligible for a full refund or a replacement.
9.2 Obsługa klienta
For any questions, concerns, or warranty claims, please do not hesitate to contact our customer service team. You can typically reach us through the seller's page on the platform where you purchased the product. Our team is committed to providing prompt and detailed assistance.