Kittyhok B0BD7MJCWK
Kittyhok Wireless Security Camera System User Manual
Model: B0BD7MJCWK
1. Wprowadzenie
This manual provides detailed instructions for the setup, operation, and maintenance of your Kittyhok Wireless Security Camera System. This system includes a 10-channel NVR with a 12-inch monitor and a 1TB hard drive, along with 2K WiFi security cameras and PTZ outdoor security cameras featuring 360-degree viewing, auto-tracking, human detection, and spotlight capabilities. Please read this manual thoroughly to ensure proper installation and optimal performance of your security system.
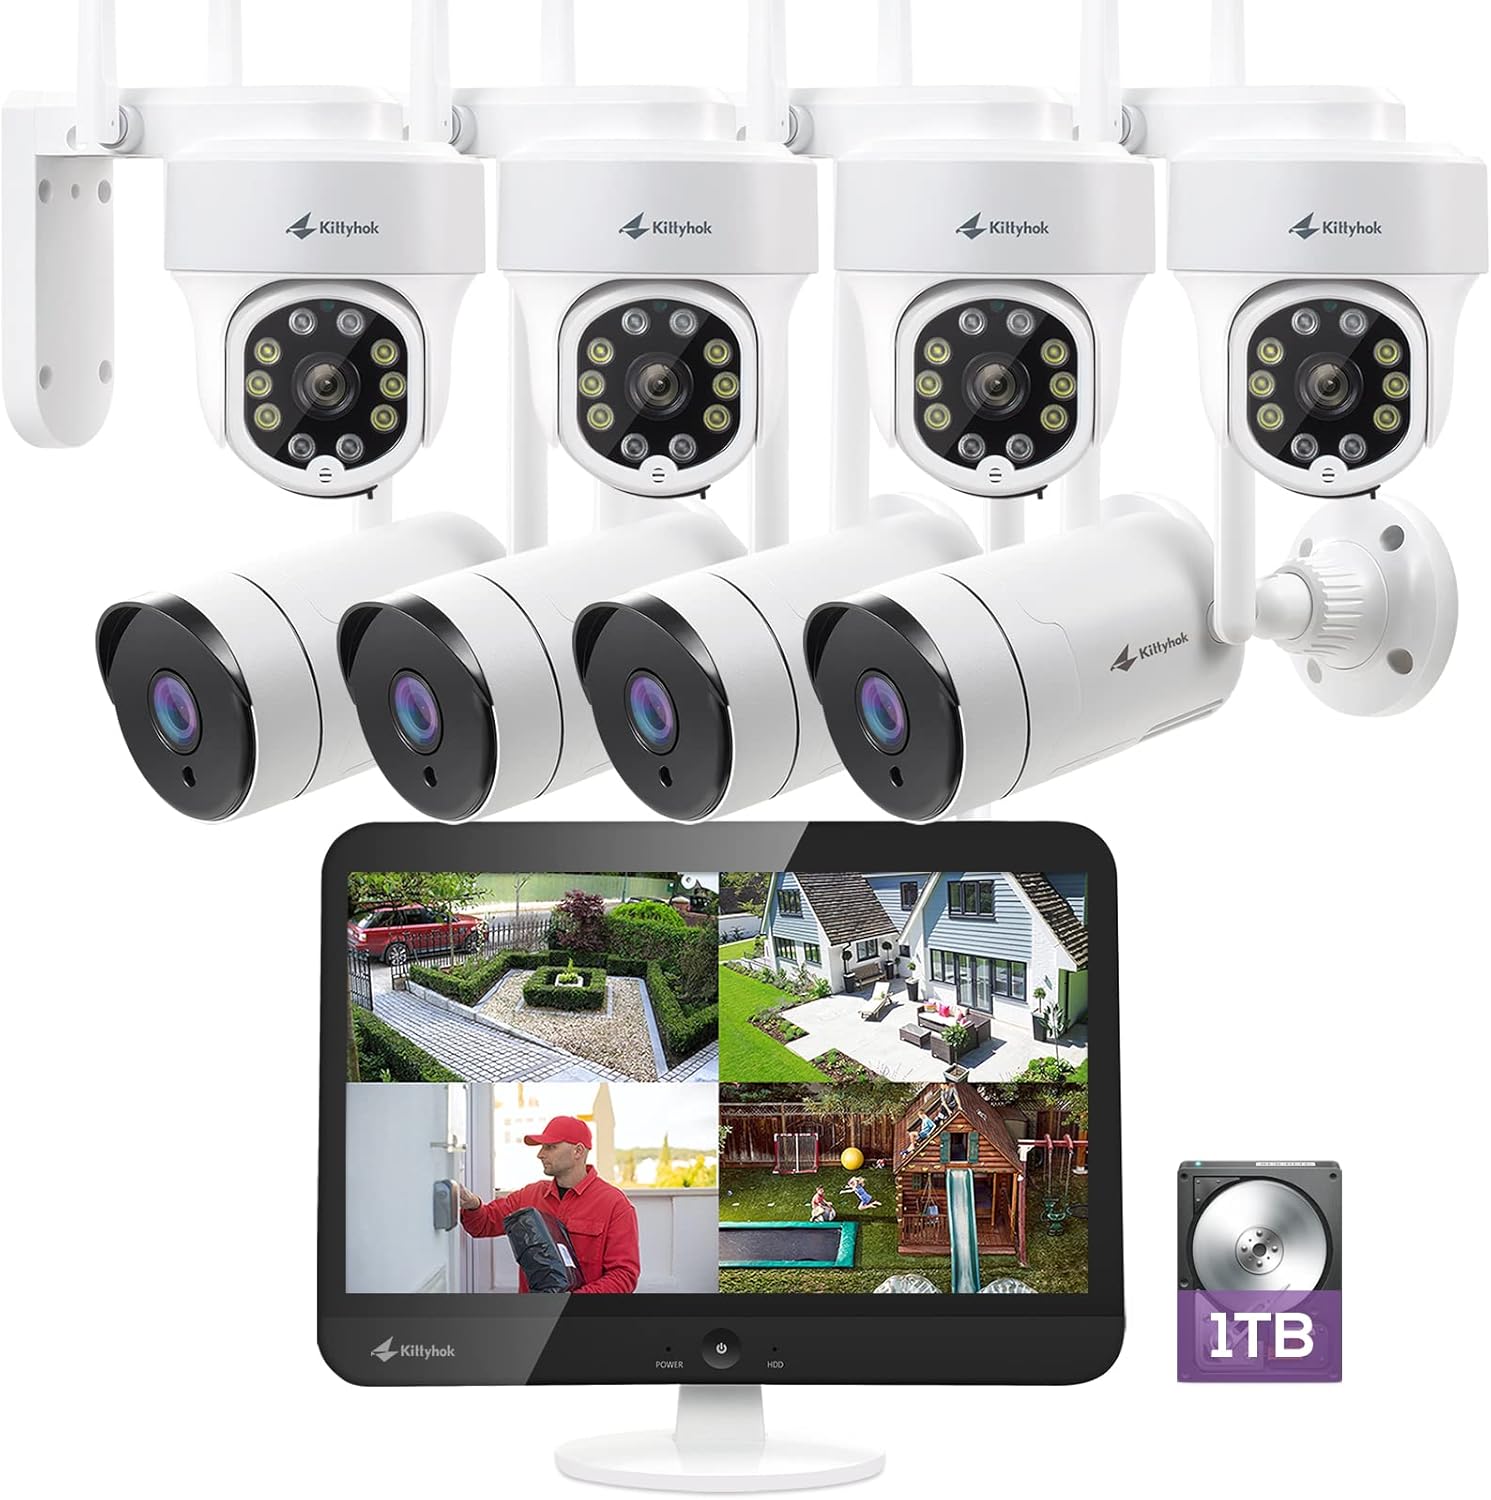
Rysunek 1.1: Koniecview of the Kittyhok Wireless Security Camera System components.
2. Co znajduje się w pudełku
Verify that all components are present and in good condition upon unboxing. The exact quantity of cameras may vary based on your specific model number.
- Mini NVR or Monitor Built-in NVR
- Kamera kopułkowa lub kulowa
- Zasilacz NVR
- Camera Power Adapter (1 per camera)
- Kabel Ethernet RJ-45
- Kabel HDMI
- Mysz USB
- Sprzęt montażowy (śruby, kotwy)

Video 2.1: Unboxing and contents of the Kittyhok Wireless Security System.
3. Wprowadzenie do NVR
Familiarize yourself with the ports and indicators on your NVR (Network Video Recorder) for proper connection and operation.
NVR Front Panel Indicators:
- Wskaźnik zasilania
- Wskaźnik dysku twardego
- Wskaźnik sieci
NVR Rear Panel Ports:
- 12V DC In (Power Input)
- USB Port (for mouse)
- HDMI Video Output (for external monitor)
- Port RJ-45 (Ethernet).
- Przycisk resetowania
- Gniazdo karty Micro SD
- Anteny NVR
- Głośnik
- SATA Hard Drive Dock (for internal HDD)

Figure 3.1: NVR and camera connection diagram.
4. Wprowadzenie do aparatu
Understand the different components of your security cameras.
Common Camera Components:
- Antena
- Uchwyt montażowy
- Obiektyw
- Infrared & Spotlight 2-in-1 LEDs
- Wbudowany mikrofon
- Głośnik
- Port zasilania
- Ethernet Port (for wired connection, if applicable)
- Reset Button (for restoring factory settings)
- Micro SD Card Slot (for local storage, if applicable)
- Czujnik światła dziennego

Figure 4.1: PTZ camera with 360-degree viewing.
5. Konfiguracja
5.1 Podłączanie systemu
- Connect the NVR to power using the included power adapter.
- Podłącz mysz USB do portu USB rejestratora NVR.
- Connect the NVR to a PC monitor or TV with an HDMI cable if your NVR does not have a built-in monitor.
- Connect the NVR to your router with an Ethernet cable for remote access, or configure Wi-Fi settings via the NVR's Network Setting menu.
- Power on all cameras using their included power adapters.
Notatka: Ensure all cameras are powered on and within range of the NVR's Wi-Fi signal for optimal performance. The system is designed for auto-pairing.

Figure 5.1: Plug and Play setup for the Kittyhok system.
5.2 Positioning Your NVR and Cameras
- Camera distance from NVR can reach up to 1300 ft. wirelessly in line of sight. Proper placement of the wireless NVR in your home will help ensure maximum coverage.
- Avoid placing the NVR near high voltage wires or other sources of electrical interference, as this can degrade signal quality.
- Install cameras 2-3 meters (7-10 ft.) above the ground. This height maximizes the detection range of the motion sensor.
- For dome cameras, they should be installed upside down for better waterproof performance and motion sensor efficiency.
- For better motion detection performance, install cameras angularly.

Figure 5.2: Auto WiFi Relay technology for extended coverage.
6. Obsługa systemu
6.1 Accessing Your System via Smartphone
Download the Kittyhok App from the App Store (iOS) or Google Play (Android) and install it on your smart device. Launch the app, register an account, and log in. Tap the '+' button and then 'Scan to add' to scan the QR code on the NVR or manually add the device.

Figure 6.1: Remote access via phone, tablet, and PC.
6.2 Accessing Your System via PC and Mac
Download and install the CMS (Central Management Software) on your computer. Log in with your phone app user account, and your system will automatically sync to the CMS.
6.3 Główne cechy
- 360° Viewing: Utilize the Pan-Tilt-Zoom (PTZ) cameras to cover every angle and eliminate blind spots. Digitally zoom in or out for detailed viewing.
- Automatyczne śledzenie: When motion is detected, the PTZ camera will automatically pan and tilt to follow the source of the motion. It returns to its 'Home Point' when the motion ceases.
- Wykrywanie człowieka: Minimize false notifications by only receiving alerts when a person is detected on your property.
- Odstraszanie aktywne: Deter unwanted guests with a motion-activated LED warning light and a remotely triggered siren.
- Rozmowa dwustronna: Communicate with visitors or deter intruders using the built-in microphone and speaker on the cameras.
- Kolorowe widzenie nocne: Experience clear, full-color video even in low-light conditions.
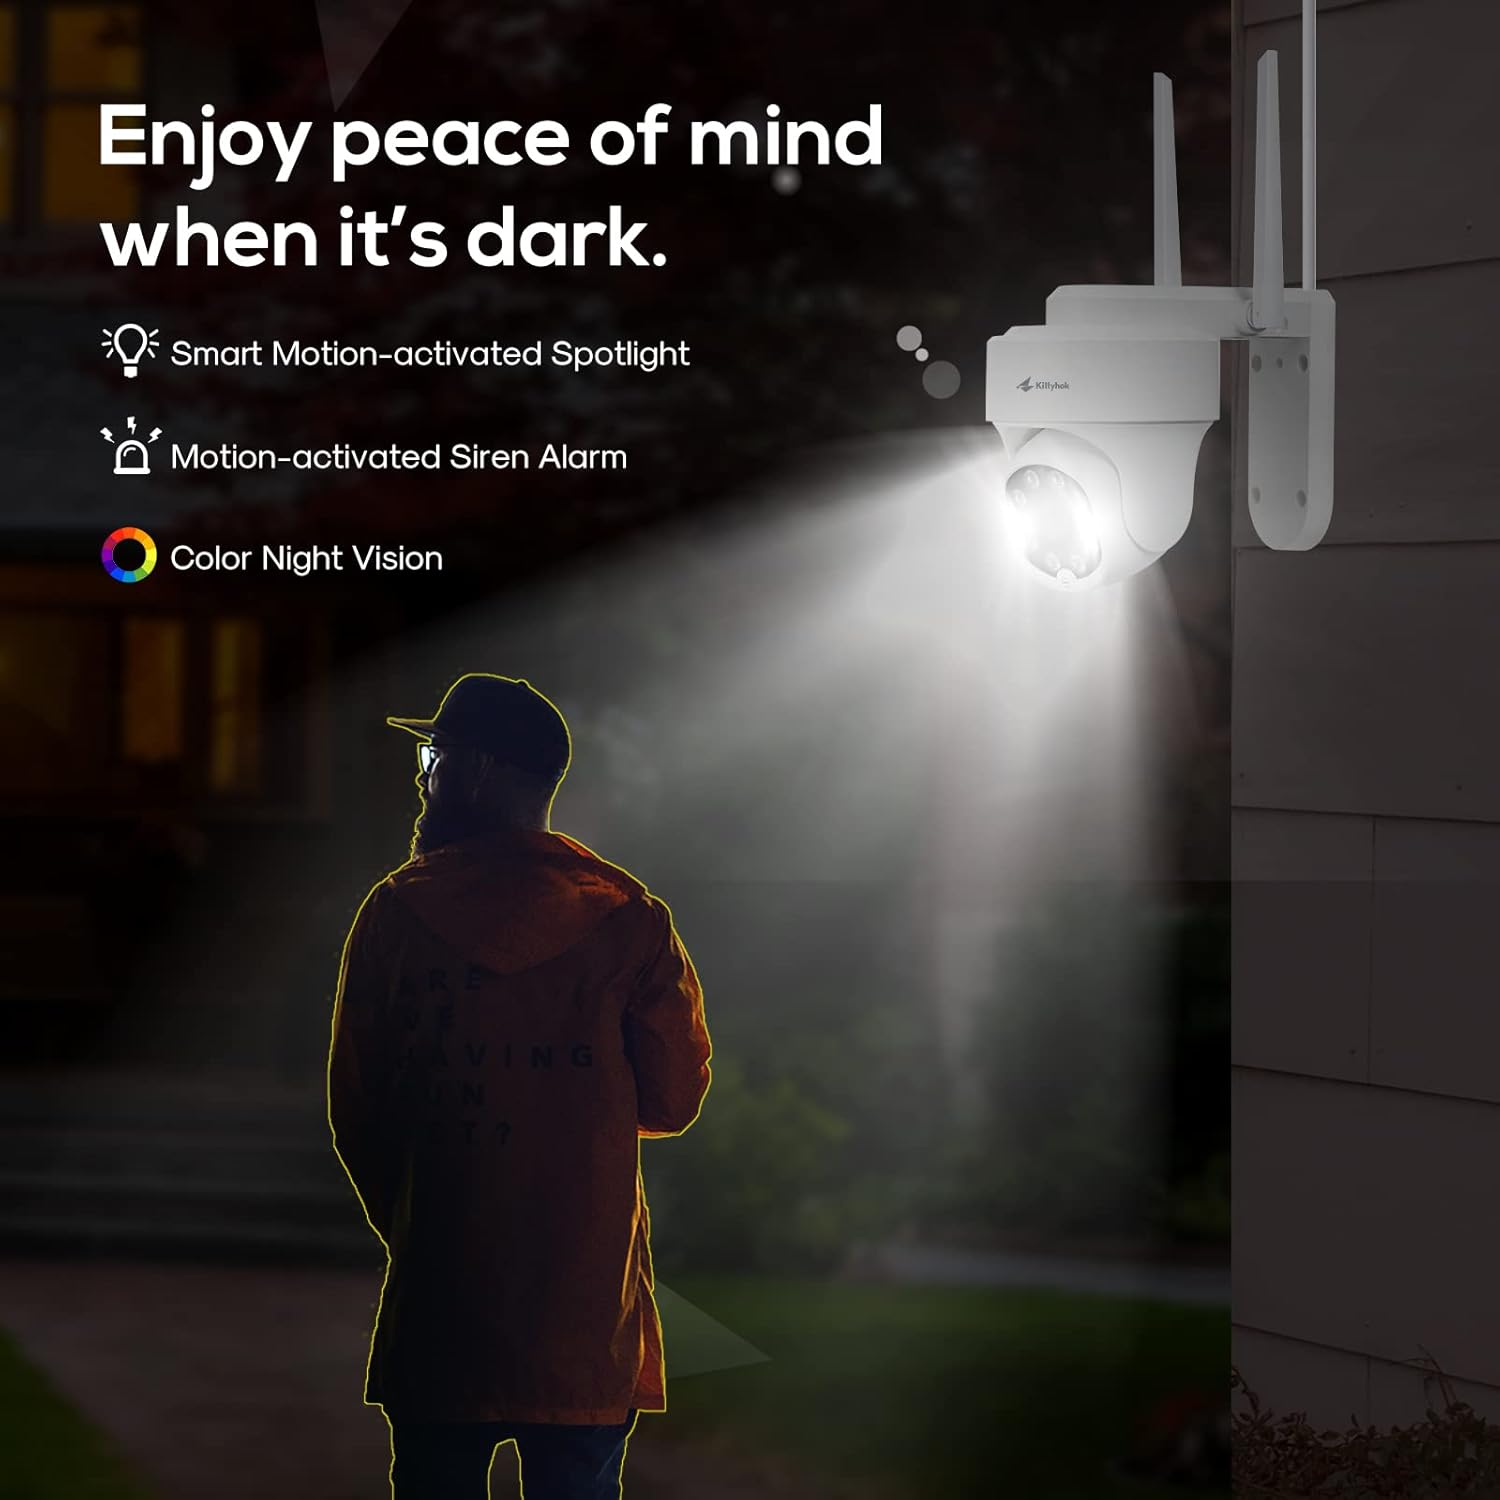
Figure 6.2: Active deterrence features including spotlight and siren.

Figure 6.3: Two-way talk functionality.
7. Konserwacja
Regularna konserwacja zapewnia długowieczność i optymalną wydajność Twojego systemu bezpieczeństwa.
- Czyszczenie: Okresowo czyść obiektywy aparatu miękką,amp cloth to remove dust and smudges that may affect image clarity. Ensure the power is off before cleaning.
- Aktualizacje oprogramowania układowego: Check the Kittyhok website or app regularly for firmware updates. Keeping your system updated ensures you have the latest features and security enhancements.
- Stan dysku twardego: The 1TB HDD is pre-installed for 24/7 recording. Monitor its health through the NVR interface to prevent data loss.
- Zarządzanie kablami: Upewnij się, że wszystkie kable są solidnie podłączone i zabezpieczone przed szkodliwym działaniem czynników środowiskowych.
- Ochrona środowiska: While cameras are weatherproof, extreme weather conditions can impact performance. Ensure proper installation to protect against direct exposure to harsh elements.

Figure 7.1: Weatherproof design of Kittyhok cameras.
8. Rozwiązywanie problemów (najczęściej zadawane pytania)
- Czy mój NVR musi być podłączony do Internetu, aby działał?
Nie, Twój NVR nie musi być podłączony do Internetu, aby działać. Możesz view transmisje na żywo i nagrania, podłączając go do telewizora/monitora przez HDMI lub VGA. - Czy będę w stanie? view mój system poza domem?
W celu view your system remotely, your NVR will need to be connected to a modem/router either with the included Ethernet cable or via Wi-Fi. You can view your system using the free Kittyhok App on your smart device or CMS client on a PC/Mac®. - W jaki sposób kamery przesyłają wideo do NVR?
Our NVRs have built-in Wi-Fi for communicating with the cameras. Each camera comes paired to the NVR by default, so your initial setup should be hassle-free. - Why my camera's PTZ control is not responding in real-time?
That normally means your camera is not having strong Wi-Fi signal. Watch the camera while controlling from App, you will see it moves immediately on your control, but the live video is not feeding in real-time due to poor Wi-Fi signal. Please mount the camera closer/ with less walls to your Wi-Fi router/ NVR so it has at least 3-bar of Wi-Fi to work smoothly, or simply use an Ethernet cable to hard wire the camera. - Czy mój NVR musi być podłączony do telewizora lub monitora?
W celu wstępnej konfiguracji konieczne będzie podłączenie NVR do telewizora lub monitora. Po zakończeniu wstępnej konfiguracji NVR nie musi być podłączony do telewizora ani monitora view lub przechwytywać nagrania. - Why is the Kittyhok App not accepting my password?
The Kittyhok App requires two passwords to configure: one password will be used to login to the app itself and the second will be the admin password of your NVR. In order to add a device to the app, you will need to enter the NVR's admin password. - Dlaczego nie mogę nawiązać połączenia za pomocą aplikacji WallPixel lub oprogramowania CMS?
If you are having trouble connecting using our mobile app or client software, A) the Wi-Fi network you are trying to connect to is not stable, B) the latest firmware or client software may not be installed on your computer or mobile device, C) the password may have been entered incorrectly, or D) you may need to restart your NVR and try again.
9. Specyfikacje
| Funkcja | Specyfikacja |
|---|---|
| Marka | Kittyhok |
| Technologia łączności | Bezprzewodowy |
| Rozdzielczość przechwytywania wideo | 1520p (2K) |
| Funkcja specjalna | Motion Sensor, Auto Tracking, Human Detection, Spotlight, 2-Way Talk |
| Liczba kanałów | 10 |
| Pojemność pamięci masowej | Dysk twardy 1TB |
| Źródło zasilania | Elektryczny przewodowy |
| Kompatybilne urządzenia | Personal Computers, Smartphones (iOS, Android) |
| Format sygnału | Cyfrowy |
| Szybkość klatek | 30 klatek na sekundę |
| Tryb nagrywania | Wideo HD |
| Technologia czujnika optycznego | CMOS |
| Interfejs sprzętowy | 802.11ac/b/g/n |
| Typ soczewki | Zmiennoogniskowe |
| Viewing kąt | 360 Degrees (PTZ cameras) |
10. Gwarancja i wsparcie
Kittyhok is committed to providing excellent customer service and support for your security system.
- 1-letnia gwarancja: The product comes with a 1-year warranty for replacement, not repair.
- Wsparcie online 24/7: Dedicated one-to-one online support is available for any queries or issues you may encounter.
- 30-dniowa gwarancja zwrotu pieniędzy: Enjoy peace of mind with a 30-day money-back guarantee.
- Brak opłat miesięcznych: There are no recurring monthly fees for using the core features of the system.

Figure 10.1: Benefits of choosing Kittyhok.
For further assistance, please visit the official Kittyhok webwitryny lub skontaktuj się z zespołem obsługi klienta.
Powiązane dokumenty - B0BD7MJCWK
 |
Instrukcje funkcji automatycznego śledzenia Prisual AI Kompleksowy przewodnik po konfiguracji i wykorzystaniu zaawansowanych funkcji automatycznego śledzenia AI kamery Prisual, w tym śledzenia prezentera/osoby i śledzenia strefy, za pośrednictwem obu web interfejs i zdalne sterowanie. |
 |
Instrukcja obsługi kamery PTZ HD AI z automatycznym śledzeniem Instrukcja obsługi kamery HD AI Auto Tracking PTZ obejmująca opis produktu, listę zawartości, charakterystykę działania, funkcje zdalnego sterowania, ustawienia śledzenia AI za pośrednictwem WebInterfejs użytkownika, typowe instrukcje obsługi, funkcje sieciowe, instalacja i rozwiązywanie problemów. |
 |
Instrukcja obsługi kamery konferencyjnej HD AI z automatycznym śledzeniem - Tongveo Niniejsza instrukcja obsługi zawiera szczegółowe instrukcje dotyczące kamery konferencyjnej Tongveo HD AI Auto Tracking, obejmujące konfigurację, funkcje, parametry techniczne, nawigację po menu i obsługę. Dowiedz się więcej o śledzeniu AI, sterowaniu PTZ, ekspozycji, ustawieniach kolorów, konfiguracji sieci i konserwacji systemu. |
 |
Instrukcja obsługi kamery PTZ HD AI z automatycznym śledzeniem User manual for the HD AI Auto Tracking PTZ Camera, detailing its features, specifications, installation, operation, and troubleshooting. Includes AI tracking modes, remote control functions, network setup, and performance characteristics. |
 |
4MP PTZ WiFi Camera (V360PRO) User Manual User manual for the 4MP PTZ WiFi Camera (V360PRO), detailing product features, setup instructions, controls, specifications, troubleshooting, and package contents. |
 |
Instrukcja obsługi Tonton Wireless Mini NVR Niniejsza instrukcja obsługi zawiera kompleksowe instrukcje dotyczące instalacji, konfiguracji i obsługi systemu Tonton Wireless Mini NVR. Obejmuje ona opisy interfejsów, instalację dysku twardego, podłączenie systemu, kreator konfiguracji początkowej, konfigurację sieci, ustawienia daty i godziny, zarządzanie pamięcią masową, konfigurację hasła, integrację z aplikacją, nawigację po menu, ustawienia nagrywania, inteligentne wykrywanie, odtwarzanie wideo, tworzenie kopii zapasowych wideo, dodawanie kamer IP i rozszerzanie zasięgu sieci bezprzewodowej. |
Ask a question about this manual
Ask about setup, troubleshooting, compatibility, parts, safety, or missing instructions. Manuals+ will review the question and use this page’s manual context to help answer it.