1. Wprowadzenie
This manual provides detailed instructions for the safe and efficient operation of your InFocus P120 INL412 Multimedia Projector (Model INL4128). Please read this manual thoroughly before using the projector and keep it for future reference. This projector is designed for high-quality image projection, suitable for various applications including presentations, home entertainment, and gaming.
2. Informacje dotyczące bezpieczeństwa
Aby zapobiec uszkodzeniu projektora i zapewnić bezpieczeństwo użytkownika, należy przestrzegać następujących środków ostrożności:
- Wentylacja: Zapewnij odpowiednią wentylację wokół projektora. Nie blokuj otworów wentylacyjnych. Zachowaj minimalną odległość 30 cm (12 cale) od ścian i innych obiektów.
- Źródło zasilania: Używaj wyłącznie określonego zasilacza i napięcia.tage. Connect the power cord securely.
- Ciepło: The projector generates heat during operation. Do not touch the projector's vents or exhaust areas directly after use.
- Moc światła: Nie patrz bezpośrednio w obiektyw projektora, gdyamp jest włączony, ponieważ intensywne światło może uszkodzić wzrok.
- Umieszczenie: Place the projector on a stable, level surface. Avoid placing it in direct sunlight, near heat sources, or in areas with high humidity or dust.
- Czyszczenie: Przed czyszczeniem odłącz przewód zasilający. Użyj miękkiej, suchej ściereczki. Nie używaj środków czyszczących w płynie ani aerozolu.
- Serwisowanie: Nie próbuj samodzielnie naprawiać projektora. Wszelkie prace serwisowe zleć wykwalifikowanemu personelowi.
3. Koniec produktuview
3.1 Top Panel and Lens Area
The top panel features the control buttons for basic operation and the lens area with focus and zoom adjustments.

Rysunek 3.1: Góra view of the InFocus P120 INL412 projector, highlighting the control panel on the right and the lens adjustment area on the left. The InFocus logo is visible on the top surface.
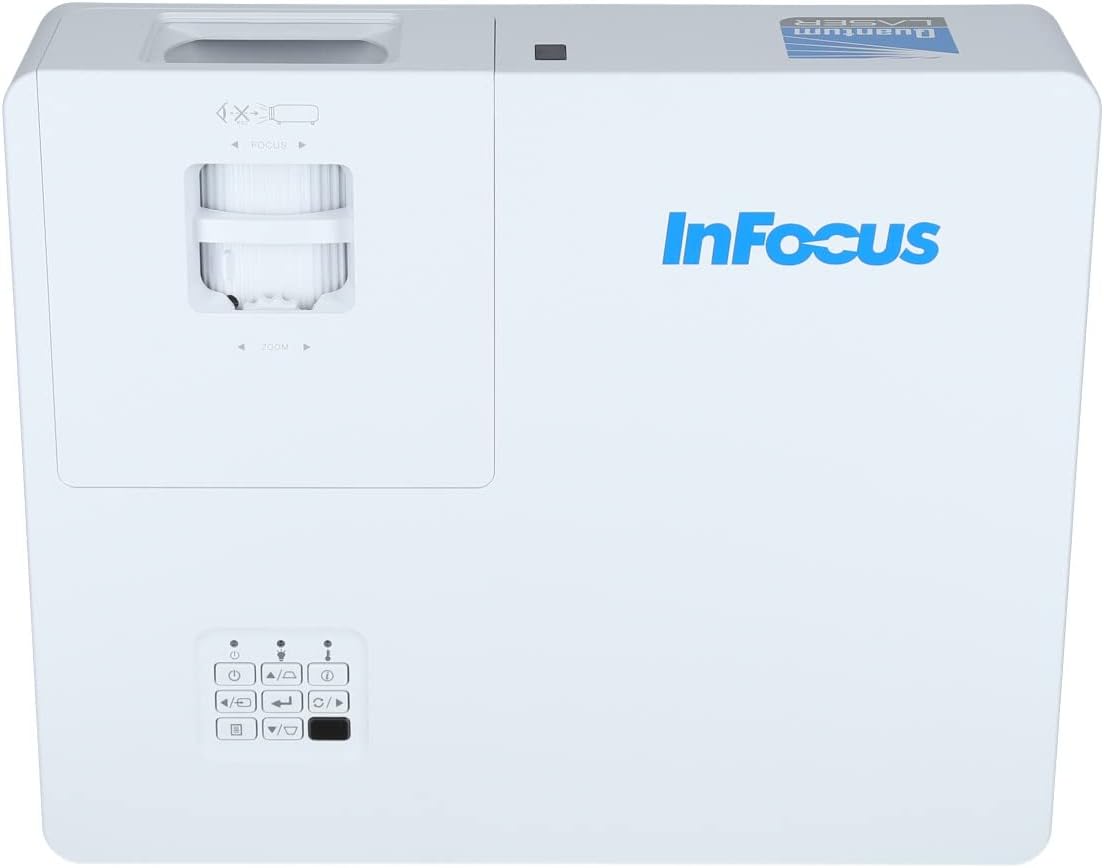
Rysunek 3.2: Bliższe spojrzenie view of the projector's top panel, showing the focus and zoom rings near the lens opening and the array of control buttons for power, menu, source selection, and navigation.
3.2 Połączenia panelu tylnego
The rear panel provides various input and output ports for connecting external devices.

Figure 3.3: Rear panel of the InFocus P120 INL412 projector, displaying a comprehensive array of connectivity options including HDMI (x2), USB, S-Video, Ethernet (LAN), VGA In (x2), VGA Out, RS232, and Audio In/Out ports. The power input is located on the bottom left.
Key ports include:
- HDMI 1 i 2: For connecting high-definition digital video and audio sources.
- USB: For connecting USB devices, potentially for media playback or firmware updates.
- S-wideo: For connecting older video sources.
- VGA IN 1 & 2: Do podłączania komputerów lub innych urządzeń z wyjściem VGA.
- WYJŚCIE VGA: Do podłączenia do monitora zewnętrznego.
- Ethernet (LAN): Do łączności sieciowej i sterowania.
- Audio IN 1 & 2 / Audio OUT: Do analogowych połączeń audio.
- RS232: Do sterowania szeregowego.
- Pobór mocy: Do podłączenia przewodu zasilającego prądem zmiennym.
3.3 Panele przednie i boczne
The front panel houses the projection lens and front ventilation, while the side panels feature additional ventilation grilles.

Rycina 3.4: Przód view of the InFocus P120 INL412 projector, displaying the main projection lens on the right and the extensive front ventilation grille on the left, crucial for heat dissipation.

Rysunek 3.5: Strona view of the InFocus P120 INL412 projector, illustrating the side ventilation grilles that contribute to maintaining optimal operating temperature.
4. Konfiguracja
4.1 Umiejscowienie projektora
Position the projector on a stable, flat surface or mount it securely. Ensure the projector is within the optimal projection distance for your screen size. Maintain clear space around the projector for proper ventilation.
4.2 Podłączanie urządzeń
Before connecting any cables, ensure the projector and all source devices are powered off.
- Połączenie HDMI: Connect an HDMI cable from your source device (e.g., laptop, Blu-ray player, gaming console) to either the HDMI 1 or HDMI 2 port on the projector.
- Połączenie VGA: Connect a VGA cable from your computer to either VGA IN 1 or VGA IN 2. For audio, connect a separate audio cable from your computer's audio output to the corresponding Audio IN port on the projector.
- Połączenie USB: Insert a USB drive into the USB port for media playback (if supported by firmware) or service functions.
- Połączenie Ethernet (LAN): Connect an Ethernet cable to the LAN port for network control or updates.
- Wyjście audio: If using external speakers, connect an audio cable from the Audio OUT port on the projector to your audio system.
4.3 Połączenie zasilania
Connect the power cord to the projector's power input and then plug the other end into a grounded electrical outlet.
5. Instrukcja obsługi
5.1 Włączanie/wyłączanie
- Włączanie: Naciśnij Moc Naciśnij przycisk na panelu sterowania projektora lub pilocie. Kontrolka zasilania zmieni kolor.
- Wyłączone: Naciśnij Moc button again. A confirmation message may appear. Press the button a second time to confirm shutdown. Allow the projector to cool down before unplugging it.
5.2 Regulacja ostrości i powiększenia
Rotate the focus ring around the lens until the image appears sharp and clear. Use the zoom ring to adjust the image size to fit your screen.
5.3 Wybór źródła sygnału wejściowego
Naciśnij Źródło button on the control panel or remote control to cycle through available input sources (HDMI 1, HDMI 2, VGA 1, VGA 2, S-Video, USB). Select the input corresponding to your connected device.
5.4 Nawigacja po menu
Użyj Menu button to access the on-screen display (OSD) menu. Use the arrow buttons to navigate through menu options and the Wchodzić przycisk, aby wybrać. Naciśnij Menu ponownie, aby wyjść.
6. Konserwacja
6.1 Czyszczenie obiektywu
Gently wipe the lens with a soft, lint-free cloth specifically designed for optical surfaces. Do not use abrasive cleaners or excessive force, as this can scratch the lens.
6.2 Cleaning the Projector Exterior
Do czyszczenia projektora należy używać miękkiej, suchej ściereczki.asing. For stubborn dirt, dampen the cloth slightly with water, then wipe dry immediately. Avoid getting liquids into the projector's openings.
6.3 Ventilation Care
Regularly check the projector's ventilation grilles for dust accumulation. Use a soft brush or a vacuum cleaner with a brush attachment to gently remove dust from the vents to ensure proper airflow and prevent overheating.
7. Rozwiązywanie Problemów
7.1 Brak wyświetlanego obrazu
- Ensure the projector is powered on and the power indicator light is solid.
- Verify that the video cable (HDMI, VGA, etc.) is securely connected to both the projector and the source device.
- Sprawdź, czy w projektorze wybrano właściwe źródło sygnału wejściowego.
- Confirm that the source device (laptop, player) is powered on and outputting a signal.
7.2 Image is Blurry or Out of Focus
- Wyreguluj pierścień ostrości na obiektywie projektora, aż obraz będzie ostry.
- Upewnij się, że projektor znajduje się w odpowiedniej odległości od ekranu.
- Wyczyść soczewkę projektora, jeśli wydaje się brudna.
7.3 Brak dźwięku
- If using HDMI, ensure the source device's audio output is set to HDMI.
- If using VGA, ensure a separate audio cable is connected from the source to the projector's Audio IN port.
- Sprawdź ustawienia głośności zarówno na projektorze, jak i na urządzeniu źródłowym.
- If using external speakers, ensure they are properly connected to the Audio OUT port and powered on.
8. Specyfikacje
| Funkcja | Szczegół |
|---|---|
| Marka | W centrum uwagi |
| Producent | W centrum uwagi |
| Nazwa modelu | P120 INL412 |
| Numer modelu | INL4128 |
| Rok | 2023 |
| Interfejs sprzętowy | Ethernet, HDMI, S-Video, USB |
| Liczba elementów | 1 |
| Proporcje obrazu | 16:9 |
| Cotage | 341 watów |
| Baterie w zestawie | NIE |
| Wymagane baterie | NIE |
| Współczynnik kształtu | Pulpit |
| Typ montażu | Mocowanie do stołu |
| W zestawie pilot zdalnego sterowania | Tak |
| Wymiary produktu | Wymiary 56.13 x 46.48 x 25.15 cm |
| Waga przedmiotu | 5.5 kilogramów |
| Maksymalny rozmiar obrazu | 308.28 cali |
| Minimalny rozmiar obrazu | 910.63 milimetrów |
| Pierwsza dostępna data | 5 stycznia 2022 r. |
9. Gwarancja i wsparcie
For warranty information and technical support, please refer to the documentation included with your purchase or visit the official InFocus webZachowaj dowód zakupu na wypadek roszczeń gwarancyjnych.