PowMr ML2440
Instrukcja obsługi regulatora ładowania słonecznego PowMr 40A MPPT
Model: ML2440
1. Wprowadzenie
This manual provides essential information for the safe and efficient operation of your PowMr 40A MPPT Solar Charge Controller, model ML2440. Please read this manual thoroughly before installation and use to ensure optimal performance and longevity of the product.
2. Instrukcje bezpieczeństwa
- Upewnij się, że wszystkie przewody są prawidłowo podłączone i zabezpieczone, aby zapobiec zwarciom i uszkodzeniom.
- Always connect the battery to the charge controller first, then the solar panels, and finally the load. Disconnect in the reverse order.
- Nie próbuj samodzielnie naprawiać ani modyfikować kontrolera. W celu uzyskania pomocy skontaktuj się z wykwalifikowanym personelem.
- Zainstaluj kontroler w dobrze wentylowanym pomieszczeniu, z dala od materiałów łatwopalnych i bezpośredniego światła słonecznego.
- Pracując przy urządzeniach elektrycznych należy nosić odpowiedni sprzęt ochrony osobistej (PPE).
- Upewnij się, że system ma objętośćtage matches the controller's specifications (12V/24V auto-detection).
3. Koniec produktuview
The PowMr 40A MPPT Solar Charge Controller is designed to efficiently manage power from your solar panels to charge various battery types, including Lithium, Sealed, Gel, and Flooded batteries. It features Maximum Power Point Tracking (MPPT) technology for optimized solar energy harvesting, automatic 12V/24V system voltage detection, and a clear LCD display for monitoring system status.
Rysunek 3.1: Przód view regulatora ładowania słonecznego MPPT PowMr 40A.
This image shows the main unit of the PowMr 40A MPPT Solar Charge Controller, highlighting its compact design and integrated LCD screen.
The controller supports a maximum solar input voltage of 100V and a maximum input power of 1100W for a 24V system (550W for 12V). It also includes temperature compensation for accurate charging across varying environmental conditions.

Rysunek 3.2: Temperature compensation feature.
This image illustrates the temperature compensation capability of the controller, ensuring optimal battery charging performance in both hot and cold environments.
4. Instalacja i okablowanie
Prawidłowa instalacja jest kluczowa dla bezpiecznego i wydajnego działania regulatora ładowania słonecznego. Postępuj zgodnie z poniższymi krokami.
4.1 Schemat okablowania

Rysunek 4.1: Wiring diagram for the PowMr MPPT Solar Charge Controller.
This diagram illustrates the correct connection order for the battery, solar panels, DC load, and optional inverter. A temperature sensor is also shown.
4.2 Kroki połączenia
- Najpierw podłącz akumulator: Connect the battery to the charge controller's battery terminals. Ensure correct polarity. The controller will auto-detect 12V or 24V system voltage.
- Podłącz panele słoneczne: Connect the solar panels to the PV input terminals. Ensure correct polarity. The controller will begin charging if sufficient sunlight is available.
- Podłącz obciążenie DC (opcjonalnie): If using a DC load directly from the controller, connect it to the load terminals.
- Connect Inverter (Optional): If using an inverter, connect it to the battery terminals (not directly to the load terminals of the controller).
- Podłącz czujnik temperatury: For accurate temperature compensation, connect the provided temperature sensor to the designated port on the controller and place the sensor near the battery.
Nakaz odłączenia: To disconnect the system, always follow the reverse order: Disconnect load, then solar panels, then battery.
5. Instrukcja obsługi
This section details how to monitor and configure your charge controller using its integrated LCD display and the optional Bluetooth mobile application.
5.1 Wyświetlacz LCD powyżejview

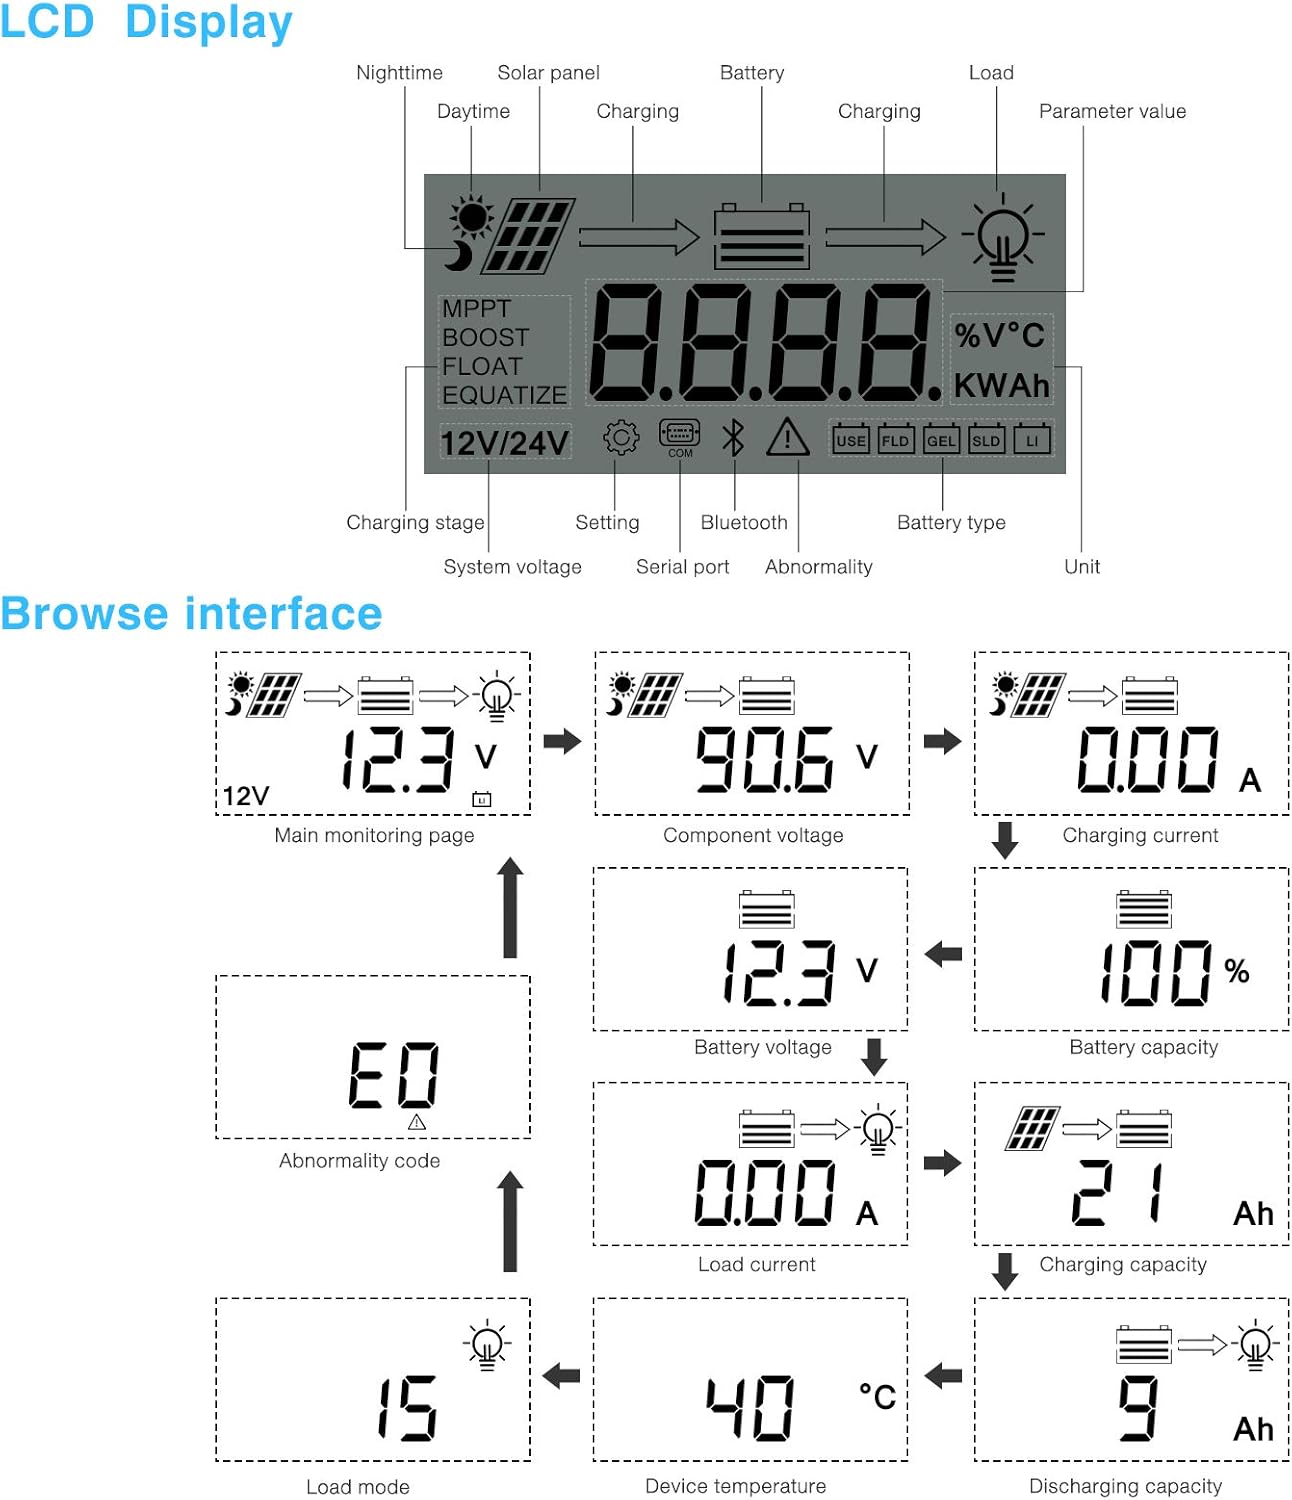
Rysunek 5.1: LCD Display and Browse Interface.
This image shows the various icons and parameters displayed on the LCD screen, along with the navigation flow through different monitoring pages.
The LCD provides real-time information about your solar system. Key indicators include:
- Ładowanie Stage: MPPT, Boost, Float, Equalize.
- Objętość systemutage: 12V/24V auto-detected.
- Typ baterii: Icons for Lithium (Li), Sealed (SLD), Gel (GEL), Flooded (FLD).
- Wskaźniki stanu: Solar panel activity, battery charging, load status, abnormality.
- Wartość parametru: Wyświetla objętośćtage, current, capacity, temperature, etc.
Use the buttons below the LCD to navigate through different screens to view parameters such as main monitoring page, component voltage, prąd ładowania, pojemność akumulatoratage, battery capacity, load current, charging capacity, device temperature, discharging capacity, abnormality codes, and load mode.
5.2 Aplikacja mobilna Bluetooth
The controller supports an optional Bluetooth module (BT-1) for remote monitoring and parameter adjustment via a mobile application (available for Apple iOS and Android devices). The Bluetooth module connects to the RS232 port on the controller.

Rysunek 5.2: Controller with optional Bluetooth module.
This image displays the PowMr MPPT Solar Charge Controller alongside its optional BT-1 Bluetooth communication module and connecting cable.

Rysunek 5.3: BT-1 Bluetooth module.
Szczegółowy view of the BT-1 Bluetooth module, which enables wireless communication with the solar charge controller for remote monitoring and settings adjustments.

Rysunek 5.4: Bluetooth Mobile Interface Display.
This image shows various screens from the mobile application, including real-time monitoring, data records, energy records, and parameter settings.
Aplikacja mobilna umożliwia:
- Monitor real-time system data (voltage, current, power, temperature).
- View historical data and energy records.
- Adjust various charging parameters and battery settings.
- Przywróć ustawienia fabryczne.
6. Konserwacja
Regular maintenance ensures the longevity and optimal performance of your charge controller.
- Czyszczenie: Periodically clean the controller's exterior with a dry cloth to remove dust and debris. Ensure ventilation openings are clear.
- Znajomości: Annually check all wiring connections for tightness and corrosion. Loose connections can cause overheating and poor performance.
- Środowisko: Ensure the installation environment remains within the specified operating temperature range and is free from excessive moisture or dust.
7. Rozwiązywanie Problemów
This section provides guidance for common issues. Refer to the LCD display for abnormality codes.
- Brak wyświetlacza/brak zasilania:
- Sprawdź połączenia akumulatora i upewnij się, że jego pojemność jest odpowiedniatage mieści się w zakresie roboczym.
- Verify that the battery fuse (if installed) is intact.
- Brak ładowania:
- Ensure solar panels are connected correctly and receiving sufficient sunlight.
- Sprawdź pojemność panelu słonecznegotagi aktualne.
- Verify that the battery is not fully charged or in a protection state.
- Ładowanie nie działa:
- Check load connections and ensure the load current does not exceed the controller's rating.
- Sprawdź, czy poziom naładowania akumulatoratage jest powyżej niskiego poziomu głośnościtagUstawienie rozłączenia (LVD).
- Check for any abnormality codes on the LCD related to load output.
- Abnormality Codes (e.g., "E0"):
- Refer to the specific abnormality code displayed on the LCD. Consult the full product manual or manufacturer's support for detailed explanations and solutions for each code.
8. Specyfikacje
Technical specifications for the PowMr 40A MPPT Solar Charge Controller (Model ML2440).

Rysunek 8.1: Tabela specyfikacji produktu.
This table provides detailed technical parameters for the ML2420, ML2430, and ML2440 models. The ML2440 column is relevant for this 40A controller.
| Parametr | Value (ML2440) |
|---|---|
| Model | ML2440 |
| Objętość systemutage | 12V / 24V Auto |
| Strata bez obciążenia | 0.7 W do 1.2 W |
| Pojemność bateriitage | 9 do 35 V |
| Maks. wejście słoneczne voltage | 100 V (25°C), 90 V (-25°C) |
| Maks. punkt mocytage zakres | Pojemność bateriitage +2V do 75V |
| Znamionowy prąd ładowania | 40A |
| Prąd znamionowy obciążenia | 20A |
| Maks. nośność pojemnościowa | 10000 XNUMXuF |
| Maks. moc wejściowa systemu fotowoltaicznego, | 550W/ 12V, 1100W/ 24V |
| Efektywność konwersji | ≤ 98% |
| Wydajność śledzenia MPPT | > 99% |
| Współczynnik kompensacji temperatury | -3.0mv/ °C/ 2V (default) |
| Temperatura pracy | -35°C do +45°C |
| Stopień ochrony | IP32 |
| Waga | 2kg |
| Metoda komunikacji | RS232 |
| Wysokość | ≤ 3000m |
| Wymiary produktu | Wymiary: 238*173*72.5 mm |
9. Gwarancja i wsparcie
For warranty information, please refer to the documentation included with your product packaging or visit the official PowMr website. If you encounter any issues not covered in this manual or require further assistance, please contact PowMr customer support.
PowMr Official Webstrona: Odwiedź sklep PowMr na Amazon
Ask a question about this manual
Ask about setup, troubleshooting, compatibility, parts, safety, or missing instructions. Manuals+ will review the question and use this page’s manual context to help answer it.