Saooer BLUE 20A
Saooer 20A Solar Charge Controller User Manual
Model: BLUE 20A
Wstęp
This manual provides essential information for the safe and efficient operation of your Saooer 20A Solar Charge Controller. This intelligent regulator is designed to manage the working of solar panels and batteries in a solar system, featuring dual USB ports for mobile device charging. It is compatible with 12V and 24V systems and includes multiple protection functions to ensure system efficiency and prolong battery lifespan.

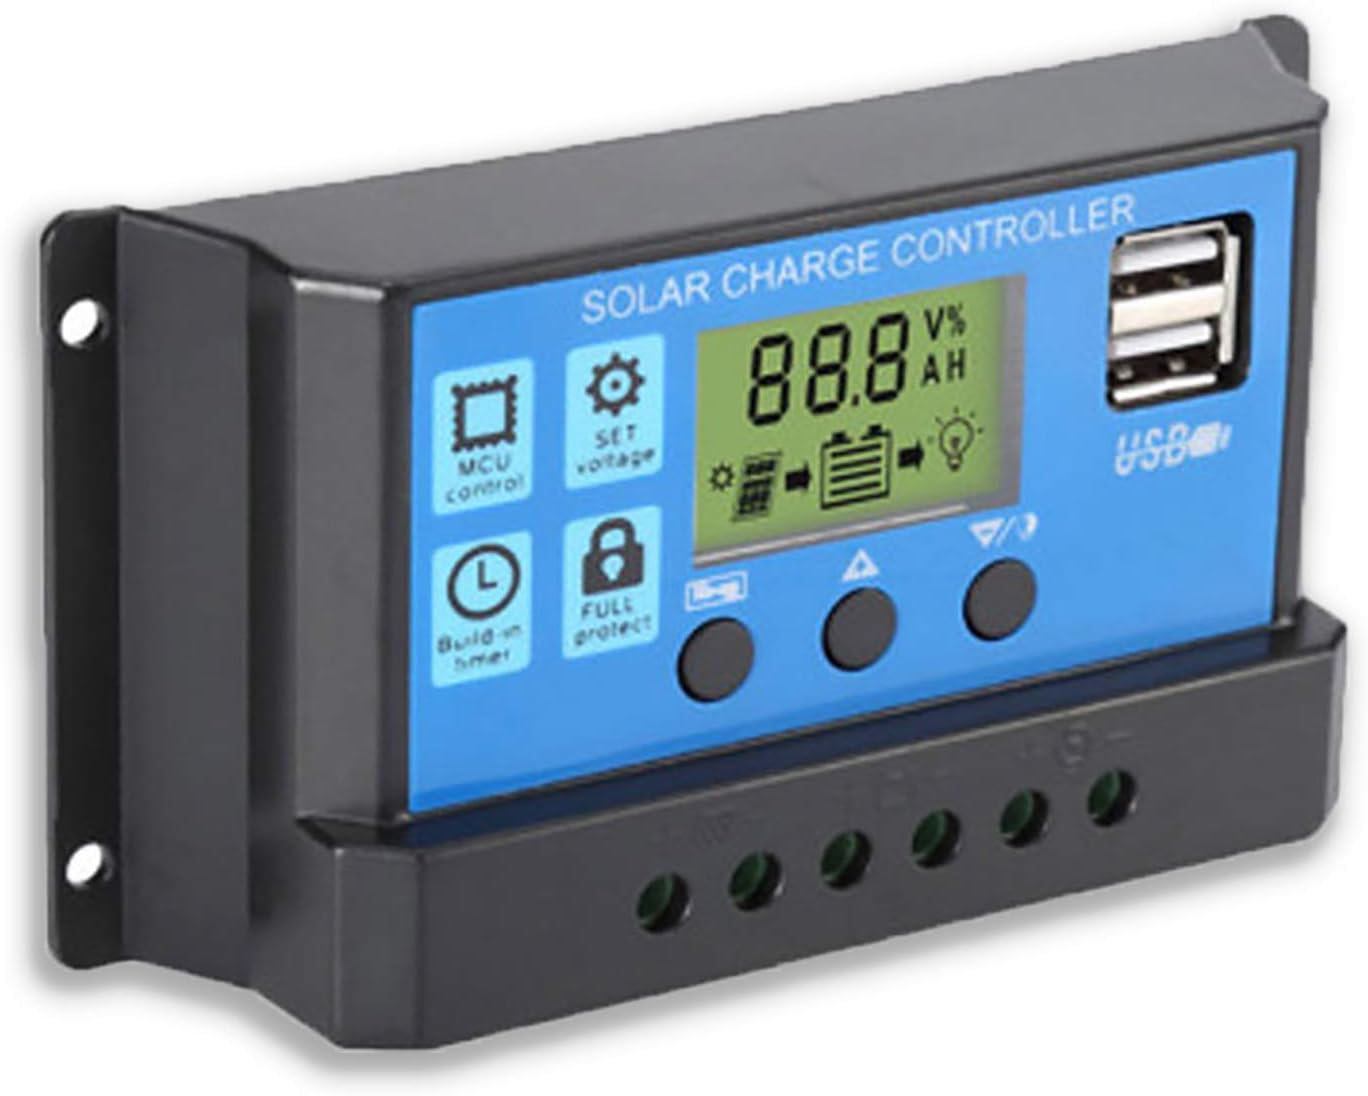
Rycina 1: Przód view of the Saooer 20A Solar Charge Controller.
Instrukcje bezpieczeństwa
- Ensure all connections are correct before powering on the controller. Incorrect wiring can damage the device or connected components.
- The controller is designed for indoor use or in a protected environment. Avoid exposure to direct sunlight, high temperatures, or moisture.
- Nie próbuj samodzielnie demontować ani naprawiać kontrolera. W celu uzyskania pomocy skontaktuj się z wykwalifikowanym personelem.
- Przechowywać w miejscu niedostępnym dla dzieci.
- This controller is only suitable for lead-acid batteries: OPEN, AGM, GEL. Do not use with other battery types like Lithium-ion or LiFePO4, as this may cause damage or safety hazards.
- Always connect the battery first, then the solar panel, and finally the load. When disconnecting, reverse the order: disconnect the load, then the solar panel, and finally the battery.
Cechy produktu
- Automatyczny system Voltage Identyfikacja: Automatically detects 12V/24V system voltage.
- PWM Charging: Efficient Pulse Width Modulation charging mode.
- Podwójne porty USB: Provides 5V/2A output for charging mobile devices.
- Wyświetlacz LCD: Clear display of status and data, allowing for convenient mode switching and parameter configuration.
- Wielorakie funkcje ochronne: Obejmuje zabezpieczenie przed zwarciem, zabezpieczenie przed rozwarciem, zabezpieczenie przed odwrotnym spięciem i zabezpieczenie przed przeciążeniem.
- Regulowane parametry: User-adjustable charge and discharge parameters.
- Kompensacja temperatury: Automatic temperature compensation for optimal charging.
Konfiguracja i instalacja
Follow these steps carefully to install your solar charge controller. Incorrect installation can lead to damage or malfunction.
- Przygotuj okablowanie: Ensure all wires are properly stripped and have appropriate connectors if necessary. Use wires of sufficient gauge for your system's current.
- Podłącz akumulator: Connect the battery to the charge regulator first. Observe correct polarity (+ to + and - to -). The controller will automatically recognize the battery voltage (12 V lub 24 V).
Rysunek 2: Strona view showing the connection terminals for battery, solar panel, and load.
- Podłącz panel słoneczny: Connect the solar panel to the solar charge controller. Ensure correct polarity.
- Podłącz obciążenie: Connect the consumer or load to the charge controller regulator. Ensure correct polarity.
Ważna uwaga: Always connect the battery first, then the solar panel, and finally the load. When disconnecting the controller, please remove the solar panel, then the load, and finally the battery. This sequence helps the controller recognize the battery voltage correctly and prevents damage.
Instrukcja obsługi
Wyświetlacz LCD i przyciski

Rysunek 3: Kątowy view showing the LCD display and control buttons.
The controller features an LCD display and three buttons for operation:
- Przycisk menu: Used to cycle through display modes and enter parameter setting mode.
- Przycisk w górę: Służy do zwiększania wartości lub poruszania się w górę menu.
- Przycisk w dół: Służy do zmniejszania wartości lub poruszania się w dół menu.
Tryby wyświetlania
Press the Menu button to cycle through the following display modes:
- Pojemność bateriitagmi (V)
- Panel słonecznytagmi (V)
- Prąd obciążenia (A)
- Battery Temperature (°C)
- Prąd ładowania (A)
- Prąd rozładowania (A)
- Load Working Mode (24H, 0-23H, 0H)
Ustawienia parametrów
To enter parameter setting mode, press and hold the Menu button for 5 seconds. Use the Up and Down buttons to adjust values, and the Menu button to confirm and move to the next parameter. Press and hold Menu again to exit setting mode.
| Parametr | Opis | Default (12V) | Range (12V) |
|---|---|---|---|
| B01/B02/B03 | Battery Type Selection (B01=Lead-acid, B02=Lithium Ion, B03=LiFePO4) | B01 | Brak |
| Charge Off Voltage | Tomtage at which charging stops | 14.4 V | 13.0 V - 15.0 V |
| Rozładowanie Ponowne podłączenie Voltage | Tomtage at which load reconnects after low voltagi rozłącz się | 12.6 V | 11.0 V - 13.5 V |
| Objętość zatrzymania rozładowaniatage | Tomtage at which load disconnects to protect battery | 10.7 V | 9.0 V - 11.5 V |
| Load Working Time | Timer for load output (24H, 0-23H, 0H) | 24H | Brak |
Note: For 24V systems, multiply the 12V values by two.
Konserwacja
- Regularna kontrola: Okresowo sprawdzaj wszystkie połączenia przewodów pod kątem szczelności i korozji.
- Czystość: Utrzymuj kontroler w czystości i zapobiegaj jego zakurzaniu. Do czyszczenia używaj suchej ściereczki.
- Wentylacja: Aby zapobiec przegrzaniu, należy zapewnić odpowiednią wentylację wokół kontrolera.
- Stan baterii: Monitoruj pojemność bateriitage and health regularly. Replace batteries as needed.
Rozwiązywanie problemów
| Problem | Możliwa przyczyna | Rozwiązanie |
|---|---|---|
| Kontroler nie włącza się / wyświetlacz LCD jest pusty | Akumulator nie jest podłączony lub jego polaryzacja jest odwrotna; Pojemność akumulatoratage za niskie. | Sprawdź połączenia i biegunowość akumulatora. Upewnij się, że akumulator jest wystarczająco naładowany. |
| Panel słoneczny nie ładuje akumulatora | Solar panel not connected or reverse polarity; Insufficient sunlight; Damaged solar panel. | Check solar panel connections and polarity. Ensure panel is in direct sunlight. Test solar panel output. |
| Ładowanie nie działa | Load not connected or reverse polarity; Battery voltage za niskie (niska objętość)tage disconnect); Overload protection activated. | Check load connections and polarity. Charge battery. Reduce load or check for short circuit. |
| Porty USB nie ładują się | Pojemność bateriitage too low; Device not compatible; Faulty USB cable. | Ensure battery is charged. Try a different device or cable. |
| Controller gets hot | Przeciążenie; Słaba wentylacja. | Reduce load. Ensure controller has adequate airflow and is not in an enclosed space. |
Specyfikacje
| Funkcja | Szczegół |
|---|---|
| Model | NIEBIESKI 20A |
| Objętość systemutage | 12V / 24V Auto |
| Maksymalny prąd ładowania/rozładowania | 20A |
| Wyjście USB | Dual USB, 5V/2A (Max) |
| Zgodność typu baterii | Lead-acid (OPEN, AGM, GEL) |
| Wymiary produktu | 5.12 x 2.76 x 1.5 inches (133mm x 70mm x 38mm approx.) |
| Waga przedmiotu | 5 uncji |
| Wyświetlacz | LCD |
| Temperatura pracy | -35°C do +60°C |

Figure 4: Product dimensions of the solar charge controller.
Gwarancja i wsparcie
For warranty information or technical support, please contact the manufacturer, Saooer, through their official channels. Refer to your purchase documentation for specific warranty terms and contact details.
Producent: Saooer
ASIN: B095764VB7
Kod UPC: 605832982977
Możesz odwiedzić Saooer Store on Amazon Aby uzyskać więcej informacji lub skontaktować się z pomocą techniczną.
Powiązane dokumenty - NIEBIESKI 20A
 |
Instrukcja obsługi regulatora ładowania słonecznego User manual for the 10A-100A Solar Charge Controller, covering installation, operation, troubleshooting, and technical specifications. |
 |
Instrukcja obsługi regulatora ładowania słonecznego PWM Li Time 20A Kompleksowa instrukcja obsługi regulatora ładowania słonecznego PWM Li Time 20A, obejmująca instrukcje bezpieczeństwa, identyfikację części, okablowanie, obsługę, specyfikacje i rozwiązywanie problemów w systemach 12 V/24 V. |
 |
W88-C Solar Charge Controller: User Manual, Features, and Specifications Comprehensive guide for the W88-C Solar Charge Controller, covering product features, technical specifications, safety instructions, system connection, icon definitions, troubleshooting, and operational modes for 12V/24V lead-acid battery systems. |
 |
Instrukcja obsługi regulatora ładowania słonecznego BougeRV serii HC24 Instrukcja obsługi regulatora ładowania słonecznego BougeRV serii HC24 zawierająca szczegółowe zalecenia dotyczące bezpiecznego użytkowania, funkcje, okablowanie systemu, funkcje przycisków, ustawienia interfejsu wyświetlacza, kody błędów i specyfikacje dla modeli 10A, 20A i 30A. |
 |
Aideepen Intelligent Solar Charge Controller | 12V/24V, 10A-100A, LED Display, Dual USB Kompleksowy ponadview of the Aideepen Intelligent Solar Charge Controller. Details features, specifications (10A, 30A, 60A, 100A models), 12V/24V compatibility, LED display, dual USB ports, and protection systems for solar power applications. |
 |
Instrukcja obsługi regulatora ładowania słonecznego – funkcje, specyfikacje i rozwiązywanie problemów Niniejsza instrukcja obsługi zawiera podstawowe informacje dotyczące obsługi regulatora ładowania słonecznego. Obejmuje ona instrukcje bezpieczeństwa, funkcje produktu, schematy połączeń systemu, funkcje wyświetlacza LCD, wskazówki dotyczące rozwiązywania problemów oraz szczegółowe dane techniczne. Dowiedz się, jak efektywnie zarządzać swoim systemem zasilania słonecznego. |
Ask a question about this manual
Ask about setup, troubleshooting, compatibility, parts, safety, or missing instructions. Manuals+ will review the question and use this page’s manual context to help answer it.