1. Wprowadzenie
The Renogy 1000W Pure Sine Wave Inverter is designed to convert 12V DC power from your battery bank into clean, stable 120V/110V AC power, suitable for a wide range of applications including off-grid solar systems, RVs, and home backup power. Featuring advanced Pure Sine Wave technology and an intelligent ECO Mode, this inverter ensures efficient and reliable power delivery for your sensitive electronics and appliances.

Image: The Renogy 1000W Pure Sine Wave Inverter, showcasing its sleek black and blue design with the 1000W rating clearly visible on the top panel.
2. Informacje dotyczące bezpieczeństwa
Przed instalacją lub uruchomieniem falownika należy przeczytać i zrozumieć wszystkie instrukcje bezpieczeństwa. Nieprzestrzeganie tych instrukcji może spowodować porażenie prądem elektrycznym, pożar lub poważne obrażenia.
- Elektryczne zagrożenia: Always ensure the inverter is turned WYŁĄCZONY before connecting or disconnecting any wiring.
- Połączenia baterii: When connecting to batteries, always connect the positive (red) cable first, then the negative (black) cable. When disconnecting, remove the negative (black) cable first, then the positive (red) cable.
- Ścisłe połączenia: Ensure all wiring connections are tight to prevent overheating and potential fire hazards. Loose connections can cause excessive heat and damage.
- Wentylacja: Install the inverter in a well-ventilated area to allow for proper heat dissipation. Avoid enclosed spaces with poor airflow.
- Środki ochrony osobistej: Always wear appropriate safety gloves and eye protection when handling batteries and performing electrical connections.
- Iskrzenie: A small spark may occur when connecting the negative battery cable. This is normal, but ensure no flammable materials are nearby.
- Grunt: Ensure the inverter and its enclosure are properly grounded to the earth to prevent electrical shock.
3. Koniec produktuview
The Renogy 1000W Pure Sine Wave Inverter is engineered for robust performance and reliability. Its design incorporates key features for user convenience and safety.
Funkcje panelu przedniego:
- Gniazdka AC: Provides standard 120V/110V AC power for your devices.
- Blok zacisków prądu przemiennego: For hardwiring AC loads.
- Przełączniki: Used for frequency selection (50Hz/60Hz) and ECO Power-Saving Mode activation.
- Communication Port (RS485): For connecting monitoring accessories like the BT-2 for Renogy App compatibility.
- Port zdalny: Connects the wired remote control for convenient power management.
- ON/OFF/REM Power Button: Główny wyłącznik zasilania falownika.
- Wskaźniki LED: Visual cues for Fault (Red), GF (Yellow), and Power (Green) status.
Cechy panelu tylnego:
- Zaciski dodatnie (+) i ujemne (-): For connecting DC input from your battery bank.
- Wentylatory chłodzące (x2): High-speed ventilation fans ensure efficient heat dissipation, crucial for prolonged operation and inverter longevity.
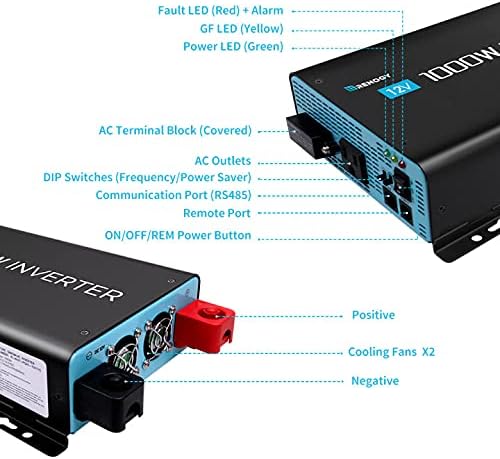
Obraz: Szczegółowy view of the Renogy 1000W Inverter's front and rear panels, highlighting the various ports, switches, and cooling fans.
Technologia czystej fali sinusoidalnej:
Advanced pure sine wave technology provides quality AC equivalent to grid power, protecting and extending the life of your electronics and appliances. It ensures quiet operation and handles high inductive loads without strange buzzing sounds, allowing devices to run smoother, cooler, and quieter.

Image: Diagram illustrating the benefits of Advanced Pure Sine Wave Technology, including smooth, continuous power, quiet operation, and handling of high inductive loads.
4. Co znajduje się w pudełku
Your Renogy 1000W Pure Sine Wave Inverter package includes the following components:
- 1 x Renogy 1000W Pure Sine Wave Inverter
- 1 x Pair of Inverter Cables (4AWG)
- 1 x 16.4ft Wired Remote Control
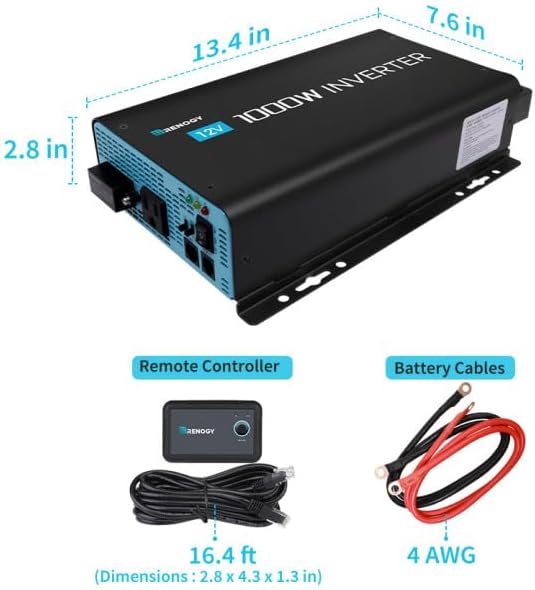
Image: Visual representation of the Renogy 1000W Inverter along with its included accessories: the remote controller with its 16.4 ft cable and the 4 AWG battery cables.
5. Konfiguracja i instalacja
5.1 Przygotowanie baterii
Before connecting the inverter, ensure your 12V batteries are fully charged. For optimal performance and longevity, especially with LiFePO4 batteries, a full charge is recommended prior to first use.
5.2 Umiejscowienie falownika
Choose a suitable location for the inverter. It should be placed in an upright position within a well-ventilated enclosure to prevent overheating. Avoid laying the inverter on its side or upside down.
5.3 Wiring the Inverter
- Ensure the inverter's main power switch is in the WYŁĄCZONY pozycja.
- Połącz red (positive) inverter cable to the positive (+) terminal on the inverter. Tighten the stainless steel nut securely.
- Podłącz drugi koniec red (positive) inverter cable to the positive (+) terminal on your 12V battery. Tighten securely.
- Połącz black (negative) inverter cable to the negative (-) terminal on the inverter. Tighten the stainless steel nut securely.
- Podłącz drugi koniec black (negative) inverter cable to the negative (-) terminal on your 12V battery. Tighten securely. A small spark may occur during this final connection; this is normal.
- Slide the protective caps over the terminals to prevent accidental contact.
5.4 Remote Control Connection (Optional)
For convenient remote operation, connect the wired remote control:
- Ensure the inverter's main power switch is in the WYŁĄCZONY pozycja.
- Plug the remote control cable into the
Ask a question about this manual
Ask about setup, troubleshooting, compatibility, parts, safety, or missing instructions. Manuals+ will review the question and use this page’s manual context to help answer it.