
1. Koniec produktuview
The AVLT Dual Monitor Wall Mount (Model AVLT-DM29-1) is designed to securely hold two flat or curved computer monitors ranging from 17 to 32 inches, each weighing up to 19.8 lbs (9 kg). This full-motion mount features gas spring technology for effortless height adjustment, along with extensive swivel, tilt, and rotation capabilities to optimize your viewdoświadczenie i ergonomia miejsca pracy.


2. Funkcje produktu
- Kompatybilność monitora: Supports two flat or curved monitors from 17 to 32 inches, each weighing up to 19.8 lbs (9 kg). Compatible with VESA 75x75mm or 100x100mm mounting patterns.
- Konstrukcja oszczędzająca miejsce: Lifts monitors off the desk, freeing up valuable workspace. The heavy-duty wall plate can be securely mounted on cement, brick, or wood walls.
- Ergonomiczne regulacje: Gas spring arm allows for height adjustment up to 9.8 inches (254mm). Offers arm extension, vertical tilt, horizontal swivel, and landscape or portrait rotation for optimal viewing.
- Improved Posture: Designed to help users achieve an ergonomic working posture, reducing strain and discomfort.
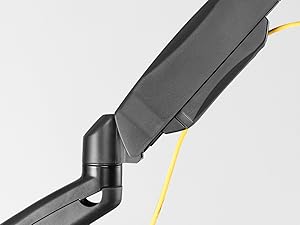
- Zintegrowane zarządzanie kablami: Features a system to route and conceal cables for a tidy workspace.
3. Specyfikacje
| Specyfikacja | Szczegół |
|---|---|
| Numer modelu | AVLT-DM29-1 |
| Zgodność rozmiaru monitora | 17" to 32" (Flat/Curved) |
| Nośność (na ramię) | 19.8 funta (9 kg) |
| Zgodność ze standardem VESA | 75x75mm, 100x100mm |
| Typ montażu | Montaż ścienny |
| Typ ruchu | Articulating, Rotate, Swivel, Tilt |
| Zakres regulacji wysokości | Up to 9.8" (254mm) via Gas Spring |
| Maksymalny kąt pochylenia | 90 stopni |
| Tworzywo | Aluminium |
| Wymiary produktu | 27.76 x 6.06 x 6.85 cala |
| Waga przedmiotu | 8.8 funta |

4. Informacje dotyczące bezpieczeństwa
Please read and understand all instructions before installation and use. Failure to do so may result in personal injury or property damage. Keep this manual for future reference.
- Ensure the mounting surface (wall) can safely support the combined weight of the mount and your monitors.
- Nie należy przekraczać maksymalnego udźwigu 19.8 funtów (9 kg) na ramię.
- Use appropriate tools and hardware for your specific wall type. If unsure, consult a qualified professional.
- Podczas instalacji należy trzymać dzieci i zwierzęta z daleka.
- Okresowo sprawdzaj wszystkie śruby i połączenia, aby mieć pewność, że są dobrze dokręcone.
5. Zawartość opakowania
Verify that all components are present before beginning installation. If any parts are missing or damaged, contact AVLT customer support.
- Montaż płyty ściennej
- Dual Gas Spring Monitor Arms
- VESA Mounting Plates (x2)
- Hardware Kit (screws, washers, spacers for various monitor types and wall mounting)
- Klucze imbusowe do regulacji
- Zaciski/osłony do zarządzania kablami
6. Konfiguracja i instalacja
6.1 Wall Type Compatibility
The AVLT Dual Monitor Wall Mount is compatible with wood stud walls, brick walls, and cement walls. Ensure you use the correct anchors and screws provided in the hardware kit for your specific wall type.
Video 6.1: This video demonstrates the features and adjustments of the AVLT Dual Monitor Wall Mount, including its full motion capabilities, gas spring height adjustment, and wide wall mounting compatibility.
6.2 Attaching VESA Plates to Monitors
- Ostrożnie połóż monitor ekranem do dołu na miękkiej i czystej powierzchni.
- Identify the VESA mounting holes on the back of your monitor (75x75mm or 100x100mm).
- Attach the VESA mounting plate to the monitor using the appropriate screws and washers from the hardware kit. Do not overtighten.

6.3 Montaż płytki ściennej
- Determine the desired height and position for your monitors. Consider your ergonomic needs.
- Mark the drilling locations for the wall plate. Use a level to ensure accuracy.
- Drill pilot holes according to the instructions for your wall type.
- Secure the wall plate to the wall using the appropriate anchors and screws. Ensure it is firmly attached.

6.4 Attaching Monitor Arms and Monitors
- Attach the gas spring monitor arms to the wall plate.
- Slide the monitors (with VESA plates attached) onto the monitor arms. Ensure they click into place or are secured with the provided locking mechanism.
6.5 Zarządzanie kablami
Route your monitor and power cables through the integrated cable management channels on the arms. Use the provided clips or covers to keep cables tidy and out of sight.

7. Instrukcja obsługi (regulacja)
7.1 Regulacja wysokości sprężyny gazowej
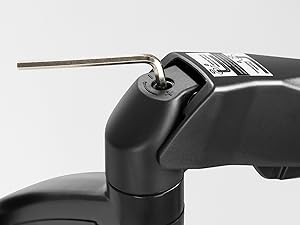
The gas spring arms allow for smooth vertical movement. If your monitor sags or floats, adjust the gas spring tension using the provided hex key. Turn clockwise to increase tension for heavier monitors, and counter-clockwise to decrease tension for lighter monitors.
7.2 Regulacja nachylenia
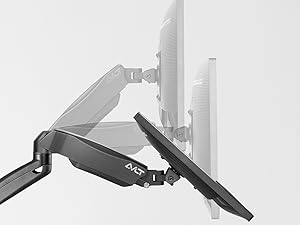
Adjust the monitor's vertical angle (tilt) to reduce glare and find your preferred viewing angle. The mount supports a wide tilt range.
7.3 Obrót i rotacja
The monitor arms allow for horizontal swivel to share your screen or adjust your viewing position. Monitors can also be rotated 360 degrees for landscape or portrait orientation.


8. Konserwacja
- Czyszczenie: Przetrzyj uchwyt miękką ściereczką.amp szmatką. Unikaj środków czyszczących o działaniu ściernym i rozpuszczalników.
- Kontrole okresowe: Regularly inspect all mounting hardware and connections to ensure they are tight and secure. Re-tighten if necessary.
- Sprężyna gazowa: If the gas spring tension feels off, re-adjust it according to Section 7.1.
9. Rozwiązywanie Problemów
| Problem | Możliwa przyczyna | Rozwiązanie |
|---|---|---|
| Monitoruj ugięcia lub spadki | Napięcie sprężyny gazowej jest zbyt słabe w stosunku do ciężaru monitora. | Increase gas spring tension (clockwise) using the hex key (refer to Section 7.1). |
| Monitor unosi się lub trudno go opuścić | Napięcie sprężyny gazowej jest zbyt duże w stosunku do ciężaru monitora. | Decrease gas spring tension (counter-clockwise) using the hex key (refer to Section 7.1). |
| Monitor is not level | Minor adjustment needed at the VESA plate. | Loosen the leveling screw on the VESA plate, adjust monitor, then re-tighten. |
| Góra wydaje się niestabilna | Wall plate not securely fastened or incorrect wall anchors used. | Re-check wall plate installation and ensure all screws are tight. Verify correct anchors for your wall type. |
10. Gwarancja i wsparcie
The AVLT Dual Monitor Wall Mount (Model AVLT-DM29-1) is covered by a 3 ROK GWARANCJI PRODUCENTA. Additionally, AVLT provides LIFETIME TECH SUPPORT to assist with any questions or concerns you may have.
For technical assistance, warranty claims, or any product-related inquiries, please contact AVLT customer support. They aim to respond within 24 hours.
Informacje kontaktowe: Refer to the AVLT official webAby uzyskać najaktualniejsze dane kontaktowe, odwiedź witrynę lub dokumentację zakupu.