1. Ważne informacje dotyczące bezpieczeństwa
Read and understand all safety warnings and instructions before operating this garden tiller. Failure to follow these instructions may result in serious injury or death.
- Środki ochrony osobistej: Always wear appropriate safety gear, including eye protection, hearing protection, sturdy footwear, and gloves.
- Bezpieczeństwo paliwa: Gasoline is highly flammable. Handle fuel in a well-ventilated area, away from sparks, open flames, or other ignition sources. Do not smoke while fueling.
- Operating Area: Clear the work area of stones, debris, and other objects that could be thrown by the tines. Keep bystanders, children, and pets at a safe distance (at least 15 meters/50 feet).
- Wydech silnika: Operate the tiller in a well-ventilated outdoor area. Engine exhaust contains carbon monoxide, which is a colorless, odorless, and deadly gas.
- Sterowanie maszyną: Always maintain a firm grip on the handlebars. Be aware of the tines and their rotation direction. Never operate the tiller on excessively steep slopes.
- Konserwacja: Disconnect the spark plug wire before performing any maintenance or adjustments to prevent accidental starting.
2. Koniec produktuview i komponenty
Familiarize yourself with the main parts of your Hecht HEC-796 garden tiller.

Rysunek 2.1: The handlebar assembly featuring the Hecht brand logo. This is where the operator controls the tiller.

Rysunek 2.2: Close-up of a handlebar grip, designed for comfortable and secure handling during operation.

Rysunek 2.3: The throttle control and engine kill switch located on the handlebar for easy access. The red switch is for turning the engine ON/OFF.

Rysunek 2.4: View of the engine area, showing the fuel tank cap (silver) and the air filter housing (black cage). Regular checks of these components are crucial for performance.

Rysunek 2.5: The tilling tines (black blades) and the transport wheel. The transport wheel assists in moving the tiller to and from the work area.
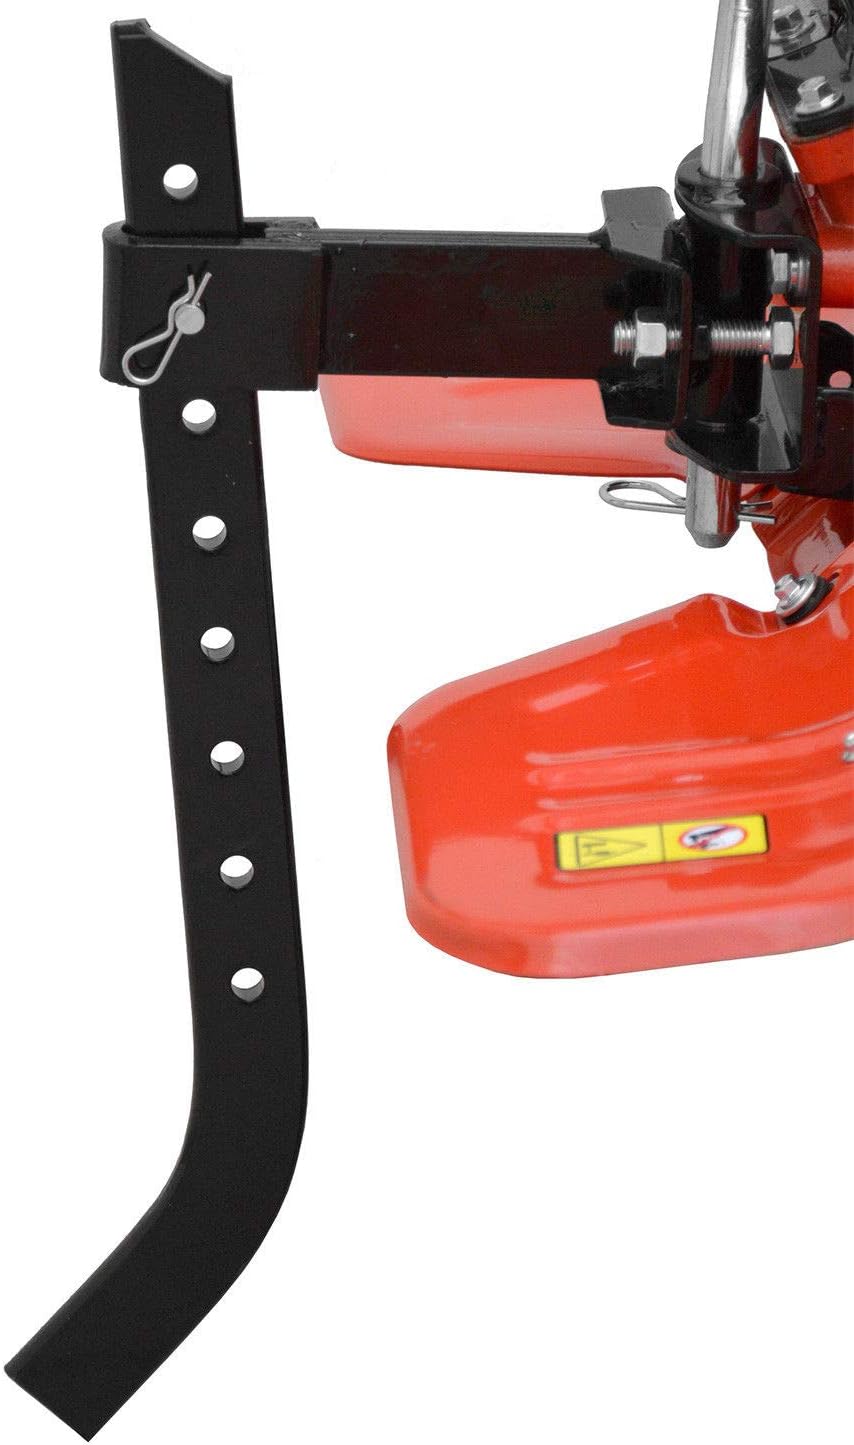
Rysunek 2.6: The adjustable depth stake (also known as a drag bar) at the rear of the tiller. This component helps control the tilling depth and forward speed.
3. Instalacja i montaż
Your Hecht HEC-796 tiller may require some assembly before first use. Follow these steps carefully:
- Rozpakowywanie: Ostrożnie wyjmij wszystkie elementy z opakowania. Sprawdź, czy nie ma uszkodzeń lub brakujących części.
- Montaż kierownicy: Attach the handlebar assembly to the main unit. Secure it firmly using the provided bolts and nuts. Ensure all cables (throttle, kill switch) are routed correctly and not pinched.
- Transport Wheel Installation: Install the transport wheel(s) as per the diagrams in the separate assembly guide. Ensure they can be easily raised and lowered.
- Depth Stake/Drag Bar: Attach the depth stake to the rear of the tiller. Adjust its height to the desired tilling depth. A lower setting results in deeper tilling and slower forward movement.
- Kontrola płynów:
- Olej silnikowy: Fill the engine with appropriate 4-stroke engine oil (e.g., SAE 10W-30) to the recommended level on the dipstick. Do not overfill.
- Paliwo: Napełnij zbiornik paliwa świeżą benzyną bezołowiową. Nie używaj paliwa E85 ani paliw mieszanych. Upewnij się, że korek wlewu paliwa jest dobrze dokręcony.
4. Instrukcja obsługi
Before starting, ensure you have read the safety section and the tiller is properly assembled and fueled.
4.1. Uruchomienie silnika
- Zawór paliwa: Otwórz zawór paliwa (jeśli jest na wyposażeniu).
- Dławić się: Przesuń dźwignię ssania do pozycji „CHOKE” (w przypadku zimnych rozruchów).
- Przepustnica: Set the throttle lever to the 'FAST' or 'START' position.
- Wyłącznik awaryjny: Ensure the engine kill switch is in the 'ON' position.
- Rozrusznik ręczny: Pull the recoil starter handle slowly until resistance is felt, then pull firmly and quickly. Repeat until the engine starts.
- Rozgrzewka: Once the engine starts, gradually move the choke lever to the 'RUN' position as the engine warms up.
4.2. Tilling
- Lower Transport Wheel: Raise the transport wheel(s) to engage the tines with the ground.
- Engage Tines: Engage the tines using the appropriate lever or clutch control on the handlebar.
- Control Depth: Use the depth stake to control how deep the tines penetrate the soil. For initial passes, a shallower depth is often recommended.
- Utrzymanie kontroli: Walk behind the tiller, maintaining a firm grip on the handlebars. Allow the tiller to pull itself forward. Do not force it.
- Wiele przepustek: For deeply compacted soil, make several passes, gradually increasing the tilling depth with each pass.
4.3. Zatrzymanie silnika
- Disengage Tines: Disengage the tines.
- Przepustnica: Move the throttle lever to the 'SLOW' or 'IDLE' position and allow the engine to cool for a minute.
- Wyłącznik awaryjny: Move the engine kill switch to the 'OFF' position.
- Zawór paliwa: Close the fuel valve (if equipped) for storage.
5. Konserwacja
Regular maintenance ensures optimal performance and extends the life of your tiller. Always disconnect the spark plug wire before performing any maintenance.
- Po każdym użyciu:
- Clean soil and debris from the tines and housing.
- Inspect tines for damage or wear.
- Sprawdź, czy elementy mocujące nie są poluzowane.
- Every 10-20 Hours of Operation (or Annually):
- Olej silnikowy: Check engine oil level and change if necessary. Refer to the engine manual for specific oil change intervals.
- Filtr powietrza: Wyczyść lub wymień filtr powietrza. Brudny filtr powietrza może obniżyć wydajność silnika.
- Świeca: Sprawdź i wyczyść świecę zapłonową. Wymień ją, jeśli elektrody są zużyte lub zanieczyszczone.
- Filtr paliwa: Inspect and replace the fuel filter if necessary.
- Składowanie:
- Drain the fuel tank or add a fuel stabilizer if storing for more than 30 days.
- Dokładnie wyczyść całą maszynę.
- Przechowywać w suchym i dobrze wentylowanym miejscu, z dala od bezpośredniego światła słonecznego i ekstremalnych temperatur.
6. Rozwiązywanie Problemów
W tej sekcji znajdziesz informacje o typowych problemach i ich potencjalnych rozwiązaniach.
| Problem | Możliwa przyczyna | Rozwiązanie |
|---|---|---|
| Silnik nie uruchamia się |
|
|
| Silnik pracuje słabo/brakuje mu mocy |
|
|
| Tiller does not cultivate effectively |
|
|
If problems persist after attempting these solutions, contact a qualified service technician or Hecht customer support.
7. Specyfikacje techniczne
| Specyfikacja | Wartość |
|---|---|
| Marka | Hecht |
| Model | HEC-796 |
| Numer części | H796 |
| Źródło zasilania | Napędzany benzyną |
| Moc silnika | 4.5 kW / 6.12 KM |
| Szerokość robocza | 80 cm |
| Głębokość robocza | 30 cm |
| Waga przedmiotu | 68 kilograma |
| GTIN | 08595614920148 |
8. Gwarancja i obsługa klienta
This Hecht HEC-796 garden tiller is covered by a manufacturer's warranty. Please refer to the separate warranty document included with your purchase for specific terms and conditions, including warranty period and coverage details.
For technical assistance, spare parts, or warranty claims, please contact your authorized Hecht dealer or visit the official Hecht webStrona z informacjami o obsłudze klienta.
Hecht Customer Service:
- Refer to your purchase documentation for local contact details.
- Odwiedzać www.hecht.cz/en/ for general information and support.