
1. Wprowadzenie
This manual provides instructions for the installation, operation, and maintenance of your AVLT Single Monitor Arm Desk Mount. This mount is designed to support a single flat, curved, or ultrawide monitor between 17 and 38 inches, weighing up to 26.4 lbs (12 kg), with VESA 75x75mm or 100x100mm mounting patterns. It features a premium mechanical spring for effortless adjustments and an ergonomic viewzdobywania doświadczenia.

Image: The AVLT Single Monitor Arm Desk Mount supporting a monitor, highlighting its robust construction and ergonomic design.
2. Informacje dotyczące bezpieczeństwa
- Ensure the desk surface is stable and capable of supporting the combined weight of the mount and your monitor.
- Nie przekraczać maksymalnego udźwigu wynoszącego 12 kg (26.4 funtów).
- Verify that your monitor has VESA 75x75mm or 100x100mm mounting holes.
- Tighten all screws securely during installation. Loose connections can cause instability.
- Adjust the spring tension carefully to match your monitor's weight to prevent sudden movements.
- Trzymaj dzieci i zwierzęta domowe z dala od miejsca instalacji.
3. Zawartość opakowania
Przed rozpoczęciem instalacji należy sprawdzić, czy wszystkie elementy są obecne:
- Zespół ramienia monitora
- Biurko Clamp Opierać
- Podstawa mocująca przelotkę
- Płyta VESA
- Zestaw narzędzi (śruby, podkładki, klucze imbusowe)
- Instrukcja obsługi
4. Konfiguracja i instalacja
The AVLT Single Monitor Arm offers two installation options: C-Clamp or Grommet Mount. Choose the method suitable for your desk.
4.1. Choose Mounting Method

Image: Illustration of the C-Clamp and Grommet mounting options, detailing desk thickness and hole diameter requirements.
4.2. Biurko Clamp Instalacja
- Dołącz C-klamp to the desk edge. Ensure it is securely tightened.
- Insert the main pole into the C-clamp podstawę i zabezpiecz ją.
4.3. Montaż mocowania przelotki
- Jeżeli biurko ma otwór na przelotkę, przełóż podstawę z przelotką przez otwór.
- Zabezpiecz podstawę przelotki od spodu biurka za pomocą dostarczonych elementów mocujących.
- Insert the main pole into the grommet base and secure it.
4.4. Attaching the Monitor Arm
- Slide the lower arm onto the main pole.
- Slide the upper arm onto the lower arm.
- Secure the arms with the provided screws and Allen wrenches.
4.5. Attaching the VESA Plate to Monitor
- Attach the VESA plate to the back of your monitor using the appropriate screws from the hardware kit.
- Ensure the VESA plate is firmly secured to the monitor.
4.6. Montaż monitora
- Carefully slide the monitor (with the attached VESA plate) onto the VESA head of the monitor arm.
- Secure the monitor to the arm using the quick-release mechanism or tightening screw.
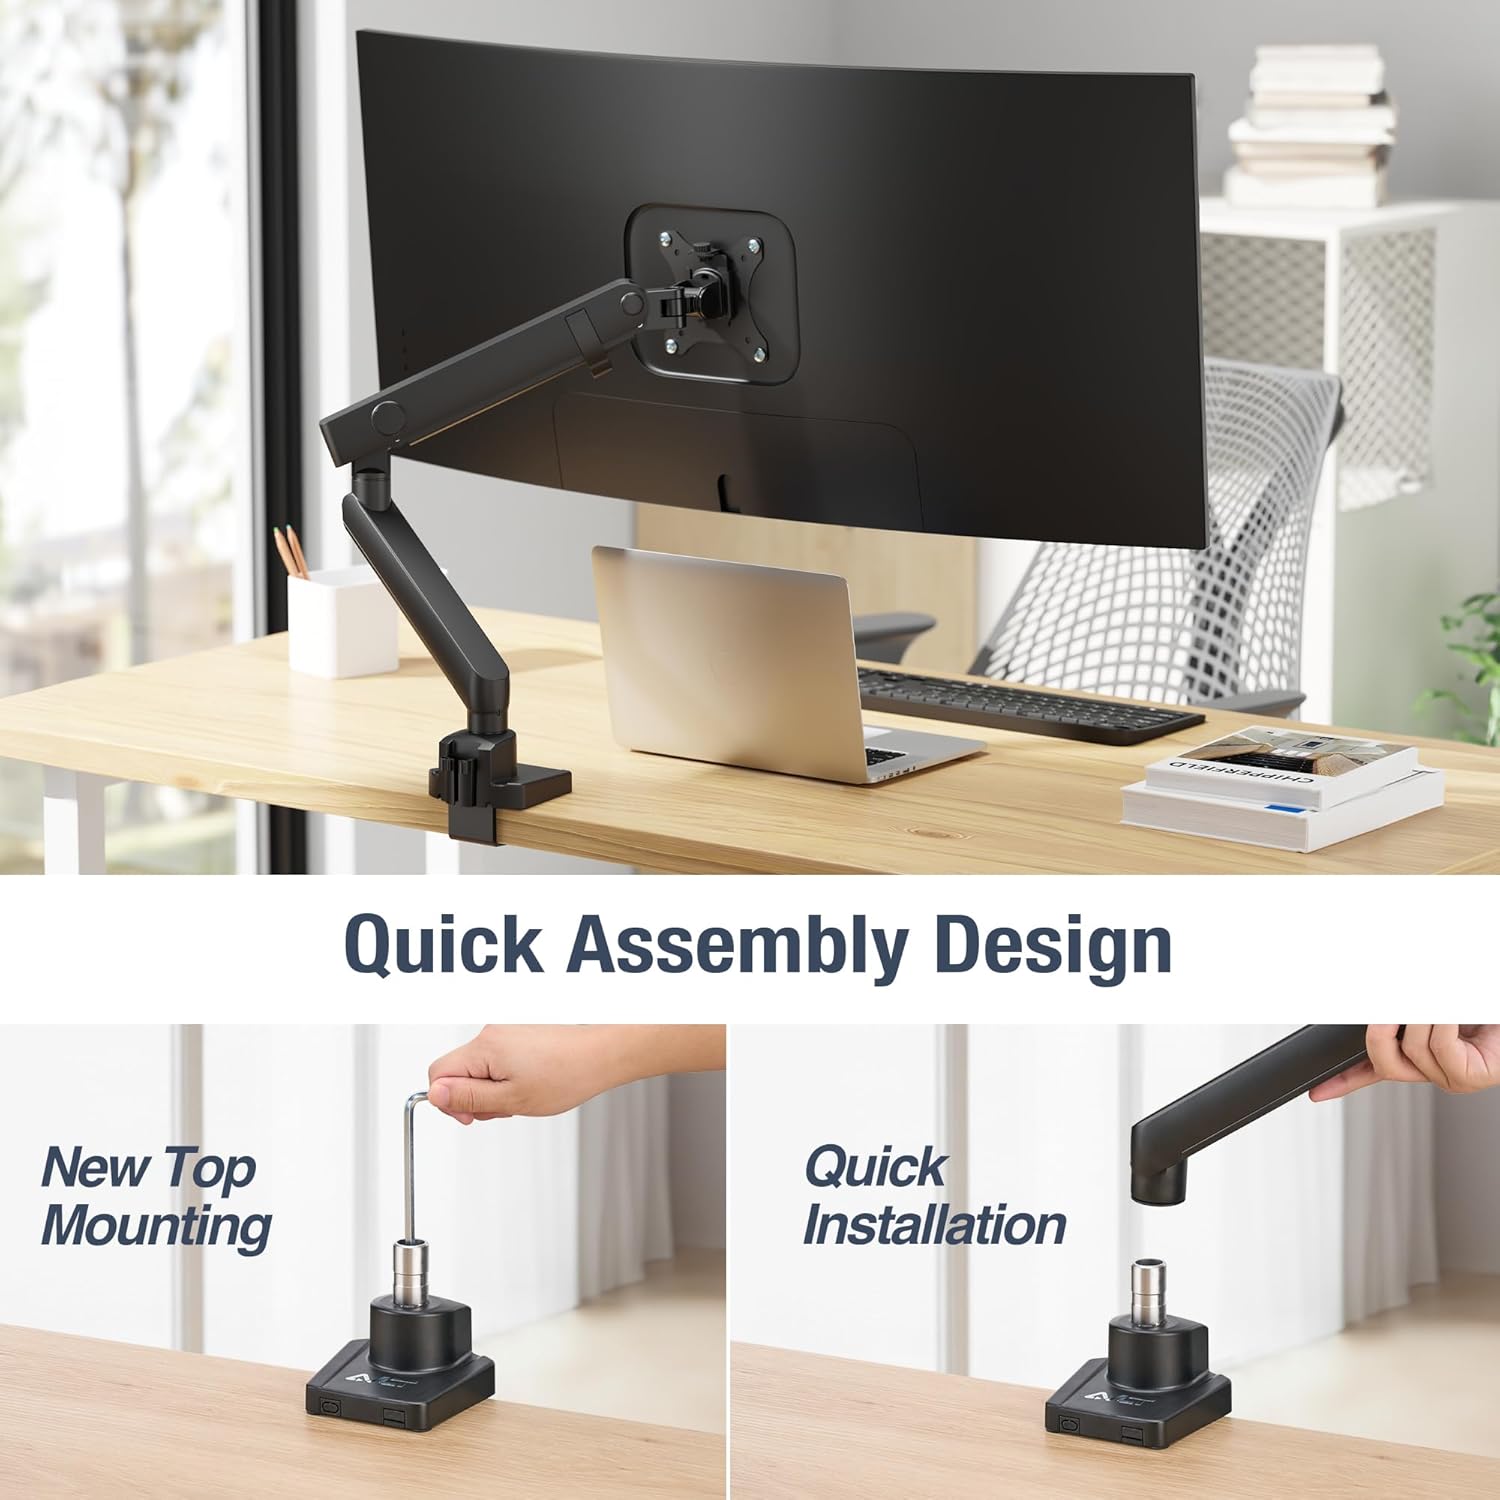
Image: Quick assembly design, illustrating the top mounting method and quick installation of the arm components.
4.7. Instrukcja wideo instalacji
Video: Official AVLT installation guide for the Single 26 lbs Monitor Desk Top Mount, demonstrating the assembly process including C-clamp/grommet installation, arm attachment, VESA plate setup, and initial adjustments.
5. Operating Instructions & Adjustments
The AVLT monitor arm provides full motion capabilities for optimal viewkomfort.
5.1. Regulacja napięcia sprężyny
The mechanical spring tension needs to be adjusted to match your monitor's weight for smooth and stable positioning. Use the provided Allen wrench to turn the tension screw located on the arm. Turn clockwise to increase tension for heavier monitors, and counter-clockwise to decrease tension for lighter monitors.
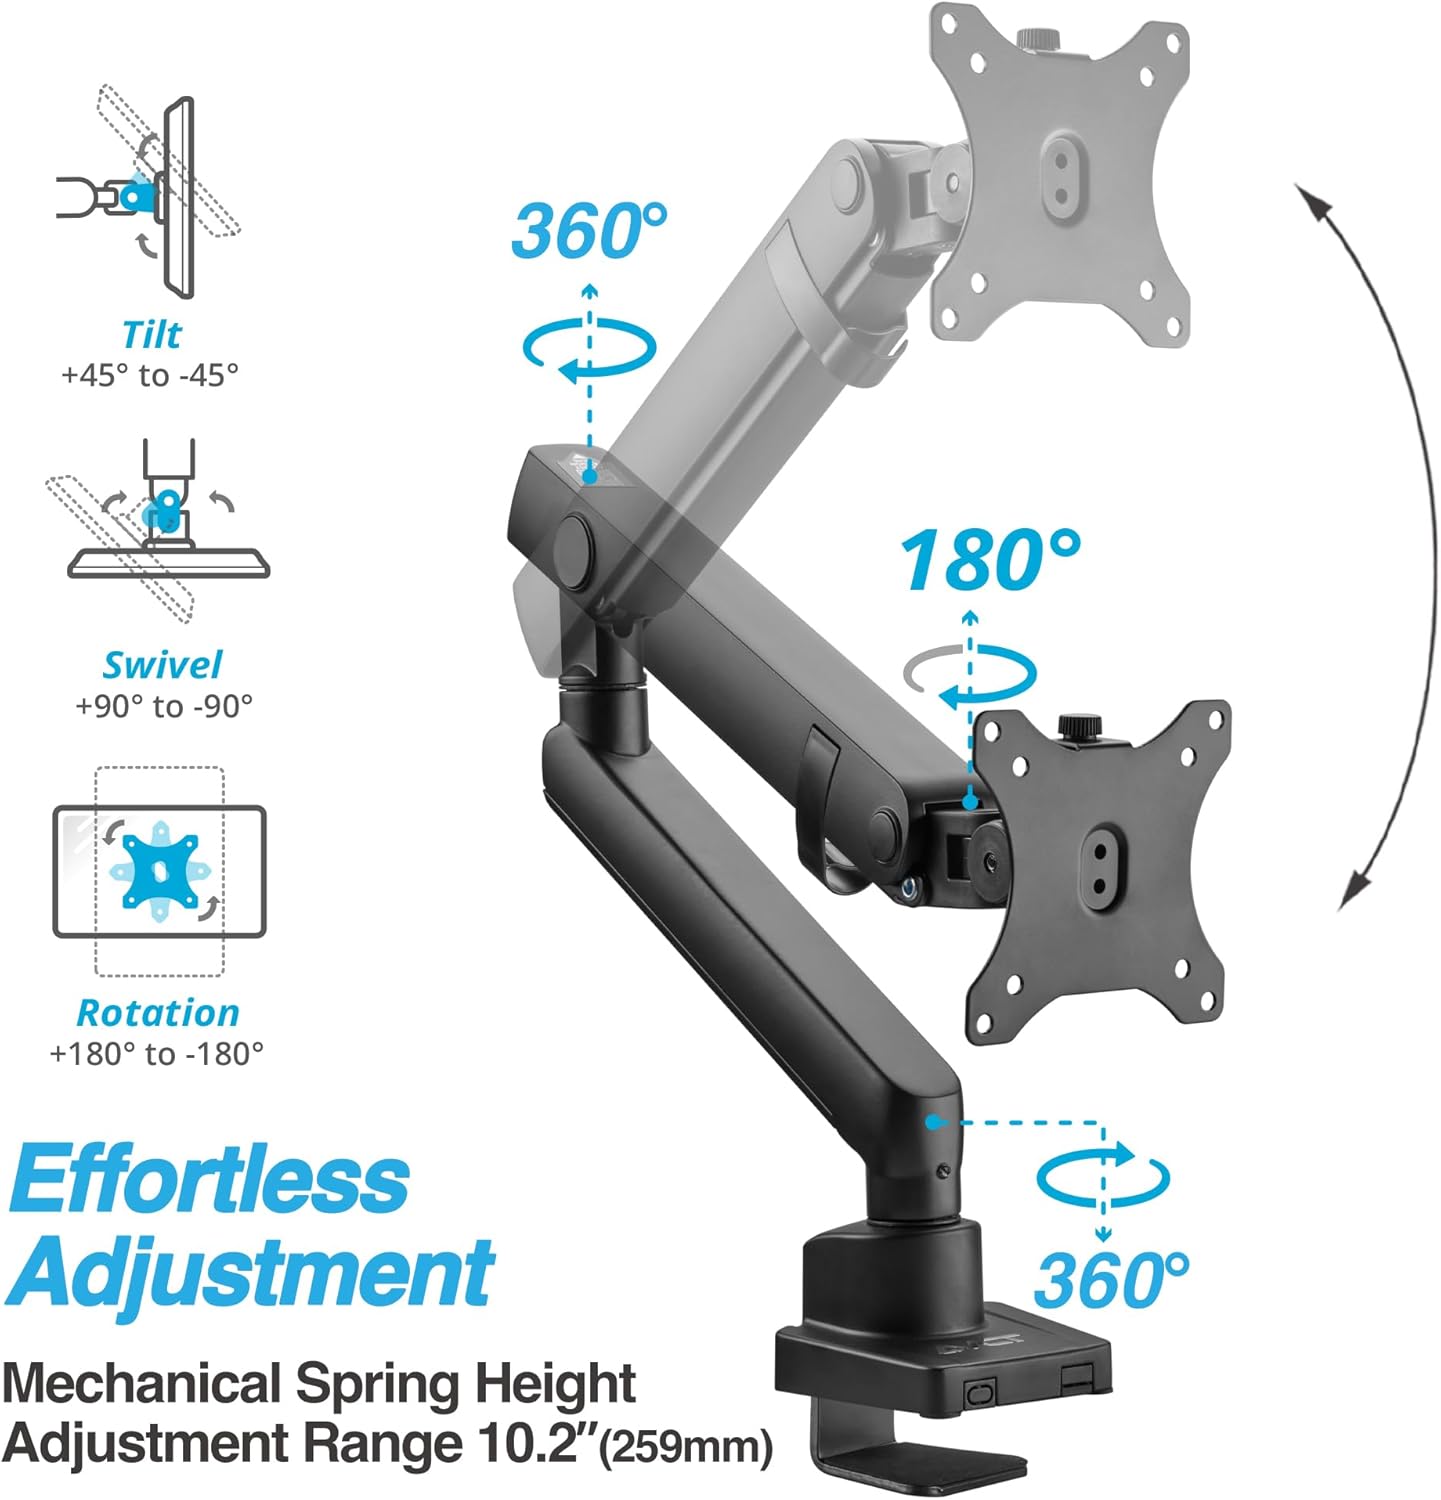
Image: Visual guide to the effortless adjustments, including tilt (+45° to -45°), swivel (+90° to -90°), and rotation (+180° to -180°).
5.2. Regulacja wysokości
The premium mechanical spring allows for height adjustment from 7.7 inches (196mm) to 17.9 inches (455mm). Gently push or pull the monitor to the desired height. If the monitor does not stay in place, adjust the spring tension.

Obraz: Szczegółowy view of the mechanical spring mechanism facilitating smooth height adjustments.
5.3. Tilt, Swivel, and Rotation
- Przechylenie: Adjust the monitor screen angle up or down (+45° to -45°) to reduce glare and optimize viewing.
- Obracać: Rotate the monitor horizontally (+90° to -90°) to share your screen or change viewkąty.
- Obrót: Rotate the monitor 360° (landscape to portrait mode) for different work tasks.

Image: Close-up of the monitor arm's head, demonstrating the adjustable tilt function.
6. Zarządzanie kablami
The monitor arm features an integrated cable management system to keep your workspace tidy and organized. Route your monitor and power cables through the designated channels on the arm to hide them from view.

Image: The monitor arm with cables neatly routed through its integrated management system, contributing to a clean desk.

Obraz: Zbliżenie view of the cable management clips on the monitor arm.
7. Konserwacja
- Regularnie sprawdzaj wszystkie śruby i połączenia, aby mieć pewność, że są dobrze dokręcone.
- Wyczyść ramię monitora miękką szmatką.amp płótno. Unikaj ściernych środków czyszczących.
- Periodically re-adjust the spring tension if your monitor's weight changes or if the arm's movement becomes too loose or stiff.
8. Rozwiązywanie Problemów
| Problem | Możliwa przyczyna | Rozwiązanie |
|---|---|---|
| Monitor opada lub nie utrzymuje się na żądanej wysokości. | Spring tension is too low for the monitor's weight. | Increase spring tension by turning the adjustment screw clockwise with the provided Allen wrench. |
| Ramię monitora jest zbyt sztywne, aby je poruszyć. | Spring tension is too high. | Decrease spring tension by turning the adjustment screw counter-clockwise. |
| Monitor chwieje się lub wydaje się niestabilny. | Śruby montażowe są luźne lub biurko jest zablokowane.amp/grommet is not secure. | Check and tighten all mounting screws and the desk clamp/grommet mechanism. Ensure the desk surface is stable. |
| Monitor does not fit the VESA plate. | Nieprawidłowy wzór VESA. | Verify your monitor's VESA pattern is 75x75mm or 100x100mm. If not, an adapter may be required (not included). |
9. Specyfikacje
| Funkcja | Szczegół |
|---|---|
| Numer modelu | AVLT-DM13-1 |
| Kompatybilność z rozmiarem ekranu | 17" - 38" (Flat/Curved/Ultrawide) |
| Nośność | Do 26.4 funtów (12 kg) |
| Zgodność ze standardem VESA | 75x75mm, 100x100mm |
| Zakres regulacji wysokości | 7.7" do 17.9" (196 mm do 455 mm) |
| Kąt nachylenia | +45° do -45° |
| Kąt obrotu | +90° do -90° |
| Obrót | 360° (Krajobraz/Portret) |
| Opcje montażu | C-Clamp, Mocowanie przelotki |
| Tworzywo | Aluminium |
10. Gwarancja i pomoc techniczna
This AVLT product comes with a 3-year warranty. For technical support, warranty claims, or any questions regarding your monitor arm, please contact AVLT customer service through their official website or the retailer where the product was purchased. Please have your model number (AVLT-DM13-1) and proof of purchase ready.