1. Wprowadzenie
Thank you for choosing the Walfront LCD Digital Programmable Weekly Timer Switch. This device is designed for automatic control of various electrical appliances based on user-defined schedules. Please read this manual carefully before installation and operation to ensure proper use and to prevent damage.
2. Informacje dotyczące bezpieczeństwa
Ostrzeżenie: Instalację elektryczną powinien wykonywać wyłącznie wykwalifikowany personel. Przed instalacją lub konserwacją należy odłączyć zasilanie, aby uniknąć porażenia prądem.
- Upewnij się, że głośność wejściowatage matches the timer's specifications (24V for this model).
- Do not exceed the maximum load capacity of 16A 250VAC (resistive load).
- Trzymaj urządzenie z dala od wody i nadmiernej wilgoci.
- Nie próbuj samodzielnie demontować ani naprawiać urządzenia. W przypadku problemów skontaktuj się z pomocą techniczną.
3. Koniec produktuview
The Walfront LCD Digital Programmable Weekly Timer Switch is a high-precision device built with durable, moisture-resistant, and corrosion-protected materials. It features a clear LCD display and supports up to 16 ON/OFF programs daily and weekly.
3.1 Główne cechy
- High-quality construction for long lifespan.
- Automatic ON/OFF control for various electrical devices.
- Built-in 1.2V/40mA rechargeable battery for memory retention.
- Industrial-grade chip for high precision and strong anti-interference.
- Up to 16 ON and 16 OFF programming settings per day/week.
- LCD display showing real-time, hour, minute, and ON/AUTO/OFF status.
- DIN rail mounting design.
3.2 Składniki

Obraz 1: Przód view of the Walfront LCD Digital Programmable Weekly Timer Switch. Shows the LCD display and control buttons.

Obraz 2: Z powrotem view of the timer switch, illustrating the wiring terminals and basic electrical specifications printed on the unit.
4. Konfiguracja i instalacja
This timer is designed for DIN rail mounting. Ensure the DIN rail is securely installed before attaching the timer.
4.1 Schemat okablowania

Obraz 3: Wiring diagrams showing direct connection (left) and connection with an AC contactor (right). The direct connection illustrates neutral and live wire inputs and load output. The AC contactor diagram shows 220V power input and output to the load device.
Direct Wiring: Connect the neutral and live wires to the designated input terminals (L and N). Connect the load to the output terminals (typically 3 and 4 for normally open, or 3 and 5 for normally closed, as indicated on the device). Refer to the diagram on the device for exact terminal numbering.
Wiring with AC Contactor: For higher loads, connect the timer to control an AC contactor. The timer's output will switch the coil of the contactor, which in turn controls the main power to the load. This setup is shown on the right side of Image 3.
4.2 Pierwsze uruchomienie i ładowanie akumulatora
Upon first use, connect the timer to power. The internal 1.2V/40mA rechargeable battery will begin charging. If the display is blank or shows incorrect time, allow it to charge for a few minutes. Press the "Nastawić" button (often labeled with a small 'R' or 'C' and requires a pointed object) to clear all settings and start fresh.
5. Instrukcja obsługi
5.1 Ustawianie aktualnego czasu
- Naciśnij "CLOCK" button (often labeled with a clock icon) and hold it.
- Podczas trzymania "CLOCK", naciśnij "D+" aby ustawić aktualny dzień tygodnia.
- Podczas trzymania "CLOCK", naciśnij "H+" przycisk, aby ustawić aktualną godzinę.
- Podczas trzymania "CLOCK", naciśnij "M+" przycisk, aby ustawić bieżącą minutę.
- Uwolnij "CLOCK" przycisk. Czas jest teraz ustawiony.
5.2 Setting 12/24 Hour Mode
By default, the timer operates in 24-hour mode. To switch between 12-hour (AM/PM) and 24-hour modes, press and hold the "CLOCK" button for approximately 5 seconds. The display will show "AM" for 12-hour mode or switch back to 24-hour format.
5.3 Programowanie harmonogramów włączania/wyłączania
The timer supports up to 16 ON and 16 OFF programs. Each program consists of an ON time and an OFF time.
- Naciśnij "PROG" Naciśnij przycisk raz. Na wyświetlaczu pojawi się „1 ON”.
- Naciskać "D+" to select the day(s) for this ON program (e.g., Mon-Fri, Sat-Sun, or specific days).
- Naciskać "H+" aby ustawić żądaną godzinę WŁ.
- Naciskać "M+" aby ustawić żądaną minutę WŁ.
- Naciskać "PROG" Ponownie. Na wyświetlaczu pojawi się komunikat „1 OFF”.
- Powtórz kroki 2-4, aby ustawić czas WYŁĄCZENIA dla pierwszego programu.
- Kontynuuj naciskanie "PROG" to cycle through "2 ON", "2 OFF", up to "16 ON", "16 OFF", setting each as needed.
- Po ustawieniu wszystkich żądanych programów naciśnij przycisk "CLOCK" button to exit programming mode and return to real-time display.
Notatka: If you need to cancel a program, press the "PROG" button to select the program, then press the "PODRĘCZNIK" button until "----" appears on the display for that program's time slot.
5.4 Sterowanie ręczne (WŁ./AUTO/WYŁ.)
Naciśnij "PODRĘCZNIK" przycisk umożliwiający przełączanie trybów pracy:
- NA: The output is continuously ON, ignoring all programs.
- AUTOMATYCZNY: Timer działa zgodnie z zaprogramowanymi harmonogramami WŁ./WYŁ.
- OFF: The output is continuously OFF, ignoring all programs.
Upewnij się, że timer jest włączony "AUTO" tryb pracy zaprogramowanej.
5.5 Funkcja blokady klawiszy
To prevent accidental changes to settings, the timer features a key lock function.

Obraz 4: The timer display showing the key lock symbol, indicating that the buttons are locked.
- To lock the keys: Press and hold the "C/R" (Cancel/Reset) button for approximately 4 seconds until a lock symbol appears on the LCD.
- To unlock the keys: Press and hold the "C/R" button again for approximately 4 seconds until the lock symbol disappears.
6. Specyfikacje
| Parametr | Wartość |
|---|---|
| Wejście Voltage | AC/DC 24V (This model) |
| Contact Rated Voltage | AC 180V~264V (50/60Hz) |
| Nośność | 16A 250VAC (obciążenie rezystancyjne) |
| Operacje WŁ./WYŁ. | 16 ON / 16 OFF (Manual/Auto) |
| Wyświetlacz | LCD |
| Pobór mocy | 4.5VA (Max) |
| Błąd | ≤2 seconds/day (at 25℃) |
| Metoda montażu | DIN Rail (sold separately) |
| Zakres czasowy | Od 1 minuty do 168 godzin |
| Minimalny interwał | 1 minuta |
| Temperatura pracy | -10℃ do 55℃ |
| Wilgotność robocza | 35-85% wilgotności względnej |
| Wymiary (dł. x szer. x wys.) | 86x36x65mm |
| Wewnętrzna bateria | 1.2V/40mA rechargeable, >15 days backup |
| Liczba obwodów | Changeover switch (SPDT) |
| Okres użytkowania | Mechanical: 107, Electrical: 105 |
| Waga | 125g |
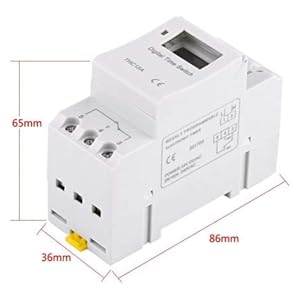
Obraz 5: Diagram illustrating the dimensions of the timer switch: 86mm length, 36mm width, and 65mm height.
7. Konserwacja
- Keep the timer clean and free from dust. Use a dry, soft cloth for cleaning.
- Nie należy używać środków czyszczących o właściwościach ściernych ani rozpuszczalników.
- Okresowo sprawdzaj połączenia przewodów, aby mieć pewność, że są bezpieczne.
- The internal battery is designed for long life and typically does not require replacement. If the timer loses settings frequently after power outages, the battery may need servicing by a qualified technician.
8. Rozwiązywanie Problemów
| Problem | Możliwa przyczyna | Rozwiązanie |
|---|---|---|
| Wyświetlacz jest pusty. | No power supply or internal battery discharged. | Check power connections. Allow the timer to charge for a few minutes after connecting to power. |
| Timer does not switch ON/OFF as programmed. | Timer is not in "AUTO" mode, programs are incorrect, or key lock is active. | Press "MANUAL" until "AUTO" is displayed. Review and correct programs. Unlock keys if necessary. |
| Przyciski nie reagują. | Funkcja blokady klawiatury jest aktywna. | Press and hold "C/R" for 4 seconds to unlock the keys. |
| Czas jest niedokładny. | Minor drift (within specifications) or internal battery issue. | Reset and re-set the time. If inaccuracy persists or settings are lost frequently, contact support. |
9. Gwarancja i wsparcie
Walfront strives to provide high-quality products. If you encounter any issues with your product, please contact us for prompt assistance. We offer return and refund services for product defects.
For support, please refer to the contact information provided with your purchase or visit the Walfront store on Amazon: Walfront Amazon Store.