PowMr SL03-30A
PowMr SL03-30A Solar Charge Controller User Manual
Model: SL03-30A
1. Wprowadzenie
The PowMr SL03-30A Solar Charge Controller is designed to manage the power flow from your solar panels to your battery bank, ensuring efficient charging and protecting your batteries from overcharge and over-discharge. This controller is suitable for 12V/24V systems and supports various battery types including Lithium and Lead-Acid batteries. It features an LCD display for monitoring system parameters and offers multiple protection functions to enhance system safety and longevity.
2. Główne cechy

Obraz: Ponadview of the PowMr SL03-30A Solar Charge Controller's main features, including 12V/24V auto-detection, energy recording, temperature compensation, aluminum heat sink, eight electronic protections, compatibility with Lithium/Lead-acid batteries, and light & timer control.
- 12V/24V Auto-detection: Automatically identifies system voltage.
- Energy Recording/Current Display: Provides real-time monitoring of energy and current.
- Kompensacja temperatury: Adjusts charging parameters based on ambient temperature.
- Radiator aluminiowy: Zapewnia wydajne odprowadzanie ciepła i stabilną pracę.
- Eight Electronic Protections: Comprehensive safety features including overcharge, over-discharge, short-circuit, and reverse current protection.
- Kompatybilność baterii: Supports Lithium and Lead-Acid battery types (Flooded, GEL, AGM, LiFePO4).
- Light & Timer Control: Programmable load control functions.
- Wyświetlacz LCD: Clear interface for parameter viewi regulacji.

Obraz: Wewnętrzny view of the controller highlighting key components such as the copper coil for stable charge/discharge, a fuse for double protection, and MOSFETs made from good raw materials for current sensing.
3. Instrukcje bezpieczeństwa
Please read all instructions carefully before installation and operation. Failure to follow these instructions may result in damage to the controller, battery, or solar panels, and may void the warranty.
- Ensure the battery is connected first to allow the controller to recognize the system voltage.
- Always connect the solar panels and load after the battery.
- Disconnect the solar panels and load before disconnecting the battery.
- Install the controller in a well-ventilated, dry, and cool environment, away from flammable materials.
- Avoid touching or short-circuiting wires or terminals.
- Aby zapobiec przegrzaniu, do wszystkich połączeń należy stosować przewody o odpowiednim przekroju.
- This device is for indoor use only. Avoid exposure to water or excessive humidity.
- Przechowywać w miejscu niedostępnym dla dzieci.
4. Instalacja
4.1 Kolejność okablowania
- Connect the battery to the charge controller. Ensure correct polarity (+ to + and - to -). The controller will display the battery voltage.
- Connect the solar panel to the charge controller. Ensure correct polarity. The controller will begin charging the battery.
- Connect the load to the charge controller. Ensure correct polarity.
Ważny: Always connect the battery first and disconnect it last. This sequence prevents damage to the controller from voltage skoki.
4.2 Montaż
Mount the controller vertically on a wall or flat surface in a well-ventilated area, away from direct sunlight, high temperatures, and water. Ensure there is sufficient air circulation around the heat sink.

Image: The PowMr SL03-30A Solar Charge Controller showing its mounting holes on the sides, indicating how it can be affixed to a surface.
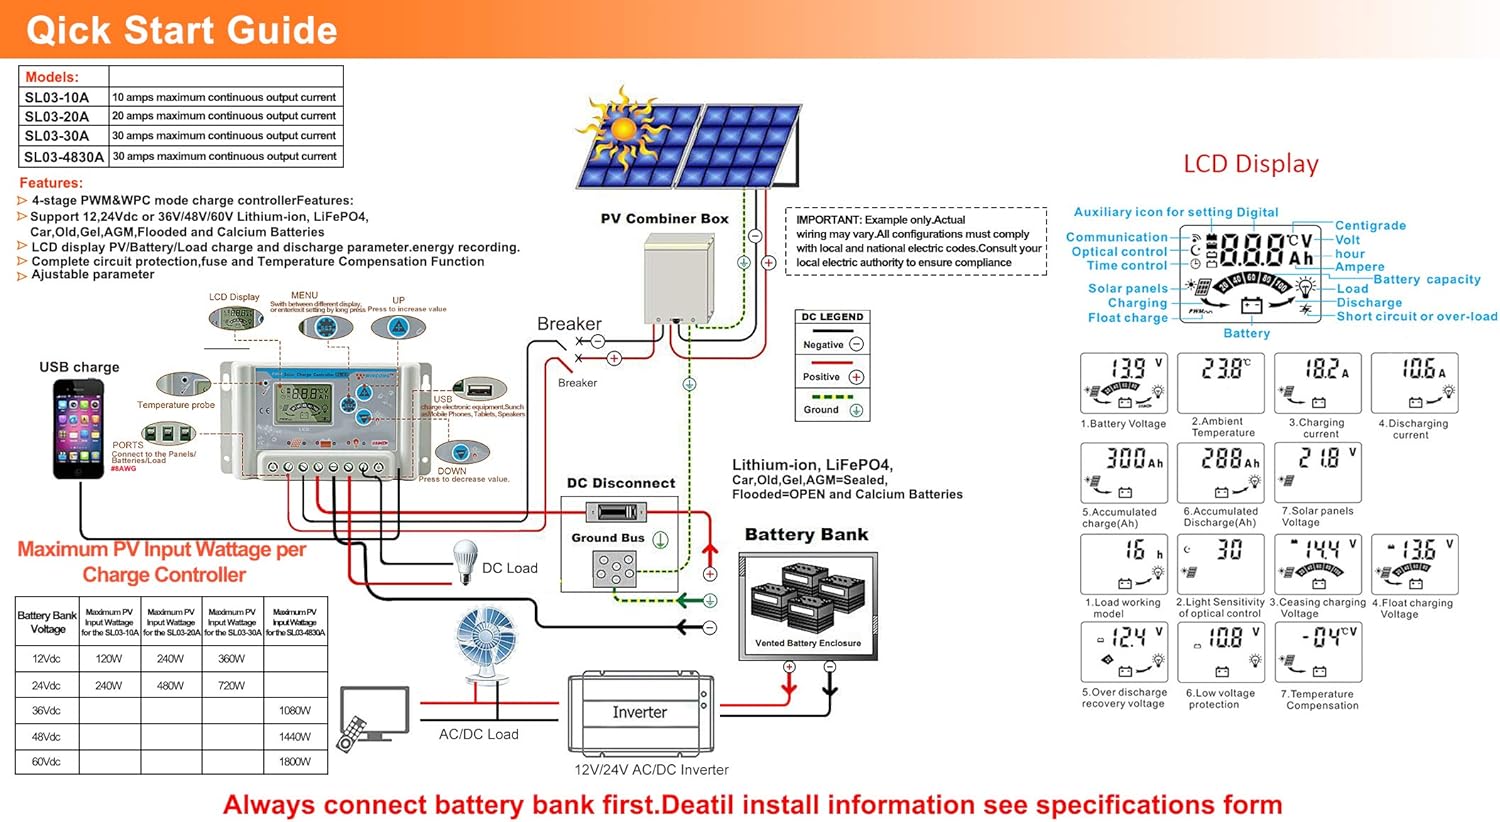
Image: A detailed wiring diagram for the solar charge controller, showing connections for PV combiner box, battery bank, DC load, and inverter. It also illustrates the LCD display and various parameters.
4.3 Video Guide: How to Connect the Controller
Video: This video demonstrates the correct wiring procedure for the PowMr SL03-30A Solar Charge Controller, showing how to connect the battery and solar panels. It also shows how to browse the interface and adjust settings.
5. Działanie
5.1 Wyświetlacz LCD i przyciski
The controller features an LCD display and three buttons for operation: UP, DOWN, and SET.
- Przycisk W GÓRĘ: Navigates through display interfaces, increases parameter values.
- Przycisk DÓŁ: Navigates through display interfaces, decreases parameter values.
- Przycisk SET: Enters/exits setting mode, confirms parameter changes.
5.2 Browsing Display Interfaces
Press the UP or DOWN button to cycle through various display interfaces, including battery voltage, charging current, accumulated discharge, and load status.
5.3 Ustawienia parametrów
To enter the setting interface, long-press the SET button for 5 seconds. Use the UP and DOWN buttons to adjust values and the SET button to confirm and move to the next parameter. Long-press SET again to save changes and exit.
Parametry regulowane obejmują:
- Typ baterii: Select the correct battery type (e.g., Lead-Acid, Lithium).
- Tryb kontroli obciążenia: Set timer for load operation (e.g., 24H for continuous, 16H for dusk-to-dawn).
- Objętość ładowaniatage: Adjust maximum charge voltage.
- Objętość odcięcia rozładowaniatage: Ustaw minimalną głośnośćtage before load disconnection.
- Rozładowanie Ponowne podłączenie Voltage: Ustaw głośnośćtage at which the load reconnects.
Refer to the "Specifications" section for default and adjustable ranges for each parameter.
6. Funkcje ochronne

Image: A circular diagram illustrating the eight electronic protection features of the PowMr SL03-30A Solar Charge Controller, including power off memory, short-circuit, over-charging, open-circuit, over-load, under-voltage discharge, over-heat, and dual MOSFET reverse current protection.
The PowMr SL03-30A controller incorporates multiple protection mechanisms to ensure the safety and longevity of your solar system:
- Ochrona przed nadmiernym ładowaniem: Chroni akumulator przed uszkodzeniem na skutek nadmiernego ładowania.
- Ochrona przed nadmiernym rozładowaniem: Odłącza obciążenie, gdy pojemność akumulatora spadnietage spada poniżej bezpiecznego poziomu.
- Zabezpieczenie przed zwarciem: Automatyczne wyłączenie w przypadku zwarcia.
- Open-circuit Protection: Protects the system if the solar panel circuit is open.
- Ochrona przed odwrotną polaryzacją: Prevents damage from incorrect battery or solar panel connections.
- Ochrona przed przeładowaniem: Disconnects the load if current exceeds the rated limit.
- Ochrona przed przegrzaniem: Reduces power or shuts down if the controller's internal temperature is too high.
- Pamięć wyłączania: Zachowuje ustawienia nawet po zaniku zasilania.
7. Specyfikacje

Image: A comprehensive table detailing the specifications for PowMr SL03-10A, SL03-20A, SL03-30A, and SL03-40A models, including normal battery voltage, charge/discharge current, battery type, system recognize range, charging regulation, maximum PV open circuit voltage, and various protection parameters.
| Parametr | Value (SL03-30A) |
|---|---|
| Normalna pojemność bateriitage | 12V / 24V Auto |
| Prąd ładowania | 30A |
| Prąd rozładowania | 30A |
| Typ baterii | Lead-Acid Battery (Flooded, AGM, Gel, Calcium), LiFePO4 (Lithium) |
| System Recognize Range | Lead-Acid Battery: 8V-15V(12V System), 18V-30V(24V System) LiFePO4: 8V-15V(12V), 18V-30V(24V) |
| Charging Regulation | Bulk, Absorption, Float, Equalization |
| Maks. Obwód otwarty PV Objętośćtage VOC) | <= 50 V. |
| Max. PV Input Wattage (12 V/24 V) | 360W/720W |
| Stop-charge Voltage | Default 14.4V (12V), 28.8V (24V) (adjustable) |
| Float-charge Voltage | Default 13.6V (12V), 27.2V (24V) (adjustable) |
| Niska objętośćtage Reconnected | Default 12.4V (12V), 24.8V (24V) (adjustable) |
| Niska objętośćtage Rozłączenie | Default 10.8V (12V), 21.6V (24V) (adjustable) |
| No Load Losses | <10mA |
| Kompensacja temperatury akumulatora | Automatic with optional NTC thermal probe (adjustable) |
| Temperatura pracy | -20°C do +60°C |
| Outline Size (L*W*H) | Wymiary: 143*77*40mm |
| Rozstaw otworów montażowych | 134*55mm |
| Waga | 260g |
8. Rozwiązywanie Problemów
This section provides solutions to common issues you might encounter with your PowMr SL03-30A Solar Charge Controller.
| Problem | Możliwa przyczyna | Rozwiązanie |
|---|---|---|
| Wyświetlacz kontrolera jest wyłączony. | Brak podłączonego akumulatora lub niski poziom naładowania akumulatoratage za niskie. | Connect the battery correctly. Ensure battery voltage jest powyżej 8V. |
| "LLL" or "HHH" displayed on screen. | No PV input or PV voltage za niskie/za wysokie. | Ensure solar panels are connected and receiving sunlight. Check PV voltage. |
| Akumulator się nie ładuje. | Panel słoneczny niepodłączony, niewystarczające nasłonecznienie lub nieprawidłowe okablowanie. | Check solar panel connections and ensure adequate sunlight. Verify wiring polarity. |
| Ładowanie nie działa. | Load disconnected, battery voltage too low (over-discharge protection), or load control settings. | Check load connections. Charge battery. Adjust load control timer (e.g., set to 24H for continuous). |
| Przegrzanie kontrolera. | Poor ventilation or excessive load/charging current. | Ensure proper ventilation around the controller. Reduce load or charging current if consistently overheating. |
9. Konserwacja
Regularna konserwacja zapewnia optymalną wydajność i wydłuża żywotność regulatora ładowania słonecznego.
- Czystość: Utrzymuj kontroler w czystości, bez kurzu i zanieczyszczeń. Do czyszczenia używaj suchej ściereczki.
- Znajomości: Okresowo sprawdzaj wszystkie połączenia przewodów pod kątem szczelności i korozji. Luźne połączenia mogą powodować przegrzewanie i słabą wydajność.
- Wentylacja: Aby zapewnić właściwe odprowadzanie ciepła, należy upewnić się, że otwory wentylacyjne nie są zablokowane.
- Stan baterii: Monitoruj pojemność bateriitage and health regularly. Replace batteries as needed.
- Warunki środowiskowe: Ensure the controller is operating within its specified temperature and humidity ranges.
10. Gwarancja i wsparcie
For warranty information, technical support, or service inquiries, please contact PowMr customer service through the retailer where the product was purchased or visit the official PowMr website. Please have your model number (SL03-30A) and purchase date available when contacting support.
Więcej informacji znajdziesz na stronie PowMr Store.