1. Wprowadzenie
This manual provides instructions for the proper setup, operation, and maintenance of your Acer B247Y 23.8-inch LED LCD Monitor. Please read this manual thoroughly before using your monitor to ensure optimal performance and to prevent damage.
The Acer B247Y is a 23.8-inch Full HD (1920 x 1080) monitor featuring an IPS panel for wide viewing angles, an anti-glare display, and a frameless design on three sides. It includes multiple connectivity options and an ergonomic stand for comfortable viewing.
2. Zawartość opakowania
Sprawdź, czy w paczce znajdują się wszystkie elementy. Jeśli brakuje któregokolwiek z nich lub jest on uszkodzony, skontaktuj się ze sprzedawcą.
- Acer B247Y 23.8-inch LED LCD Monitor
- Stojak na monitor (podstawa i szyjka)
- Power Adapter (Internal) and Power Cable
- Kabel VGA
- Kabel DisplayPort 1.2
- Kabel HDMI
- Audio-in Cable (if included)
- Audio-out Cable (if included)
- Instrukcja obsługi (ten dokument)
3. Konfiguracja
3.1 Montaż podstawy monitora
The monitor comes with a detachable foot stand. Follow these steps to assemble:
- Ostrożnie wyjmij monitor i elementy stojaka z opakowania.
- Przymocuj podstawę do panelu monitora. Upewnij się, że jest pewnie zamocowana.
- Attach the stand base to the stand neck. Tighten any screws if provided, usually located on the underside of the base.
- Zmontowany monitor należy umieścić na stabilnej, płaskiej powierzchni.
Notatka: The monitor also supports VESA mount (100 x 100 mm) for wall or arm mounting. Refer to your VESA mount kit instructions for installation.
3.2 Podłączanie monitora
Podłącz monitor do komputera lub innych urządzeń za pomocą odpowiednich kabli.
- Połączenie wideo:
- Podłącz jeden koniec kabla DisplayPort do wyjścia DisplayPort w komputerze, a drugi koniec do wejścia DisplayPort w monitorze.
- Alternatively, connect an HDMI cable from your computer's HDMI output to the monitor's HDMI input.
- For older systems, connect a VGA cable from your computer's VGA output to the monitor's VGA input.
- Połączenie audio:
- If using VGA or DisplayPort without audio, connect an audio cable from your computer's audio output to the monitor's audio-in port for integrated speakers.
- To connect external speakers or headphones, use the monitor's audio-out port.
- Podłączenie zasilania:
- Podłącz kabel zasilający do wejścia zasilania monitora, a następnie podłącz drugi koniec do uziemionego gniazdka elektrycznego.

Figure 3.2.1: Acer B247Y Monitor with Stand. This image illustrates the overall appearance of the monitor when fully assembled on its stand.
4. Instrukcja obsługi
4.1 Włączanie/wyłączanie
Press the power button, usually located on the bottom right or rear of the monitor, to turn the monitor on or off. The power indicator light will illuminate when the monitor is on.
4.2 Adjusting Monitor Settings (OSD)
The monitor features an On-Screen Display (OSD) menu for adjusting various settings. Use the control buttons (typically located near the power button) to navigate and select options within the OSD menu.
Typowe ustawienia OSD obejmują:
- Zdjęcie: Brightness, Contrast, Color Temperature, Gamma, Acer eColor Management modes (e.g., Dark Room, Eco).
- Audio: Volume control for integrated speakers or audio-out.
- Wejście: Select the active video input source (VGA, DisplayPort, HDMI).
- OSD: Czas oczekiwania na wyświetlenie menu OSD, język.
- Kierownictwo: Przywróć ustawienia fabryczne.
4.3 Regulacje ergonomiczne
The Acer B247Y monitor stand offers several ergonomic adjustments to optimize your viewdoświadczenie:
- Przechylenie: Adjust the screen angle from -5 degrees to 25 degrees (forward/backward).
- Obracać: Rotate the monitor horizontally up to +/- 45 degrees.
- Regulacja wysokości: Możliwość regulacji wysokości ekranu w zakresie do 120 mm.
- Sworzeń: Obróć ekran o 90 stopni, aby uzyskać tryb portretowy viewing.
5. Konserwacja
Właściwa konserwacja gwarantuje długowieczność i optymalną wydajność monitora.
- Czyszczenie ekranu: Delikatnie przetrzyj ekran miękką, niepozostawiającą włókien ściereczką. W przypadku uporczywych zabrudzeń,ampen the cloth with a small amount of water or a non-abrasive screen cleaner. Do not spray liquid directly onto the screen.
- Czyszczenie Casing: Do czyszczenia monitora należy używać miękkiej, suchej ściereczki.asing. Unikaj stosowania silnych detergentów i środków czyszczących o właściwościach ściernych.
- Wentylacja: Aby zapobiec przegrzaniu, upewnij się, że otwory wentylacyjne monitora nie są zablokowane.
- Wyłączone: Zawsze wyłączaj monitor i odłączaj go od gniazdka elektrycznego przed czyszczeniem lub jeśli nie używasz go przez dłuższy czas.
6. Rozwiązywanie Problemów
Jeśli masz problemy z monitorem, zapoznaj się z poniższymi typowymi procedurami rozwiązywania problemów:
- No Power / Monitor Does Not Turn On:
- Upewnij się, że kabel zasilający jest prawidłowo podłączony do monitora i do sprawnego gniazdka elektrycznego.
- Sprawdź, czy gniazdko elektryczne działa prawidłowo, podłączając do niego inne urządzenie.
- Naciśnij mocno przycisk zasilania.
- No Image / "No Signal" Message:
- Check that the video cable (DisplayPort, HDMI, or VGA) is securely connected to both the monitor and your computer.
- Upewnij się, że komputer jest włączony i nie znajduje się w trybie uśpienia.
- Użyj menu OSD, aby ręcznie wybrać właściwe źródło sygnału wejściowego.
- Jeśli to możliwe, spróbuj użyć innego kabla wideo lub portu.
- Obraz jest zniekształcony lub niewyraźny:
- Upewnij się, że rozdzielczość wyświetlania na Twoim komputerze jest ustawiona na rozdzielczość natywną monitora (1920 x 1080).
- Adjust brightness, contrast, and other picture settings via the OSD menu.
- Sprawdź, czy ekran lub kable nie uległy uszkodzeniu fizycznemu.
- Brak dźwięku z głośników:
- Zwiększ głośność korzystając z menu OSD lub ustawień dźwięku komputera.
- Ensure the audio cable (if used) is properly connected.
- Sprawdź, czy w ustawieniach dźwięku komputera wybrano właściwe urządzenie wyjściowe audio.
7. Specyfikacje
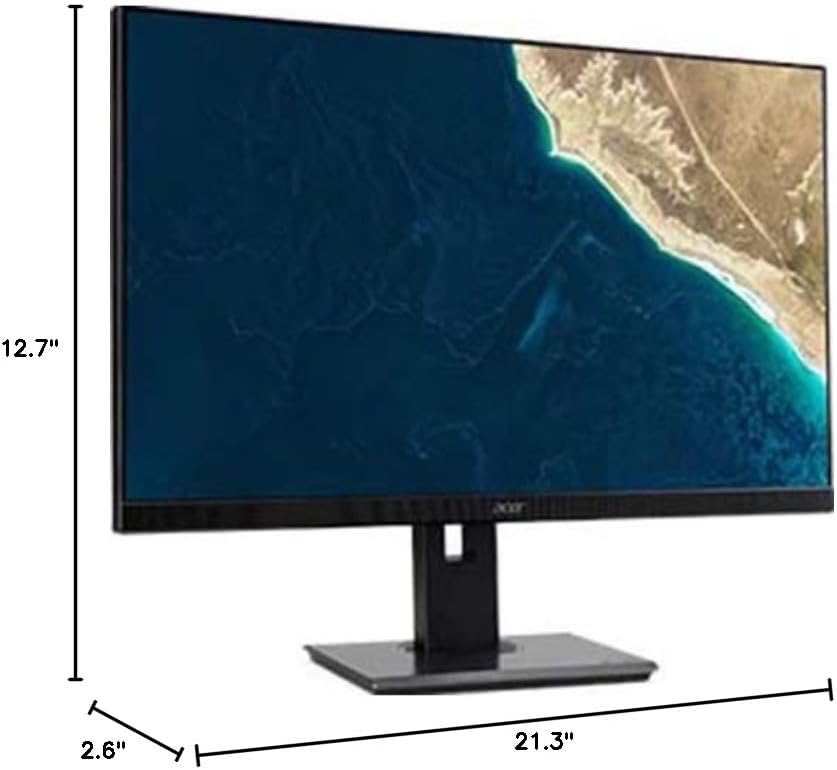
Figure 7.1.1: Acer B247Y Monitor Dimensions. This image shows the approximate height (12.7"), width (21.3"), and depth (2.6") of the monitor without the stand.
| Funkcja | Specyfikacja |
|---|---|
| Numer modelu | B247Y |
| Rozmiar ekranu | 23.8 cali (60.5 cm) |
| Typ wyświetlacza | LED LCD, IPS Panel, Anti-glare (AG) |
| Maksymalna rozdzielczość | 1920 x 1080 (Pełna rozdzielczość HD) |
| Proporcje obrazu | 16:9 |
| Częstotliwość odświeżania | 75 Hz |
| Czas reakcji | 4ms (gray-to-gray) |
| Jasność (typowa) | 250 cd/m² |
| Natywny współczynnik kontrastu | 1,000:1 |
| Współczynnik kontrastu dynamicznego | 100,000,000:1 |
| Viewkąty (poziom/pion) | 178° / 178° |
| Łączność | VGA, DisplayPort 1.2, HDMI, Audio-in, Audio-out |
| Zintegrowane głośniki | 2 x 2.0W |
| Ergonomiczne regulacje | Tilt (-5° to 25°), Swivel (+/- 45°), Height Adjustment (120mm), Pivot (90°) |
| VESA Mount Support | 100x100mm |
| Wymiary ze stojakiem (szer. x wys. x gł.) | 21.3" x 14.9"~19.6" x 7.6" (54.0cm x 37.9cm~49.9cm x 19.3cm) |
| Waga ze stojakiem | 12.3 funtów (5.6 kg) |
| Zasilacz | Wewnętrzny |
| Kolor | Czarny |
8. Gwarancja i wsparcie
Your Acer B247Y monitor comes with a Limited Three-Year Warranty. Please retain your proof of purchase for warranty claims.
For technical support, service, or warranty inquiries, please refer to the official Acer support website or contact their customer service department. Contact information can typically be found on the Acer webstronie internetowej lub w karcie gwarancyjnej dołączonej do produktu.
Blokada Kensingtona: The monitor supports a Kensington lock for security. Attach a compatible Kensington lock (sold separately) to the security slot on the monitor to deter theft.