SILCA PISTA
Instrukcja obsługi pompki podłogowej SILCA Pista
Model: PISTA
Wstęp
Thank you for choosing the SILCA Pista Floor Pump. This manual provides essential information for the proper setup, operation, maintenance, and troubleshooting of your new pump. Designed for quick and efficient inflation of bicycle tires, the SILCA Pista combines high-pressure capability with durable construction and premium components.
Produkt ponadview
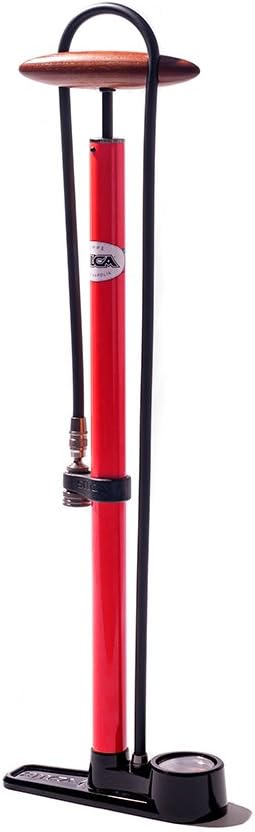
Figure 1: The SILCA Pista Floor Pump in red with a black single-sided base and wood handle.
Główne cechy:
- High Pressure Design: Delivers high pressure for quick and efficient inflation of bicycle tires.
- Stalowa konstrukcja: Durable steel construction ensures long-lasting quality and performance.
- Wood Handle: Ergonomic Ash wood handle provides a comfortable grip.
- Premium Presta and Schrader Chuck: Equipped with machined aluminum chucks for various valve types.
- Leather Gasket: Includes a leather gasket for a secure and airtight pumping.
Organizować coś
The SILCA Pista Floor Pump comes largely pre-assembled. Follow these steps to prepare your pump for first use:
- Rozpakowywanie: Ostrożnie wyjmij pompę z opakowania. Sprawdź, czy nie ma widocznych uszkodzeń.
- Hose and Chuck Inspection: Ensure the hose is securely attached to the pump body and the chucks (Presta and Schrader) are properly connected to the hose.
- Stabilność podstawy: Place the pump on a flat, stable surface. The single-sided base provides stability during operation.
Instrukcja obsługi
Follow these steps for effective and safe tire inflation:
- Prepare the Tire Valve:
- For Presta valves, unscrew the valve core lock nut counter-clockwise until it is loose. Press down briefly on the valve core to release a small amount of air and ensure it is not stuck.
- For Schrader valves, no special preparation is typically needed.
- Zamontuj uchwyt:
- Select the appropriate chuck (Presta or Schrader).
- Firmly press the chuck onto the tire valve until it is fully seated. Ensure a tight seal to prevent air leakage.

Figure 2: The SILCA Pista Floor Pump chuck attached to a bicycle tire valve.
- Napompuj oponę:
- Hold the pump handle firmly and place your feet on the pump's base for stability.
- Push the handle down smoothly and completely to inflate the tire. Pull the handle back up to draw in more air.
- Repeat this motion until the desired pressure is reached.

Figure 3: Proper technique for using the SILCA Pista Floor Pump.
- Monitoruj ciśnienie:
- Observe the pressure gauge located at the base of the pump. Inflate to the recommended PSI (Pounds per Square Inch) or BAR for your tire.
- Note: The gauge scale is condensed at higher pressures. Read carefully.

Rysunek 4: Zbliżenie view of the pressure gauge on the pump's base.
- Wyjmij uchwyt: Once the desired pressure is achieved, quickly and firmly pull the chuck straight off the valve.
- Secure Presta Valve (if applicable): For Presta valves, screw the valve core lock nut clockwise until it is finger-tight.
Konserwacja
Regular maintenance ensures the longevity and optimal performance of your SILCA Pista Floor Pump.
- Leather Gasket Care: The leather gasket is crucial for an airtight seal. Over time, it may dry out or wear.
- If pumping becomes difficult or air leaks are detected, the leather gasket may need lubrication or replacement.
- Apply a small amount of leather conditioner or a suitable lubricant to the gasket to keep it supple.
- Replacement leather gaskets are available from SILCA or authorized dealers.
- Ogólne sprzątanie: Wipe down the pump body and hose with a damp szmatką do usunięcia brudu i kurzu. Unikaj używania ostrych środków chemicznych.
- Składowanie: Store the pump in a dry, clean environment away from extreme temperatures.
Rozwiązywanie problemów
| Problem | Możliwa przyczyna | Rozwiązanie |
|---|---|---|
| Pump not building pressure / Air leaking |
|
|
| Gauge not reading correctly or stuck |
|
|
| Pump handle feels loose or detached |
|
|
Specyfikacje
- Nazwa modelu: PISTA
- Numer części: AM-PU-001-ASY-0101
- Kolor: Czerwony
- Przybory: Alloy Steel, Aluminum, Brass, Leather, Wood
- Źródło zasilania: Podręcznik
- Maksymalne ciśnienie: 15 Bars (approximately 220 PSI)
- Wymiary przedmiotu (dł. x szer. x wys.): 25.98 x 9.06 x 3.94 cala
- Wymiary opakowania przedmiotu (dł. x szer. x wys.): 27 x 9.5 x 3 cala
- Waga paczki: 0.66 kilograma
- Kod UPC: 853740005886
Gwarancja i wsparcie
SILCA products are built for durability and performance. For specific warranty information, please refer to the warranty card included with your purchase or visit the official SILCA website. For technical support, replacement parts, or service inquiries, please contact SILCA customer service directly.
SILCA Official Webstrona: www.silca.cc
Informacje kontaktowe: Proszę zapoznać się z webna naszej stronie znajdziesz najnowsze dane kontaktowe.
Ask a question about this manual
Ask about setup, troubleshooting, compatibility, parts, safety, or missing instructions. Manuals+ will review the question and use this page’s manual context to help answer it.