1. Wprowadzenie
Dziękujemy za zakupasing the Panasonic 6.5 kg Semi-Automatic Top Loading Washing Machine, model NA-W65B3RRB. This manual provides essential information for the safe and efficient operation, installation, and maintenance of your washing machine. Please read it thoroughly before use and retain it for future reference.

Obraz 1.1: Przód view of the Panasonic NA-W65B3RRB washing machine, showcasing its red and white design with floral patterns and top-mounted control panel.
2. Informacje dotyczące bezpieczeństwa
To prevent injury to yourself and others, and to avoid property damage, please observe the following safety precautions.
2.1 Ogólne zasady bezpieczeństwa
- Nie pozwalaj dzieciom bawić się pralką ani jej obsługiwać.
- Trzymaj zwierzęta z dala od urządzenia.
- Do not wash items that are soiled with flammable substances (e.g., gasoline, kerosene).
- Ensure the machine is unplugged before cleaning or performing any maintenance.
- Do not open the spin tub lid until the tub has completely stopped rotating.
2.2 Bezpieczeństwo elektryczne
- Connect the washing machine to a properly grounded electrical outlet.
- Nie należy używać przedłużaczy ani adapterów.
- Nie należy używać urządzenia, jeśli przewód zasilający lub wtyczka są uszkodzone.
- Unikaj dotykania wtyczki zasilania mokrymi rękami.
2.3 Bezpieczeństwo instalacji
- Install the machine on a firm, level surface to prevent vibration and noise.
- Należy zapewnić odpowiednią wentylację wokół maszyny.
- Do not install in areas exposed to direct sunlight or freezing temperatures.
3. Koniec produktuview
Familiarize yourself with the components and control panel of your washing machine.
3.1 Główne komponenty

Obraz 3.1: Szczyt view of the washing machine with both wash and spin tub lids open, illustrating the internal layout.
- Wanna do mycia: For washing and rinsing clothes.
- Wirówka: For drying clothes by spinning.
- Pokrywki: Covers for the wash and spin tubs.
- Panel sterowania: Located at the top rear, contains all operational dials.
- Dopływ wody: Punkt podłączenia węża doprowadzającego wodę.
- Wąż spustowy: For expelling water.
- Filtr kłaczków: Zbiera kłaczki w trakcie cyklu prania.
3.2 Panel sterowania

Obraz 3.2: Szczegółowy view of the control panel, showing the Wash Timer, Program Selector, and Spin Timer dials, along with the water inlet.
- Timer mycia: Sets the duration of the wash cycle (up to 15 minutes). Includes an auto-soak function.
- Selektor programów: Choose between "Regular" for normal clothes and "Strong" for heavily soiled items or sturdy fabrics.
- Dopływ wody: Directs water into the wash tub.
- Selektor odpływu: Controls water drainage. Options typically include Wash/Rinse, Drain, and Spin.
- Timer wirowania: Ustawia czas trwania cyklu wirowania (do 5 minut).
- Brzęczyk: Indicates the end of a cycle.
4. Konfiguracja
Prawidłowa instalacja gwarantuje optymalną pracę i bezpieczeństwo pralki.
4.1 Rozpakowanie
- Carefully remove all packaging materials, including the base packing.
- Sprawdź maszynę pod kątem uszkodzeń powstałych podczas transportu. W przypadku stwierdzenia uszkodzeń skontaktuj się natychmiast ze sprzedawcą.
- Ensure all included accessories are present: 1 owner manual, 1 inlet hose, 1 spin cap.
4.2 Umieszczenie
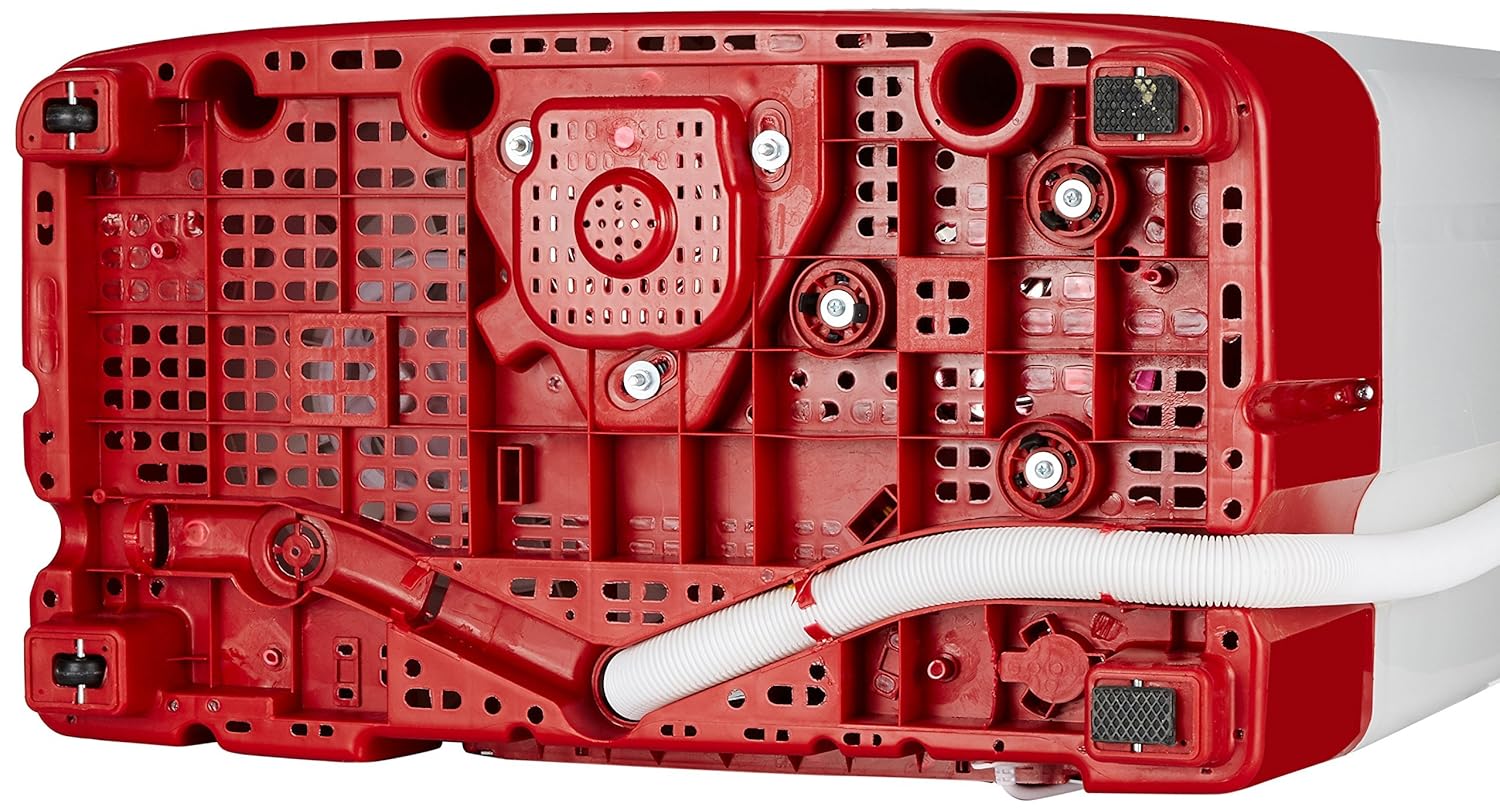
Obraz 4.1: Spód view of the washing machine, highlighting the sturdy base and integrated wheels for mobility.
- Place the washing machine on a flat, stable, and non-slippery surface.
- Ensure there is sufficient space around the machine for ventilation and operation.
- Avoid placing the machine in direct sunlight or in areas with high humidity or freezing temperatures.
4.3 Podłączenie wody
- Connect the inlet hose to the water inlet on the washing machine and to a water tap.
- Sprawdź, czy wszystkie połączenia są szczelne, aby zapobiec wyciekom.
4.4 Montaż węża spustowego

Obraz 4.2: Tył view of the washing machine, illustrating the power cord and the flexible drain hose extending from the lower back.
- Position the drain hose to allow for proper water drainage. It should not be kinked or blocked.
- Ensure the end of the drain hose is placed lower than the bottom of the washing machine to facilitate gravity drainage.
4.5 Połączenie zasilania
- Podłącz przewód zasilający do uziemionego gniazdka elektrycznego (230 V).
- Nie należy dzielić gniazdka z innymi urządzeniami o dużym poborze mocy.
5. Instrukcja obsługi
Aby pranie i wirowanie było efektywne, postępuj zgodnie z poniższymi wskazówkami.
5.1 Proces mycia
- Załaduj pranie: Otwórz pokrywę bębna pralki i luźno włóż do niego ubrania. Nie przekraczaj dopuszczalnej ładowności 6.5 kg.
- Dodaj wodę: Turn on the water tap and direct the water into the wash tub via the water inlet until the desired water level is reached.
- Dodaj detergent: Add the appropriate amount of detergent according to the detergent manufacturer's instructions and the load size.
- Wybierz program prania: Turn the "Program Selector" dial to either "Regular" for normal washing or "Strong" for heavily soiled items.
- Ustaw timer prania: Turn the "Wash Timer" dial to the desired wash duration (e.g., 5-15 minutes). The machine will start washing. The auto-soak function will engage if selected, combining washing and soaking for an efficient clean.
- Woda ściekowa: Once the wash cycle is complete, turn the "Drain Selector" to "Drain" to empty the water from the wash tub.
5.2 Rinsing Process
- After draining the wash water, refill the wash tub with clean water.
- Set the "Wash Timer" for a short duration (e.g., 2-3 minutes) to rinse the clothes.
- Repeat the rinse and drain steps as needed until clothes are free of detergent.
5.3 Proces przędzenia
- Transfer the rinsed clothes from the wash tub to the spin tub. Ensure clothes are evenly distributed to prevent imbalance and excessive vibration.
- Dokładnie załóż nasadkę wirującą na ubrania znajdujące się w bębnie wirówki.
- Zamknij pokrywę pojemnika wirówkowego.
- Turn the "Spin Timer" dial to the desired spin duration (e.g., 1-5 minutes). The machine will start spinning.
- Once the spin cycle is complete and the tub has stopped rotating, open the lid and remove the clothes.
5.4 Lint Filter Usage
The cassette-type lint filter effectively traps lint during the wash cycle. For optimal performance, clean the lint filter regularly after each wash cycle, especially after washing items that produce a lot of lint.
6. Konserwacja
Regularna konserwacja pomaga przedłużyć żywotność pralki.
6.1 Czyszczenie powierzchni zewnętrznej
- Wytrzyj obudowę urządzenia miękką, damp płótno.
- Nie należy używać środków czyszczących o działaniu ściernym, rozpuszczalników ani silnych środków chemicznych, gdyż mogą one uszkodzić powierzchnię.
6.2 Czyszczenie filtra kłaczków
- Wyjmij filtr kłaczków z pralki.
- Otwórz filtr i usuń wszelkie nagromadzone kłaczki.
- Wypłucz filtr pod bieżącą wodą, aby go dokładnie oczyścić.
- Reinsert the clean lint filter back into its position in the wash tub.
6.3 Odprowadzanie resztek wody
- After each use, ensure all water is drained from the wash tub.
- If the machine will not be used for an extended period, ensure it is completely dry and unplugged.
7. Rozwiązywanie Problemów
Rozwiązania typowych problemów operacyjnych można znaleźć w tej sekcji.
| Problem | Możliwa przyczyna | Rozwiązanie |
|---|---|---|
| Maszyna nie uruchamia się. | Przewód zasilający nie jest podłączony; zasilanie wyłączonetage; lid not closed properly; timer not set. | Check power connection; ensure lid is closed; set the timer. |
| Woda nie spływa. | Wąż spustowy jest zagięty lub zablokowany; selektor spustu nie jest ustawiony w pozycji „Spust”. | Straighten drain hose; clear any blockages; set drain selector to "Drain". |
| Excessive vibration or noise during spin. | Ubrania są nierównomiernie rozłożone w bębnie wirówki; pralka nie stoi na równej powierzchni. | Rearrange clothes evenly; ensure machine is on a stable, level surface. |
| Słabe efekty prania. | Too much laundry; insufficient detergent; incorrect wash program selected; lint filter clogged. | Reduce load size; use correct amount of detergent; select appropriate wash program; clean lint filter. |
Jeśli po wypróbowaniu tych rozwiązań problem nadal występuje, skontaktuj się z obsługą klienta.
8. Specyfikacje
Technical details of the Panasonic NA-W65B3RRB washing machine.

Obraz 8.1: Diagram illustrating the overall dimensions of the washing machine, including length (72 cm), width (44 cm), and height (89 cm).
- Model: NA-W65B3RRB
- Typ: Półautomatyczne ładowanie od góry
- Pojemność: 6.5 kilograma
- Maksymalna prędkość obrotowa: 1350 obr./min.
- Programy prania: 2 (Regular, Strong)
- Cechy szczególne: Lint Filter, Powerful Motor, Rust Free Body, Wash Timer with Auto Soak
- Efektywność energetyczna: Ocena 3 gwiazdek
- Noise Level Spinning: 65dB
- Tworzywo: Plastic (Drum and Body)
- Tomtage: 230 wolty
- Waga przedmiotu: 19.5 kilograma
- Wymiary przedmiotu (dł. x szer. x wys.): 76 x 44 x 89 centymetrów
- Zawartość zestawu: 1 owner manual, 1 Hose, 1 spin cap
- Kraj pochodzenia: Indie
9. Gwarancja i wsparcie
Your Panasonic NA-W65B3RRB washing machine comes with a manufacturer's warranty.
9.1 Informacje o gwarancji
Ten produkt jest objęty a 1-letnia gwarancja producenta od daty zakupu. Prosimy zachować paragon na wypadek reklamacji. Gwarancja obejmuje wady produkcyjne i usterki powstałe w normalnych warunkach użytkowania.
9.2 Obsługa klienta
For any queries, service requests, or technical assistance, please contact Panasonic Customer Care:
- Numery obsługi klienta: 1800 103 1333 / 1800 108 1333
- Producent: Panasonic India Private Limited
- Adres: 12th Floor, Ambience Tower, NH-8, Ambience Island, DLF Phase 3, Sector 24, Gurugram, Haryana 122002.
Możesz również odwiedzić oficjalną stronę Panasonic webwitrynę, w której można znaleźć więcej informacji i zasobów wsparcia.