NETGEAR XS712T
NETGEAR ProSAFE XS712T 12-Port 10GBase-T Gigabit Smart Managed Switch User Manual
Model: XS712T-100NES
1. Wprowadzenie
This manual provides detailed instructions for the installation, configuration, and operation of your NETGEAR ProSAFE XS712T 12-Port 10GBase-T Gigabit Smart Managed Switch. Designed for small to medium-sized businesses (SMBs), this switch offers high-performance 10-Gigabit connectivity, advanced Layer 2 features, and easy web-based management to meet diverse networking needs.
2. Główne cechy
- Advanced VLAN features such as MAC (Media Access Control), protocol-based VLAN and guest VLAN.
- Advanced QoS (Quality of Service) including Q-in-Q.
- Dynamic VLAN assignment - Increases security by imposing consistent policy and user credentials across the network, regardless of where users connect.
- MLD snooping - Increases network efficiency by forwarding multicast traffic to designated hosts only, rather than flooding multicast packets across all ports.
- Security management.
- IPv6 for management, QoS and ACL.
- Łatwy w użyciu Web-zarządzanie oparte.
3. Zawartość opakowania
Sprawdź, czy w przesyłce znajdują się następujące elementy:
- NETGEAR ProSAFE XS712T 12-Port 10GBase-T Gigabit Smart Managed Switch
- Przewód zasilający
- Zestaw do montażu w szafie rack (jeśli dotyczy)
- Instrukcja instalacji
4. Koniec produktuview
The NETGEAR ProSAFE XS712T switch features a robust design with multiple ports and indicators for efficient network management.
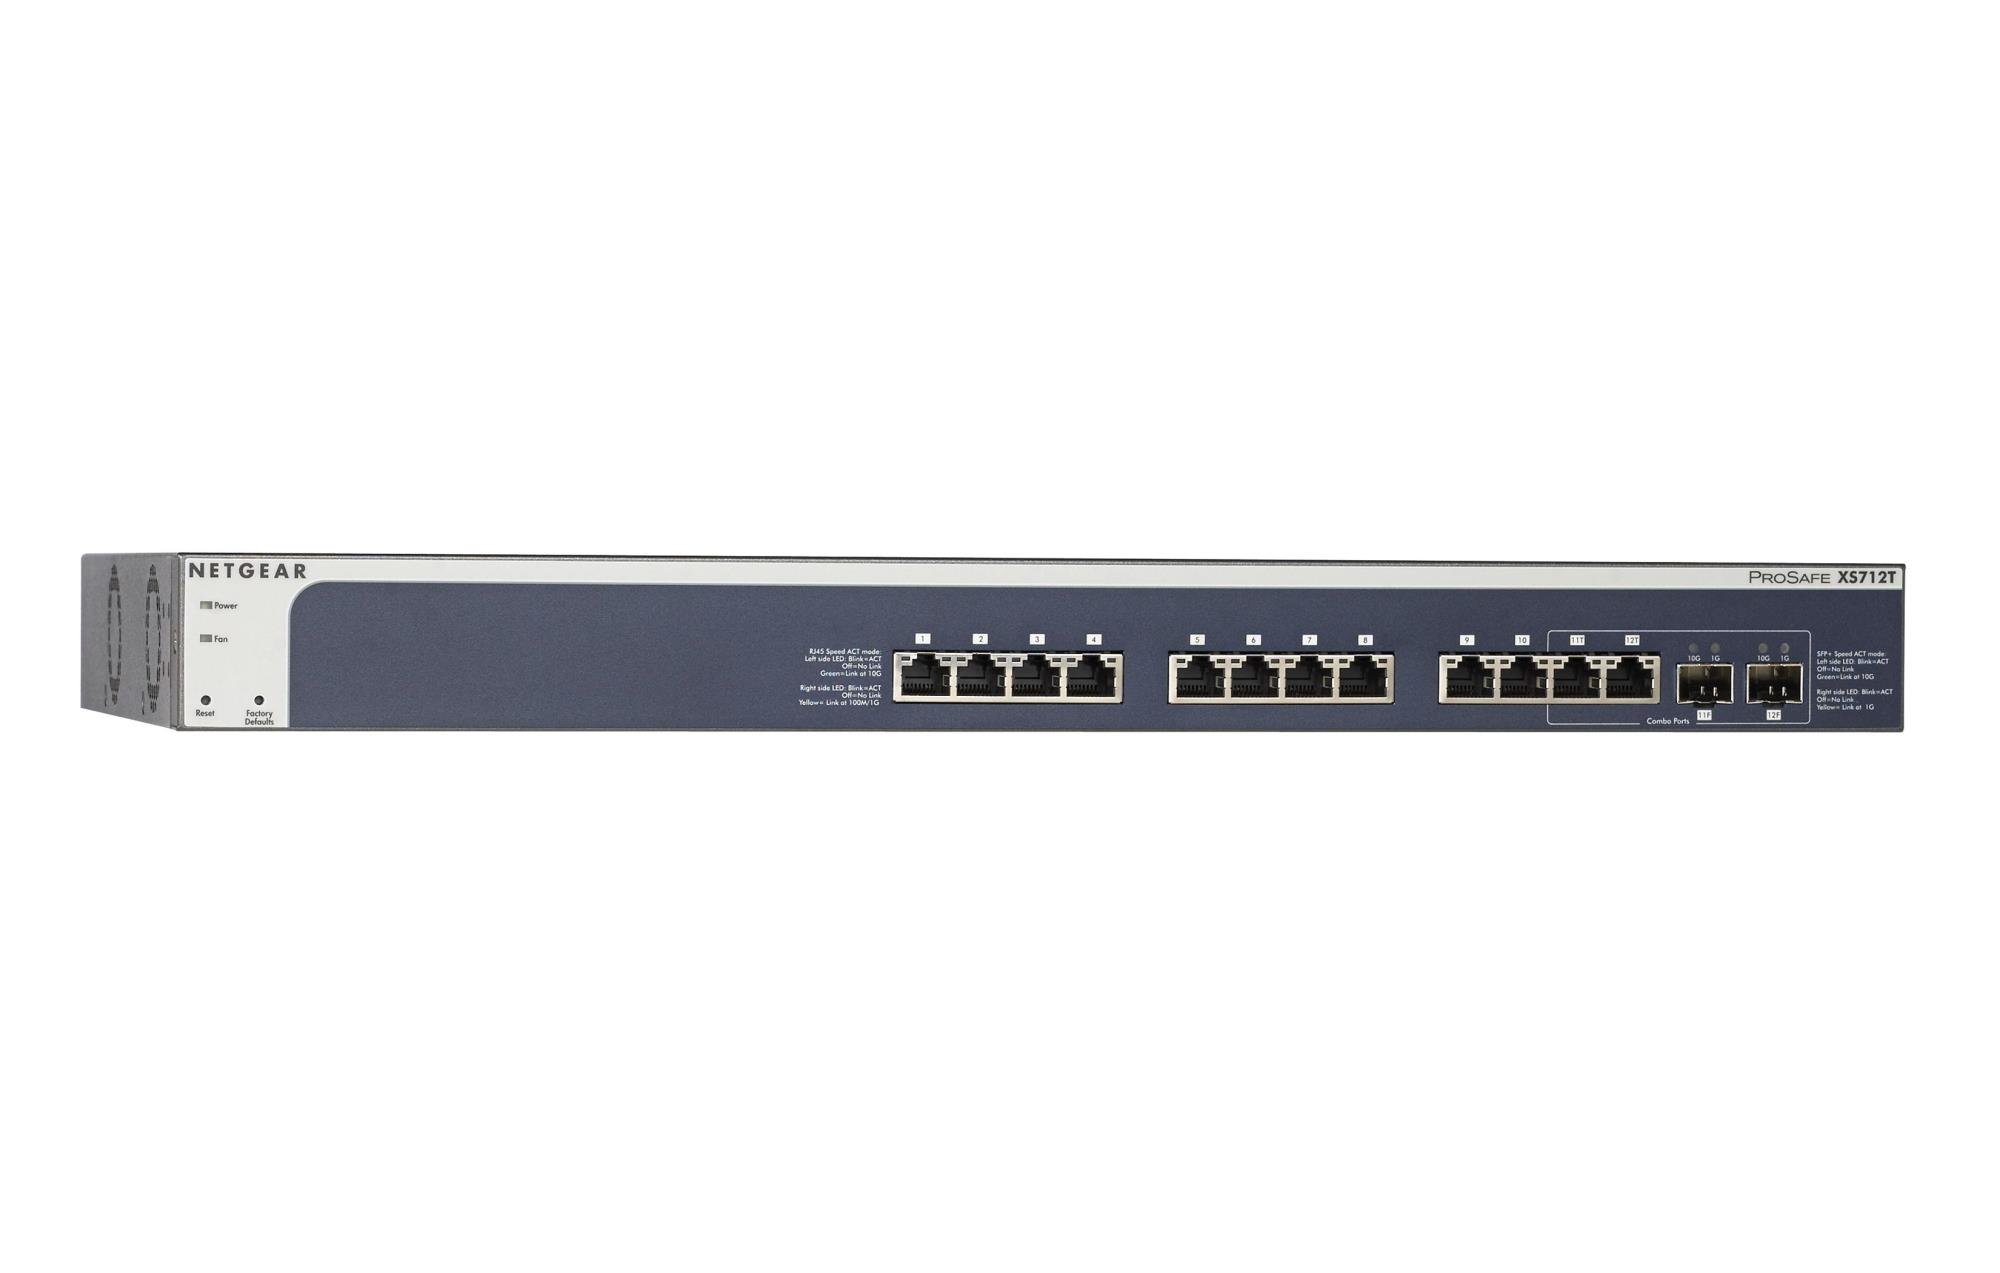
Figure 1: Front Panel of NETGEAR ProSAFE XS712T Switch
This image displays the front panel of the NETGEAR ProSAFE XS712T switch, showing the 12 10GBase-T ports, two combo SFP+ ports, and LED indicators for power, fan status, and port activity. The reset and factory defaults buttons are also visible on the left side.
Elementy panelu przedniego:
- Dioda LED zasilania: Wskazuje stan zasilania urządzenia.
- Dioda LED wentylatora: Wskazuje stan działania wentylatora chłodzącego.
- Przycisk resetowania: Used to restart the switch.
- Przycisk ustawień fabrycznych: Used to restore the switch to its factory default settings.
- Porty RJ45 (1-10): 10GBase-T Ethernet ports for high-speed network connections. Each port has associated Link/Act LEDs (Left side LED: Blink=ACT, Off=No Link, Green=Link at 100M/1G; Right side LED: Blink=ACT, Off=No Link, Yellow=Link at 10G).
- Combo Ports (11, 12): These ports can function as either 10GBase-T RJ45 ports or SFP+ fiber ports. Each combo port has associated SFP+ Speed/ACT LEDs (Left side LED: Blink=ACT, Off=No Link, Green=Link at 10G; Right side LED: Blink=ACT, Off=No Link, Yellow=Link at 1G).
5. Konfiguracja
5.1 Montaż w szafie rack (opcjonalnie)
If you intend to install the switch in a standard 19-inch equipment rack, use the provided rack-mount kit. Secure the mounting brackets to the sides of the switch using the screws provided. Then, attach the switch to the rack using appropriate rack screws.
5.2 Umiejscowienie na biurku
For desktop use, ensure the switch is placed on a flat, stable surface. Allow adequate ventilation around the device to prevent overheating.
5.3 Połączenie zasilania
- Connect one end of the provided power cord to the AC power inlet on the rear panel of the switch.
- Podłącz drugi koniec przewodu zasilającego do uziemionego gniazdka elektrycznego.
- Sprawdź, czy dioda LED zasilania na panelu przednim świeci się, wskazując, że przełącznik jest zasilany.
5.4 Połączenia sieciowe
- Connect your network devices (servers, workstations, other switches) to the RJ45 ports (1-10) using appropriate Ethernet cables (Cat6a or higher for 10G speeds).
- For fiber optic connections, insert compatible SFP+ transceivers into the combo SFP+ ports (11F, 12F) and connect fiber optic cables.
- Observe the Link/Act LEDs for each connected port. A solid green or yellow light indicates a successful link, and blinking indicates activity.
6. Instrukcja obsługi
6.1 Podstawowa obsługa
The NETGEAR ProSAFE XS712T is a plug-and-play device for basic connectivity. Once powered on and connected, it will automatically detect and configure connected devices for optimal performance.
6.2 Web-Zarządzanie oparte
For advanced configuration and management, access the switch's weboparty na interfejsie:
- Sprawdź, czy komputer jest podłączony do przełącznika.
- Otwórz web browser and enter the default IP address of the switch (refer to the Quick Start Guide or NETGEAR support for the specific default IP).
- Log in using the default username and password (typically "admin" and "password" or similar, check documentation).
- Z web interface, you can configure VLANs, QoS settings, security features, and monitor network status.
7. Konserwacja
- Aktualizacje oprogramowania układowego: Regularnie sprawdzaj wsparcie NETGEAR webwitryna z najnowszymi aktualizacjami oprogramowania sprzętowego, zapewniająca optymalną wydajność i bezpieczeństwo.
- Czyszczenie: Utrzymuj przełącznik w czystości i zapobiegaj jego zakurzeniu. Do czyszczenia używaj miękkiej, suchej ściereczki. Nie używaj środków czyszczących w płynie ani aerozolu.
- Wentylacja: Aby zapobiec przegrzaniu, upewnij się, że otwory wentylacyjne nie są zablokowane.
- Zarządzanie kablami: Organize network cables to prevent strain on ports and improve airflow.
8. Rozwiązywanie Problemów
- Brak zasilania: If the Power LED is off, ensure the power cord is securely connected to both the switch and the electrical outlet. Try a different outlet or power cord.
- Brak łącza w porcie: Sprawdź połączenie kabla Ethernet na obu końcach. Wypróbuj inny kabel lub port. Upewnij się, że podłączone urządzenie jest włączone i działa prawidłowo.
- Niska prędkość sieci: Verify that you are using appropriate cables (Cat6a or higher for 10G). Check for network congestion or misconfigurations in the switch's settings (e.g., QoS).
- Nie można uzyskać dostępu Web Interfejs: Ensure your computer's IP address is in the same subnet as the switch's IP address. Verify the switch's IP address and login credentials. Try resetting the switch to factory defaults if necessary (this will erase all custom configurations).
- Hałas wentylatora: The switch may generate fan noise during operation, especially under heavy load or in warmer environments. This is normal. Ensure proper ventilation.
9. Specyfikacje
| Funkcja | Szczegół |
|---|---|
| Marka | NETGEAR |
| Numer modelu | XS712T-100NES |
| Liczba portów | 12 (10GBase-T RJ45, 2 Combo SFP+) |
| Szybkość przesyłu danych | 10000 megabitów na sekundę (10 gigabit) |
| Typ interfejsu | RJ45, SFP+ |
| Materiał obudowy | Plastikowy |
| Waga przedmiotu | 1.32 funta |
| Wymiary produktu | 22.44 x 3.54 x 13.74 cala |
| Górna ocena temperatury | 40 stopni Celsjusza |
| BARAN | 2 MB |
| Język | angielski |
10. Gwarancja i wsparcie
For warranty information, technical support, and product registration, please visit the official NETGEAR support website or refer to the warranty card included in your product package. Keep your purchase receipt for warranty claims.
Zasoby internetowe:
Ask a question about this manual
Ask about setup, troubleshooting, compatibility, parts, safety, or missing instructions. Manuals+ will review the question and use this page’s manual context to help answer it.