
1. Wprowadzenie
This manual provides essential information for the proper setup, operation, and maintenance of your Dual DAB 2 A DAB/DAB+ Radio Adapter. Please read these instructions carefully before using the device to ensure optimal performance and safety. The Dual DAB 2 A allows you to upgrade your existing stereo system with digital radio reception (DAB/DAB+) and traditional FM radio.
2. Informacje dotyczące bezpieczeństwa
- Źródło zasilania: Używaj wyłącznie określonego zasilacza. Upewnij się, że napięcietage odpowiada wymaganiom urządzenia.
- Woda i wilgoć: Nie wystawiaj urządzenia na działanie deszczu, wilgoci ani kapiących/rozpryskujących się płynów. Nie stawiaj na urządzeniu przedmiotów wypełnionych płynami, takich jak wazony.
- Wentylacja: Zapewnij odpowiednią wentylację. Nie blokuj otworów wentylacyjnych.
- Ciepło: Trzymaj urządzenie z dala od źródeł ciepła, takich jak grzejniki, kratki wentylacyjne, piece lub inne urządzenia (w tym amp(lifiers) wytwarzające ciepło.
- Czyszczenie: Przed czyszczeniem odłącz urządzenie od gniazdka elektrycznego. Użyj miękkiej, suchej ściereczki. Nie używaj środków czyszczących w płynie ani w aerozolu.
- Serwisowanie: Nie próbuj samodzielnie naprawiać tego produktu. Wszelkie czynności serwisowe należy powierzyć wykwalifikowanemu personelowi serwisowemu.
3. Zawartość opakowania
Sprawdź, czy w przesyłce znajdują się wszystkie wymienione poniżej elementy:
- Dual DAB 2 A Radio Adapter
- Zasilacz
- External Antenna (wire with connector)
- Zdalne sterowanie
- Instrukcja obsługi (ten dokument)
4. Koniec produktuview
4.1 Panel przedni
The front panel features the main display and controls for operating the device.

Obraz 4.1: Przód view of the Dual DAB 2 A radio adapter. The display shows the current time (14:28) and the selected station ("Senderliste #Galaxy"). The "DAB+" logo is visible at the top left, and "Dual" is printed at the bottom center.

Obraz 4.2: Kątowy przód view of the Dual DAB 2 A, providing a clearer look at the illuminated multi-line LCD display and the device's compact design.
4.2 Panel tylny i złącza
The rear panel contains all necessary connection ports for power, antenna, and audio output.

Obraz 4.3: Tył view of the Dual DAB 2 A. From left to right, the ports are: WYJŚCIE (3.5mm audio jack), Prąd stały 6.0 V = 0.5 A (power input), ANTENA (coaxial connector for external antenna), and MOC przycisk.

Obraz 4.4: Strona view of the Dual DAB 2 A, illustrating its compact and slightly curved profile.

Obraz 4.5: Strona kątowa view showing the rear connections, including the Line Out, DC power input, and antenna port.
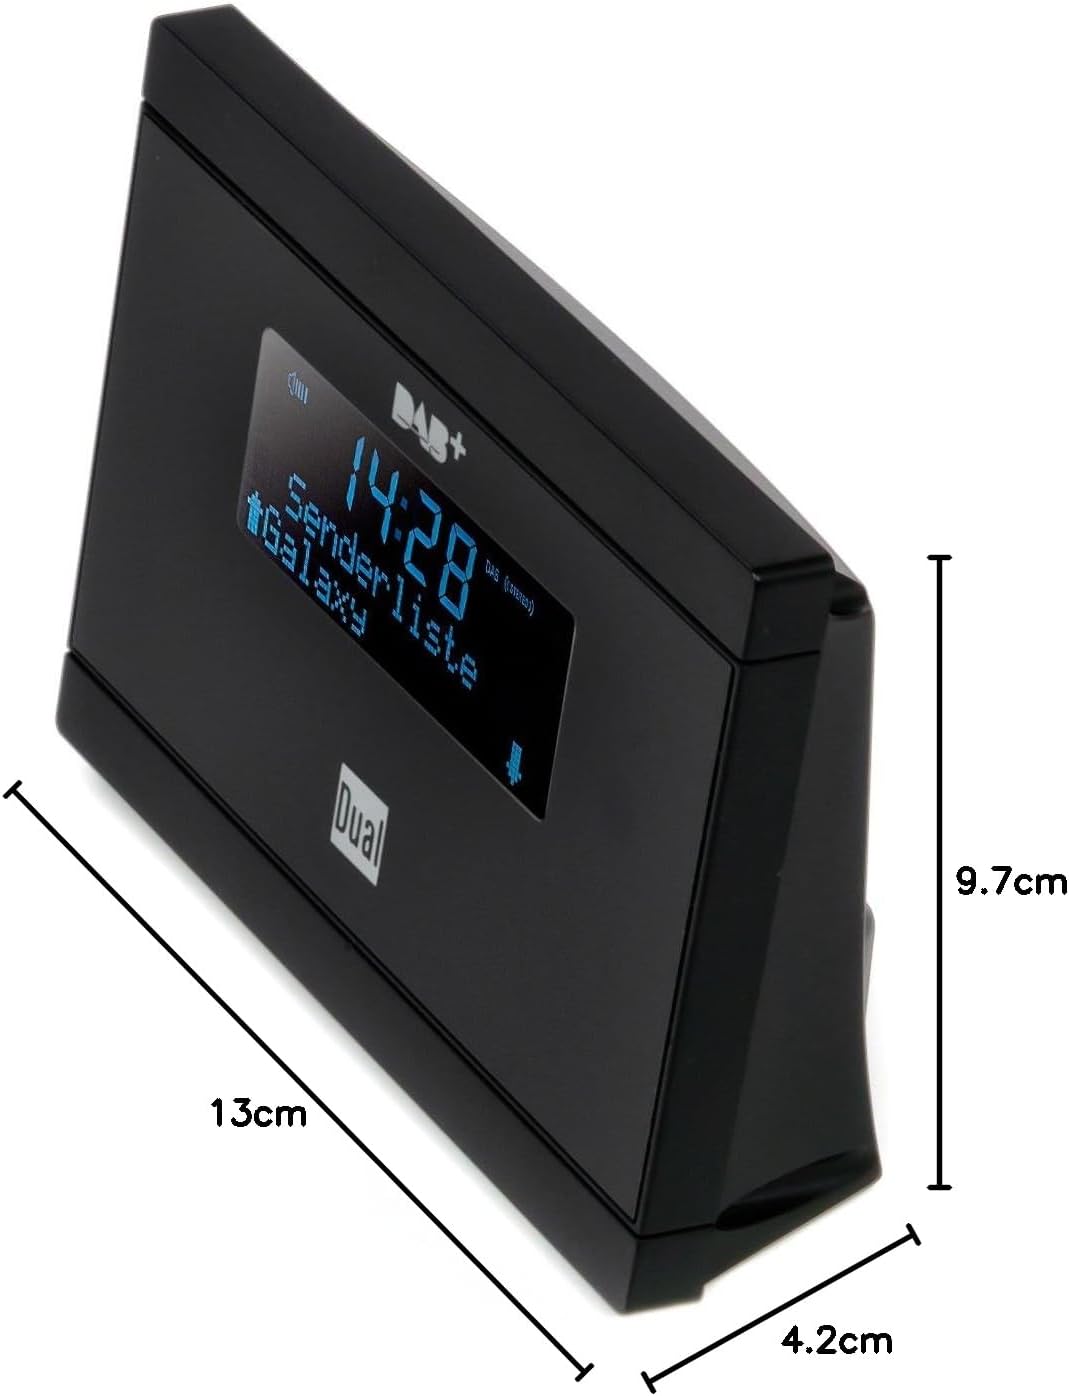
Obraz 4.6: Dimensions of the Dual DAB 2 A: 13 cm (length), 4.2 cm (width), and 9.7 cm (height).
5. Konfiguracja
5.1 Podłączenie anteny
- Zlokalizuj ANTENA port on the rear of the DAB 2 A.
- Connect the supplied external wire antenna to this port.
- For optimal reception, position the antenna away from other electronic devices and metallic objects. You may also connect a commercially available external antenna for improved signal quality.
5.2 Connecting to your Stereo System
- Zlokalizuj WYJŚCIE (3.5mm jack) on the rear of the DAB 2 A.
- Connect an audio cable (not supplied) from the WYJŚCIE of the DAB 2 A to an available audio input (e.g., AUX IN, LINE IN) on your existing stereo system or audio device.
5.3 Połączenie zasilania
- Podłącz dołączony zasilacz do Prąd stały 6.0 V = 0.5 A port on the rear of the DAB 2 A.
- Podłącz zasilacz do odpowiedniego gniazdka ściennego.
6. Instrukcja obsługi
6.1 Włączanie/wyłączanie
Naciśnij MOC button on the rear of the device or on the remote control to turn the unit on or off.
6.2 Initial Scan (DAB/DAB+)
Upon first power-on, the device will automatically perform a scan for available DAB/DAB+ stations. This process may take a few minutes. Once complete, the first available station will begin playing.
6.3 Switching Between DAB/DAB+ and FM
Użyj TRYB button on the remote control or the device (if available) to switch between DAB/DAB+ and FM radio modes.
6.4 Strojenie i wybór stacji
- DAB/DAB+: Użyj GÓRA/DÓŁ arrow buttons on the remote control or device to navigate through the list of available digital stations.
- FM: W trybie FM użyj GÓRA/DÓŁ arrow buttons to manually tune frequencies or initiate an automatic scan for the next available station.
6.5 Zapisywanie i przywoływanie ustawień wstępnych
The DAB 2 A allows you to store up to 20 favorite stations (DAB/DAB+ and FM combined).
- Do przechowywania: Dostrój się do żądanej stacji. Naciśnij i przytrzymaj USTAWIENIE WSTĘPNE button (or similar, refer to remote control layout) until the display shows a preset number. Use the arrow buttons to select a preset number (1-20) and confirm.
- Przypomnieć sobie: Naciśnij USTAWIENIE WSTĘPNE button briefly, then use the arrow buttons to select the desired preset station.
6.6 Funkcje zegara, alarmu i snu
The device features a clock, alarm, and sleep timer. Refer to the detailed instructions in the full manual for setting these functions. The alarm can be set to wake you with DAB, FM, or a buzzer sound.
7. Konserwacja
- Czyszczenie: Always unplug the device before cleaning. Use a soft, dry, lint-free cloth to wipe the surfaces. Do not use abrasive cleaners, waxes, or solvents.
- Składowanie: Jeżeli nie używasz urządzenia przez dłuższy czas, odłącz je od zasilania i przechowuj w chłodnym, suchym miejscu.
8. Rozwiązywanie Problemów
| Problem | Możliwa przyczyna | Rozwiązanie |
|---|---|---|
| Brak zasilania | Zasilacz nie jest podłączony lub gniazdko jest uszkodzone. | Sprawdź, czy zasilacz jest prawidłowo podłączony do urządzenia i do działającego gniazdka elektrycznego. |
| Brak dźwięku | Audio cable not connected, incorrect input selected on stereo, or volume too low. | Check audio cable connection. Select the correct input on your stereo system. Increase volume on both the DAB 2 A and your stereo. |
| Poor DAB/DAB+ reception or no stations found | Weak signal, antenna not properly connected or positioned. | Ensure the antenna is securely connected and positioned for optimal reception. Try repositioning the antenna. Consider using a higher-gain external antenna. Perform a full scan for stations. |
| Słaby odbiór FM | Weak signal, antenna not properly connected or positioned. | Extend and reposition the wire antenna. Try a different antenna if available. |
| Pilot nie działa | Batteries are dead or incorrectly inserted, or line of sight is blocked. | Replace batteries with new ones, ensuring correct polarity. Remove any obstructions between the remote and the device. |
9. Specyfikacje
| Funkcja | Szczegół |
|---|---|
| Marka | Podwójny |
| Numer modelu | DAB 2 A |
| Kolor | Czarny |
| Technologia łączności | Auxiliary (3.5mm Line Out) |
| Cechy specjalne | DAB/DAB+ Radio, FM Tuner, Clock, Alarm, Sleep Function |
| Kompatybilne urządzenia | Devices with 3.5 mm audio connector |
| Wymiary produktu (dł. x szer. x wys.) | Wymiary: 13 cm x 4.2 cm x 9.7 cm |
| Technologia strojenia | FM, DAB, DAB+ |
| Źródło zasilania | Electric Cable (DC 6.0V=0.5A) |
| Obsługiwane pasma radiowe | FM, DAB, DAB+ |
| Waga przedmiotu | 200 gram |
10. Gwarancja i wsparcie
For warranty information and technical support, please refer to the documentation provided with your purchase or contact Dual customer service. Keep your proof of purchase for any warranty claims.