Optelec Clear View Speech
Introduction
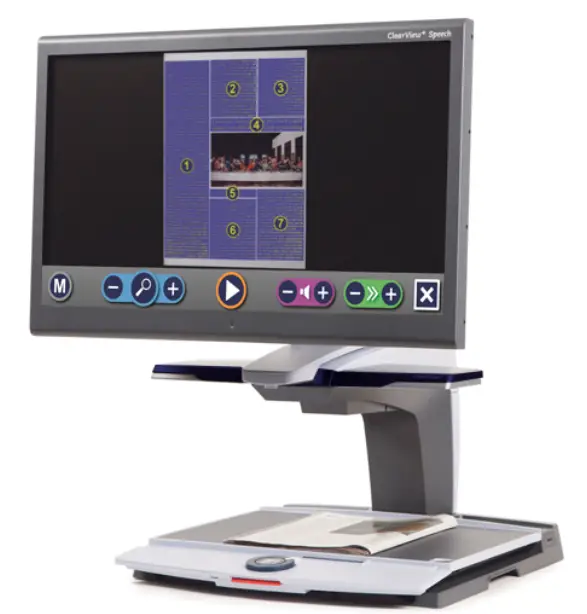
Congratulations on choosing the Optelec ClearView Speech, an intuitive video magnifier to listen to, view and magnify text. The ClearView Speech will add speech as well as full page overview, a picture viewer and fast document navigation to your ClearView C or ClearView+.
About this manual
At Optelec, we are constantly improving our products and their functionalities. Therefore, it is possible that this manual is not the latest version. Please download the most up-to-date manual on www.optelec.com at the Support section.
This manual will familiarize you with the speech features and functions of the ClearView Speech. Please read this manual carefully before using your ClearView Speech. For the standard ClearView video magnifier functionality, please refer to your ClearView C or ClearView+ manual.
Getting to know your ClearView Speech
This chapter will familiarize you with the operation of the Optelec ClearView Speech.
Switching the ClearView Speech on and off
To switch on both the ClearView and ClearView Speech module, press the ON / OFF button. It takes about 10 seconds for the ClearView to initialize before it displays an image. In addition, the start-up process for the ClearView Speech module will take approximately 40 seconds. You will hear the start-up sound to indicate that the ClearView Speech is ready to use. To switch off the ClearView Speech, press the ON / OFF button again. The ClearView will switch off after which it will take approximately one minute for the ClearView Speech module to power down.
Resetting the ClearView Speech
In case a reset of the ClearView Speech is needed, press the black button, located on the right side of the monitor above the SD card slot to power down the ClearView Speech. This will take approximately 15 seconds. Press this button again after 15 seconds to switch the ClearView Speech back on. After about 40 seconds, the ClearView Speech will play the start-up sound to indicate it is ready to use again.
Getting started
To get started with your ClearView Speech:
Step 1:
Switch the ClearView Speech on with the <Orange> button.

Step 2:
After 40 seconds the ClearView Speech will play a start up sound. Now, tap the screen once in the bottom right corner to activate the speech mode.

Step 3:
Place the document you want to read under the ClearView Speech, inside the document outline, which is shown on the monitor.
Step 4:
Tap the screen to activate the document capture process and to start the speech. This can take approximately 15 to 20 seconds.

Step 5:
The speech will start reading the document and the document zones will be marked on the screen with large blue numbered bullets. Tap a bullet to start reading the specific text zone.
Step 6:
Press the pause button to pause the speech.
Step 7
Select another zone by tapping once on another blue bullet. Photos are displayed in the original colors. To view photos magnified, tap it once. To return to the full page view, tap the photo once again.
Step 8:
Tap the button marked with the “X” on the right end of the button bar to return to ClearView mode. Tap and hold the button marked with the “X” on the right end of the button bar to capture a new page.

The Button Bar
The following figure shows the ClearView Speech button bar. Use the button bar to start and pauze the speech, adjust the magnification, adjust the volume, adjust the reading speed, activate the menu, exit Speech mode and return to ClearView mode.
![]()
- Play / Pause button: Orange button in the centre of the button bar to start and pause the speech.
- Magnification: The blue “–” button will decrease the magnification. The blue “+” button will increase the magnification. Tapping the magnifier will switch between Overview and the last used magnification level.
- Volume:
The purple “–” button will decrease the volume of the speech. The purple “+” button will increase the volume of the speech. - Reading speed: The green “–” button will decrease the reading speed. The green “+” button will increase the reading speed.
- ClearView mode: Tap the white button with the “X” to switch back to the ClearView. Tap and hold the white button with the “X” to take a new picture.
- Menu button: Grey button marked with the character “M” on the left side of the button bar to enter the menu.
Reading modes
The ClearView Speech has two modes: ClearView and Speech mode. When in ClearView mode, the ClearView operation is not changed. All ClearView buttons function exactly the same as with a ClearView, without the ClearView Speech module. For the standard ClearView video magnifier functionality, please refer to your ClearView C or ClearView+ manual. To activate the Speech mode, touch the screen in the bottom right corner once. When “Speech on” is announced, please place the document you wish to read inside the document outline and tap the screen to start reading.

The ClearView Speech will capture and process the document and will start reading within several seconds. To read another text, press and hold the “X” button, place a new page inside the document outline and tap the screen. To exit the Speech mode, tap the white Exit button marked with an “X” at the right side of the button bar at the bottom of the screen.
Overview and reading zones
The ClearView Speech always provides an overview of the full page when it starts reading the page for the first time. In the overview, blue numbered bullets mark the detected text zones in the document. The navigation bullets can be used to quickly navigate through a text. Tap a navigation bullet and the ClearView Speech will start reading the selected text zone. The number of the navigation bullets represent the most likely order of the text. The speech reads the zone with navigation bullet number 1, followed by navigation bullet number 2, and so on.
Magnifying a document
To leave the full page Overview with navigation bullets, and magnify your document, tap the blue “+” button on the left side of the Button Bar at the right of the magnifying glass. To decrease the magnification, tap the blue “–” button left of the magnifying glass. The minimum magnification is the Overview with the navigation bullets. To quickly switch between Overview and the last used magnification level, tap the magnifying glass in the Button Bar. Besides the zoom buttons there is another possibility to magnify documents. Touch the screen by pointing on the text you wish to magnify. Touch the screen as long as you would like to zoom in.
Reading a document
To start reading, tap the Play button in the middle of the Button Bar. To pause reading, tap the button once again. The ClearView Speech will mark your reading position in the document with a highlight. To start reading at another position in the document, tap on a blue bullet in page overview, or magnify the text and tap on a word where you would like the ClearView Speech to continue reading.
Scrolling the document
To scroll up, down, left or right within the magnified document, simply touch the screen with one finger and swipe up, down, left or right.
Text color
To enhance the contrast of the text, a text foreground and background color can be selected. This will not influence the representation of pictures. Pictures are always displayed in their original colors. If no high contrast color is needed, the text can be displayed in its original colors. Please refer to the following chapter on how to configure the high contrast colors.
This chapter will familiarize you with the ClearView Speech Menu.

Activating and closing the menu
To activate the menu, tap on the grey Menu button. The Menu button is the most left button on the Button Bar marked with the character “M”. To close the menu, tap the white button marked with the “X” at the bottom right corner of the menu. Any changes made in the menu are automatically saved.
Using the menu
The ClearView Speech menu contains two rows of three large buttons. To activate a button, tap the button once. Activating a button will either change a setting, or open a submenu or list. If a button is greyed out, the option is not available.
The menu contains the following buttons:
- Save
- Voice
- Open
- View
- Delete
- Settings
Save
To save a document, open the menu and tap the blue “Save” button.
First you will be asked in what format you would like to save the document:
- Document: this is the standard Speech format
- e-PUB: This is an e-reader or Daisy compatible format
- DOCX: Use this document if you would like to edit the document on a PC with Microsoft Word
- MP3: Selecting this format will save the document as an MP3 audio file. When saving a document as an audio MP3 file, you will need to select the reading voice. The list of voices to choose from are the Nuance voices of the selected language, or the voices of the languages detected if automatic language detection is enabled.

Not all voices can be used to save as an MP3 audio file. The available voices are limited to only the Nuance voices. In case no Nuance voice is installed, the MP3 button will be greyed out and this option is not available for the selected language. Only one voice will be used for the entire MP3 file. Automatically switching between languages within an MP3 audio file is not supported Saving a document in MP3, DOCX or e-PUB takes longer than the standard format. Especially saving a multipage document in MP3 format could take several minutes. After you selected the format to save the document in, you will be asked if you would like to save your document with a voice label.
If you wish to save a document without a voice label, select “No”. The document will be saved using the first line of the document as the name of the document. If you would like to add a voice label, select “Yes”. You will hear a beep after which you have 5 seconds to record a voice label. At the end of the recording you will hear another beep sound. The document will be saved with the recorded voice label. When the document is saved, the ClearView Speech will ask if you would like to append more pages to the document.
If you select “No”, the menu will be closed showing the document again. If you select “Yes” you can start appending more pages to the document by placing the page in the document outline and tapping the screen once to capture the new page. To stop appending more pages to the document, press the close button marked with the “X”. The ClearView Speech will prompt you with the question if the captured pages should be processed. If “No” is selected, the conversion to text will be done while reading the document. If “Yes” is selected, all pages will be processed before returning to the document reading mode. This process may take several minutes, depending on the number of pages of the document. By default a document will be saved on the SD card delivered with the ClearView Speech. If you wish to save your document on a USB drive, connect a USB drive to the ClearView Speech. When a USB drive is connected the document will be saved automatically on the drive.
Open
To open a document, open the menu and tap on the green “Open” button. Select the “Document” button to see the list of saved documents, showing the most recently saved document first. To open and view pictures, select the “Pictures” button.
Scroll the list of documents or pictures using the scroll bar on the right side of the screen. If you touch the screen and slowly move your finger over the documents, the title of the document will be read aloud. To select a document simply tap on it. In the list with documents or pictures, tap the document or picture you wish to read or view. The menu will be closed and the document or picture will be opened. Pictures can be magnified. It is also possible to open text documents in “txt” format or photos from a USB stick. To open documents in “txt” format, the document should be located in the root of the USB stick or SD card.
Delete
To delete a document, open the menu and tap on the “Delete” button to see the list of documents. Select the document you wish to delete.

You will be prompted to confirm to delete the document. To delete the document, select “Yes”. To cancel deleting the document, select “No”. Both choices will return you to the list of documents.
Voice
This menu item lets you select your reading voice and language. To select another reading voice, tap the “Voice” button. The ClearView Speech will switch to the next configured voice. If adjusting the reading voice results in a change of language, the menus will automatically change to the same language. To add or delete voices and languages from the voice selection, please refer to paragraph 3.8.1.
Note: In case automatic language detection is enabled (please refer to paragraph 3.8.2.), this button only changes between voices of the detected language. For instance, if the detected language is English this button will only change between the different English voices. With automatic language detection enabled, you will not be able to change the language of the menu. To change the menu language, either: 1) disable automatic language detection, 2) scan a document in your preferred menu language and change the voice once in the menu, or 3) switch back to ClearView mode, activate Speech mode, go into the menu and select your menu language.

View
By selecting the “View” button, the “View” menu will be opened. The “View” menu contains three buttons:
- Color
- Contrast
- Highlight
Color
This option is only available when the Contrast submenu is enabled. Tap the “Color” button to cycle through the available high contrast text foreground and background color combinations. The colors that can be selected are:
- Black – White
- White – Black
- Yellow – Black
- Black – Yellow
- Yellow – Blue
- Blue – Yellow
- Black – Red
- Red – Black
- Black – Green
- Green – Black
- Black – Purple
- Purple – Black
- Blue – White
- White – Blue
- Black – Amber
- Amber – Black
Contrast
Tap the “Contrast” button to enable or disable high contrast text colors. Pictures will always be displayed in their original colors. Only the text foreground and background colors will be changed. The default contrast settings are black text on a white background.
Highlight
This option lets you choose a word highlight, line highlight or no highlight. Both the color of the word and line highlight can be changed from red to yellow. The red word highlight is the default.
Settings
Select the “Settings” button to enter the Settings menu. The Settings menu contains four buttons:
- Voice
- Options
- Restore defaults
- About
Voice
The Voice button in the settings menu opens a list with all available reading voices and languages. Selecting this button will open the languages list. To add or remove a reading voice, select the language from the list by tapping on the language. This will display a list with available voices for the selected language. To enable a reading voice, select it from the list by tapping on it. A checkmark in front of the voice name will indicate if it is enabled. When the voice is enabled, it will be available under the “Voice” button in the main menu. By deselecting a voice, the voice will be removed from the available reading voices. The languages of which a reading voice is selected, will appear at the top of the list with languages, and be marked with a checkmark.

Options
The options menu contains the following configuration settings:
- Text recognition quality
- Activate Speech
- Automatic language detection
- Column filter

Text recognition quality
This option lets you set the recognition quality. The “Optimal” setting is the recommended mode and will offer the best text recognition quality. The “Fast” mode is for simple documents without columns and pictures. The “Fast” mode is up to 30% faster than the “Optimal” mode.
Activate Speech
This option lets you configure how to activate the Speech mode by tapping either in the bottom right corner or anywhere on the screen.

Automatic language detection
When the “Automatic language detection” is enabled, the ClearView Speech will detect the language of the text reading zone or paragraph, and automatically select the correct reading voice. The ClearView Speech is capable of detecting multiple languages in one page. To enable the language detection, first enable up to maximum five languages. To do this, go to the “Voice” selection menu, and enable a language by selecting at least one voice per language. Do this for a maximum of 5 languages. Now make sure the language detection is enabled in the “Options” menu.

Note: In case the ClearView Speech Is not able to detect the language, the langage of the menu is being used. If English is one of the selected languages, the ClearView Speech will use an English voice and will ignore the menu language.
Column Filter
This option contains two settings:
- Ignore incomplete columns
- Include incomplete columns.
When “Ignore incomplete columns” is enabled, the OCR algorithms will try to detect if text columns are cut off at the left or right margin of the picture. Disabling the filter will include partial columns and will read all detected text on the page. The “Ignore incomplete columns” is the recommended and default setting, offering the most comprehensive text recognition. The “Include incomplete columns” will try to detect all text on the page, but may result in incomprehensive text at the beginning or end of the document.

Restore defaults
If you wish to restore the default settings, select this button. You will be prompted if you are sure to restore the defaults. To restore the defaults select “Yes”. To cancel restoring the defaults, select “No”.
Default settings
- View: High contrast on
- Color: Black on white
- Highlight: Word

About
The About screen shows the versoin of the Application interface, camera interface, OCR interface and the mains frequency.
Appendix A: Safety
- Handle the ClearView Speech with care. Rough handling will damage internal components.
- Contact your Optelec distributor to service this equipment if necessary.
- Do not open or remove any parts of the ClearView Speech as it will void the warranty.
- Do not expose the ClearView Speech to excessive heat or direct sunlight to avoid the risk of fire.
- Do not use the ClearView Speech near inadequately shielded medical devices.
- To avoid risk of electrical damage, keep your ClearView Speech away from fluids and chemicals.
- Always disconnect the ClearView Speech before cleaning. Use a soft cloth to clean the exterior. Do not use cleaning agents or abrasive materials as they will damage the product.
- Warning – Do not modify this equipment without authorization of the manufacturer.
- Warning – To avoid risk of electric shock, this equipment must only be connected to a grounded power outlet.
- The ClearView Speech may only be used with the UL listed Optelec ClearView.
- Caution: Please be aware of the risk of explosion if the battery is replaced by an incorrect battery type. Please dispose the old battery according to the instructions.
- Use of the ClearView Speech other than described in this manual will exclude it from warranty conditions.

RoHS Compliance
This product is in compliance with Directive 2011/65/EU, on the restriction of the use of certain hazardous substances in electrical and electronic equipment (RoHS) and its amendments.
European Union Notice
Products with CE marking comply with the EMC Directive (2014/30/EU) and the Low Voltage Directive (2014/35/EU) issued by the Commission of the European Community. Compliance with these directives implies conformity to the following international standards:
- EMC
EN 55022
EN 55024 - FCC
FCC part 15 Class B - Safety
UL 60950-1
EN 60950-1
WARNING: The use of accessories, transducers and cables, with the exception of transducers and cables sold by the manufacturer of the ClearView Speech as replacement parts for components, may result in increased emissions or decreased immunity of the ClearView Speech.
Communications Commission (FCC) Statement:
This Equipment has been tested and found to comply with the limits for a Class B digital device, pursuant to Part 15 of the FCC rules. These limits are designed to provide reasonable protection against harmful interference in a residential installation. This equipment generates, uses and can radiate radio frequency energy and, if not installed and used in accordance with the instructions, may cause harmful interference to radio communications. However, there is no guarantee that interference will not occur in a particular installation. If this equipment does cause harmful interference to radio or television reception, which can be determined by turning the equipment off and on, the user is encouraged to try to correct the interference by one or more of the following measures:
- Reorient or relocate the receiving antenna.
- Increase the separation between the equipment and receiver.
- Connect the equipment into an outlet on a circuit different from that to which the receiver is connected.
- Consult the dealer or an experienced radio/TV technician for help.
WARNING: You are cautioned that changes or modifications not expressly approved by the party responsible for compliance could void your authority to operate the equipment. This device complies with Part 15 of the FCC Rules.
Operation is subject to the following two conditions:
- This device may not cause harmful interference, and
- This device must accept any interference received; including interference that may cause undesired operation.
To reduce potential safety issues, only the AC adapter provided with the product, a replacement AC adapter provided by Optelec, or an AC adapter purchased as an accessory from Optelec should be used with this product.
WEEE Notice
The directive on Waste Electrical and Electronic Equipment (WEEE), which entered into force as European law on February 13, 2003, resulted in a major change in the treatment of electrical equipment at end-of-life. The purpose of this Directive is, as a first priority, the prevention of WEEE, and in addition, to promote the reuse, recycling and other forms of recovery of such wastes so as to reduce disposal. The WEEE logo (shown at the left) on the product or its box indicates that this product must not be disposed of or dumped with your other household waste. You are liable to dispose of all your electronic or electrical waste equipment by relocating over to the specified collection point for recycling of such hazardous waste. Isolated collection and proper recovery of your electronic and electrical waste equipment at the time of disposal will help conserve natural resources. Moreover, proper recycling of the electronic and electrical waste equipment will ensure the safety of human health and the environment. For more information about electronic and electrical waste equipment disposal, recovery, and collection points, please contact your local city centre, household waste disposal service, shop from where you purchased the equipment, or manufacturer of the equipment.
Appendix B: Operating, Storage & transportation conditions
Operating conditions
- Temperature +10 °C to 35 °C / 50 °F to 95 °F
- Humidity < 70%, no condensation
- Altitudes up to 3000 m (9842 feet)
- Pressure 700 – 1060 hPa
- Storage & transportation conditions
- Temperature +10 °C to 40 °C / 50 °F to 104 °F
- Humidity < 95%, no condensation
- Altitudes up to 12192 m (40000 feet)
- Pressure 186 – 1060 hPa
Appendix C: Warranty Conditions
Optelec warrants the ClearView Speech, effective from the date of delivery, to be free of any defects in material and workmanship. The warranty is not transferable and does not apply to groups, multi-users and agencies. The ClearView Speech was designed for the individual purchaser to be used at home or on the go. Optelec reserves the right to repair or replace any purchased ClearView Speech with a similar or improved product. In no event shall Optelec or its suppliers be held liable for any indirect or consequential damages. The original user’s remedies are limited to replacement of the ClearView Speech. This warranty is valid only when serviced in the country of original purchase, and with intact seals. For additional warranty claims or service during or after the warranty period, please contact your Optelec distributor. Optelec is not responsible for any uses of this device other than those described in this manual. Use of the ClearView Speech other than described in this manual will exclude it from warranty conditions.
Optelec
2993 LT Barendrecht
Nederland
Telefoon: +31 (0)88 678 35 55
E-mail: info@optelec.nl
Website: www.optelec.nl
Documents / Resources
 | Optelec Clear View Speech [pdf] User Manual Clear View Speech, View Speech, Speech |


