1. Introduzzjoni
This manual provides instructions for the proper use and maintenance of the SUNMI V2SE Smart Mobile Terminal. The V2SE is a versatile device designed for various business applications, featuring an integrated 58mm thermal printer, 1D/2D barcode recognition, NFC capabilities, and running on Android 12.0.
Il-karatteristiċi ewlenin jinkludu:
- Integrated 58mm thermal printer with 80mm/s print speed.
- 1D/2D Barcode recognition for efficient scanning.
- NFC for contactless transactions.
- Android 12.0 operating system with a Quad Core 2.0 GHz CPU.
- 2 GB RAM and 8 GB ROM for smooth operation.
- Connectivity: 4G/3G/2G, 2.4G/5G Wi-Fi, Bluetooth 2.1/3.0/4.2.
- Removable Lithium Ion battery.
2. Komponenti tal-Apparat
Familiarize yourself with the main components of your SUNMI V2SE terminal.
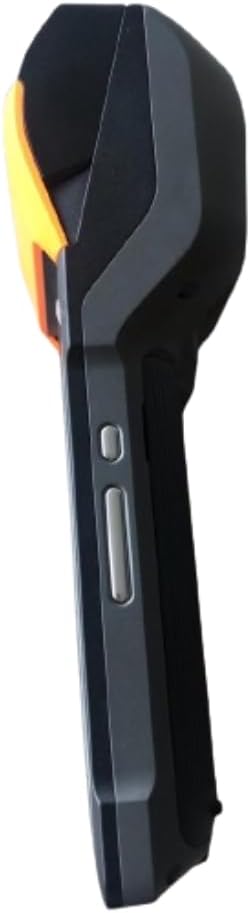
Figura 2.1: Quddiem u Ġenb View. This image displays the device's screen, the integrated barcode scanner at the top, and the power and volume buttons located on the side.

Figura 2.2: Ġenb View. This image shows the side profile of the terminal, including the cover for the SIM card slot and additional buttons.

Figura 2.3: Lura View. This image illustrates the rear of the device, featuring the thermal printer cover, the 0.3 MP camera, and the charging contact points.
Lista tal-Komponenti:
- Skrin tad-displej: Touch-sensitive LCD for user interaction.
- Skaner tal-barcode: Integrated 1D/2D scanner for data capture.
- Printer Termali: For printing receipts and other documents.
- Buttuna tal-Qawwa: To turn the device on/off or wake/sleep.
- Buttuni tal-Volum: To adjust audio levels.
- Kamera: 0.3 MP front photo sensor.
- Slot tal-Kard SIM: Supports 1 Nano SIM.
- Kompartiment tal-batterija: Fiha l-batterija tal-jone tal-litju li tista' titneħħa.
- Charging Port/Contacts: Għall-iċċarġjar tal-apparat.
3. Setup Inizjali
3.1. Installazzjoni tal-batterija
- Kun żgur li l-apparat ikun mitfi.
- Locate the battery compartment cover on the back of the device (refer to Figure 2.3).
- Remove the cover by sliding or lifting it according to the markings.
- Daħħal il-batterija tal-jone tal-litju pprovduta, waqt li tiżgura li l-kuntatti jkunu allinjati sew.
- Ibdel l-għatu tal-kompartiment tal-batterija b'mod sikur.
3.2. Installazzjoni ta' SIM Card
- Ensure the device is powered off and the battery is installed.
- Locate the SIM card slot cover on the side of the device (refer to Figure 2.2).
- Iftaħ il-qoxra.
- Insert a Nano SIM card into the designated slot with the gold contacts facing down and the notched corner aligned.
- Close the SIM card slot cover firmly.
3.3. Thermal Paper Loading
- Locate the printer cover release latch, typically on the top or side of the printer compartment (refer to Figure 2.3).
- Iftaħ il-qoxra tal-printer.
- Insert a 58mm thermal paper roll into the compartment, ensuring the paper feeds from the bottom and the leading edge extends out of the printer slot.
- Close the printer cover firmly until it clicks into place. Ensure there is no slack in the paper roll.
3.4. Iċċarġjar Inizjali u Tixgħel
- Connect the provided power adapter to the device's charging port.
- Plug the adapter into a power outlet. Allow the device to charge fully before first use.
- To power on, press and hold the Power button (refer to Figure 2.1) until the SUNMI logo appears on the screen.
4. Istruzzjonijiet Operattivi
4.1. Modalità Mixgħul/Mitfi u Modalità Rieqed
- Qawwa Mixgħul: Press and hold the Power button until the device vibrates and the screen lights up.
- Itfi: Press and hold the Power button until a power menu appears. Select "Power Off" and confirm.
- Sleep/Qawmien: Agħfas fil-qosor il-buttuna tal-Enerġija biex tpoġġi l-apparat fil-modalità sleep jew biex tqajmu.
4.2. Using the Thermal Printer
The integrated 58mm thermal printer can be used to print receipts, tickets, and other documents.
- Ensure thermal paper is correctly loaded (refer to Section 3.3).
- Open the application that requires printing (e.g., POS software).
- Initiate the print command within the application. The device will automatically print the content.
- Tear off the printed paper against the serrated edge.
4.3. Skennjar tal-Barcode
The V2SE supports 1D and 2D barcode recognition.
- Open an application that requires barcode input.
- Point the scanner window (located at the top of the device, refer to Figure 2.1) at the barcode.
- Press the dedicated scan button (if available) or trigger the scan function within the application.
- Kun żgur li l-barcode jinsab fil-kamp tal-iskaner view and well-lit for optimal performance.
4.4. Funzjonalità tal-NFC
The device supports Near Field Communication (NFC) for contactless operations.
- Ensure NFC is enabled in the device settings (Settings > Connected devices > NFC).
- Open an application that utilizes NFC (e.g., payment app, data transfer app).
- Hold the NFC-enabled card or device close to the NFC detection area on your terminal (typically near the top or back of the device).
- Follow the on-screen prompts to complete the transaction or data transfer.
4.5. Konnettività tan-Netwerk
- Wi-Fi: Mur f'Settings > Netwerk u internet > Wi-Fi biex tikkonnettja man-netwerks mingħajr fili disponibbli.
- Dejta Mobbli (4G/3G/2G): Ensure a valid SIM card is installed and mobile data is enabled in Settings > Network & internet > Mobile network.
- Bluetooth: Mur f'Settings > Apparati konnessi > Bluetooth biex tqabbad ma' apparati Bluetooth oħra.
5. Manutenzjoni
5.1. Tindif tal-Apparat
- Itfi l-apparat qabel it-tindif.
- Uża drapp ratba u mingħajr ħelu ftit dampened with water or a mild, non-abrasive cleaner to wipe the exterior.
- For the display, use a screen-specific cleaner and a microfiber cloth.
- Do not use harsh chemicals, solvents, or abrasive materials. Avoid spraying liquids directly onto the device.
5.2. Kura tal-batterija
- Charge the battery regularly, avoiding complete discharge whenever possible.
- Tesponix il-batterija għal temperaturi estremi.
- Jekk l-apparat ma se jintużax għal perjodu twil ta' żmien, iċċarġja l-batterija sa madwar 50% u aħżinha f'post frisk u niexef.
- Use only the original or approved charger and battery.
5.3. Printer Head Cleaning
Regular cleaning of the printer head can prevent print quality issues.
- Power off the device and open the printer cover.
- Uża swab tal-qoton ħafifampened with isopropyl alcohol to gently wipe the thermal print head.
- Allow the print head to dry completely before closing the cover and powering on the device.
6 Issolvi l-problemi
| Problema | Kawża Possibbli | Soluzzjoni |
|---|---|---|
| L-apparat ma jixgħelx | Low battery; Faulty battery; Power button issue | Charge the device for at least 30 minutes. Ensure battery is correctly installed. Try a different charger. |
| L-istampatur mhux qed jistampa | No paper; Paper jammed; Printer head dirty; Application error | Check and load paper. Clear any paper jams. Clean the printer head (Section 5.3). Restart the application or device. |
| Barcode scanner not working | Scanner window obstructed; Barcode damaged; Application error | Ensure scanner window is clean. Try scanning a different barcode. Restart the application or device. |
| Ebda konnessjoni Wi-Fi | Wi-Fi off; Incorrect password; Out of range | Enable Wi-Fi in settings. Re-enter password. Move closer to the Wi-Fi router. |
| L-ebda dejta mobbli | SIM card not installed; Mobile data off; No network coverage | Check SIM card installation. Enable mobile data in settings. Check for network coverage in your area. |
7. Speċifikazzjonijiet
| Karatteristika | Dettall |
|---|---|
| Mudell | V2SE |
| Sistema Operattiva | Android 12.0 |
| CPU | Quad Core 2.0 GHz |
| RAM | 2 GB |
| ROM | 8 GB |
| Wiri | LCD, 1920 x 1080 resolution, 16:9 Aspect Ratio |
| Printer | 58 mm thermal printer, 80 mm/s print speed |
| Barcode Recognition | 1D / 2D Barcode recognition |
| Kamera | 0.3 MP Front Photo Sensor |
| SIM Slott | 1 Nano SIM (Dual SIM support) |
| Konnettività | 4G/3G/2G Cellular, Wi-Fi (2.4G/5G), Bluetooth 2.1/3.0/4.2, NFC |
| GPS | True, Supports GPS satellite navigation system |
| Batterija | 1 batterija tal-jone tal-litju (li tista' titneħħa, inkluża) |
| Dimensjonijiet | 22 x 9 x 9 ċm |
| Piż | 400 g |
| Manifattur | SUNMI |
8. Garanzija u Appoġġ
For warranty information and technical support, please refer to the documentation provided with your purchase or contact your vendor. Keep your proof of purchase for warranty claims.