Introduzzjoni
This manual provides detailed instructions for the setup, operation, and maintenance of your MK MK61 Hotswap PCB. This high-quality printed circuit board is designed for custom mechanical keyboard builds, featuring Kailh hotswap sockets for easy switch installation, per-key RGB lighting, and full programmability via QMK and VIA software. Please read this manual thoroughly before beginning your build to ensure proper functionality and longevity of your PCB.
Kontenut tal-Pakkett
- MK MK61 Hotswap PCB (ANSI 60% Layout)
Nota: This product includes the PCB only. Keycaps, switches, keyboard case, stabilizers, and USB-C cable are not included and must be purchased separately.
Setup u Installazzjoni
Follow these steps to assemble your custom mechanical keyboard using the MK MK61 PCB.
- Ipprepara l-Komponenti: Ensure you have all necessary components: the MK61 PCB, compatible mechanical switches (3-pin or 5-pin), keycaps, PCB-mount stabilizers, a 60% keyboard case, and a USB-C cable.
- Install Stabilizers: Attach the PCB-mount stabilizers to the designated slots on the PCB for larger keys (Spacebar, Shift, Enter, Backspace). Ensure they are securely clipped into place.
- Mount PCB in Case (Optional, but recommended): If your case supports it, mount the PCB into the keyboard case. Some cases require switches to be installed first to secure the PCB.
- Installa Swiċċijiet: Carefully align each mechanical switch with the Kailh hotswap socket on the PCB. Ensure the pins on the switch are straight before inserting. Press firmly until the switch clicks into place. Do not force switches, as bent pins can damage the hotswap socket. Repeat for all 61 switch positions.
- Installa l-Keycaps: Once all switches are installed, place the corresponding keycaps onto the switches.
- Qabbad il-Kejbil USB-C: Connect one end of a USB-C cable to the USB-C port on the PCB and the other end to your computer. The PCB should be recognized automatically.
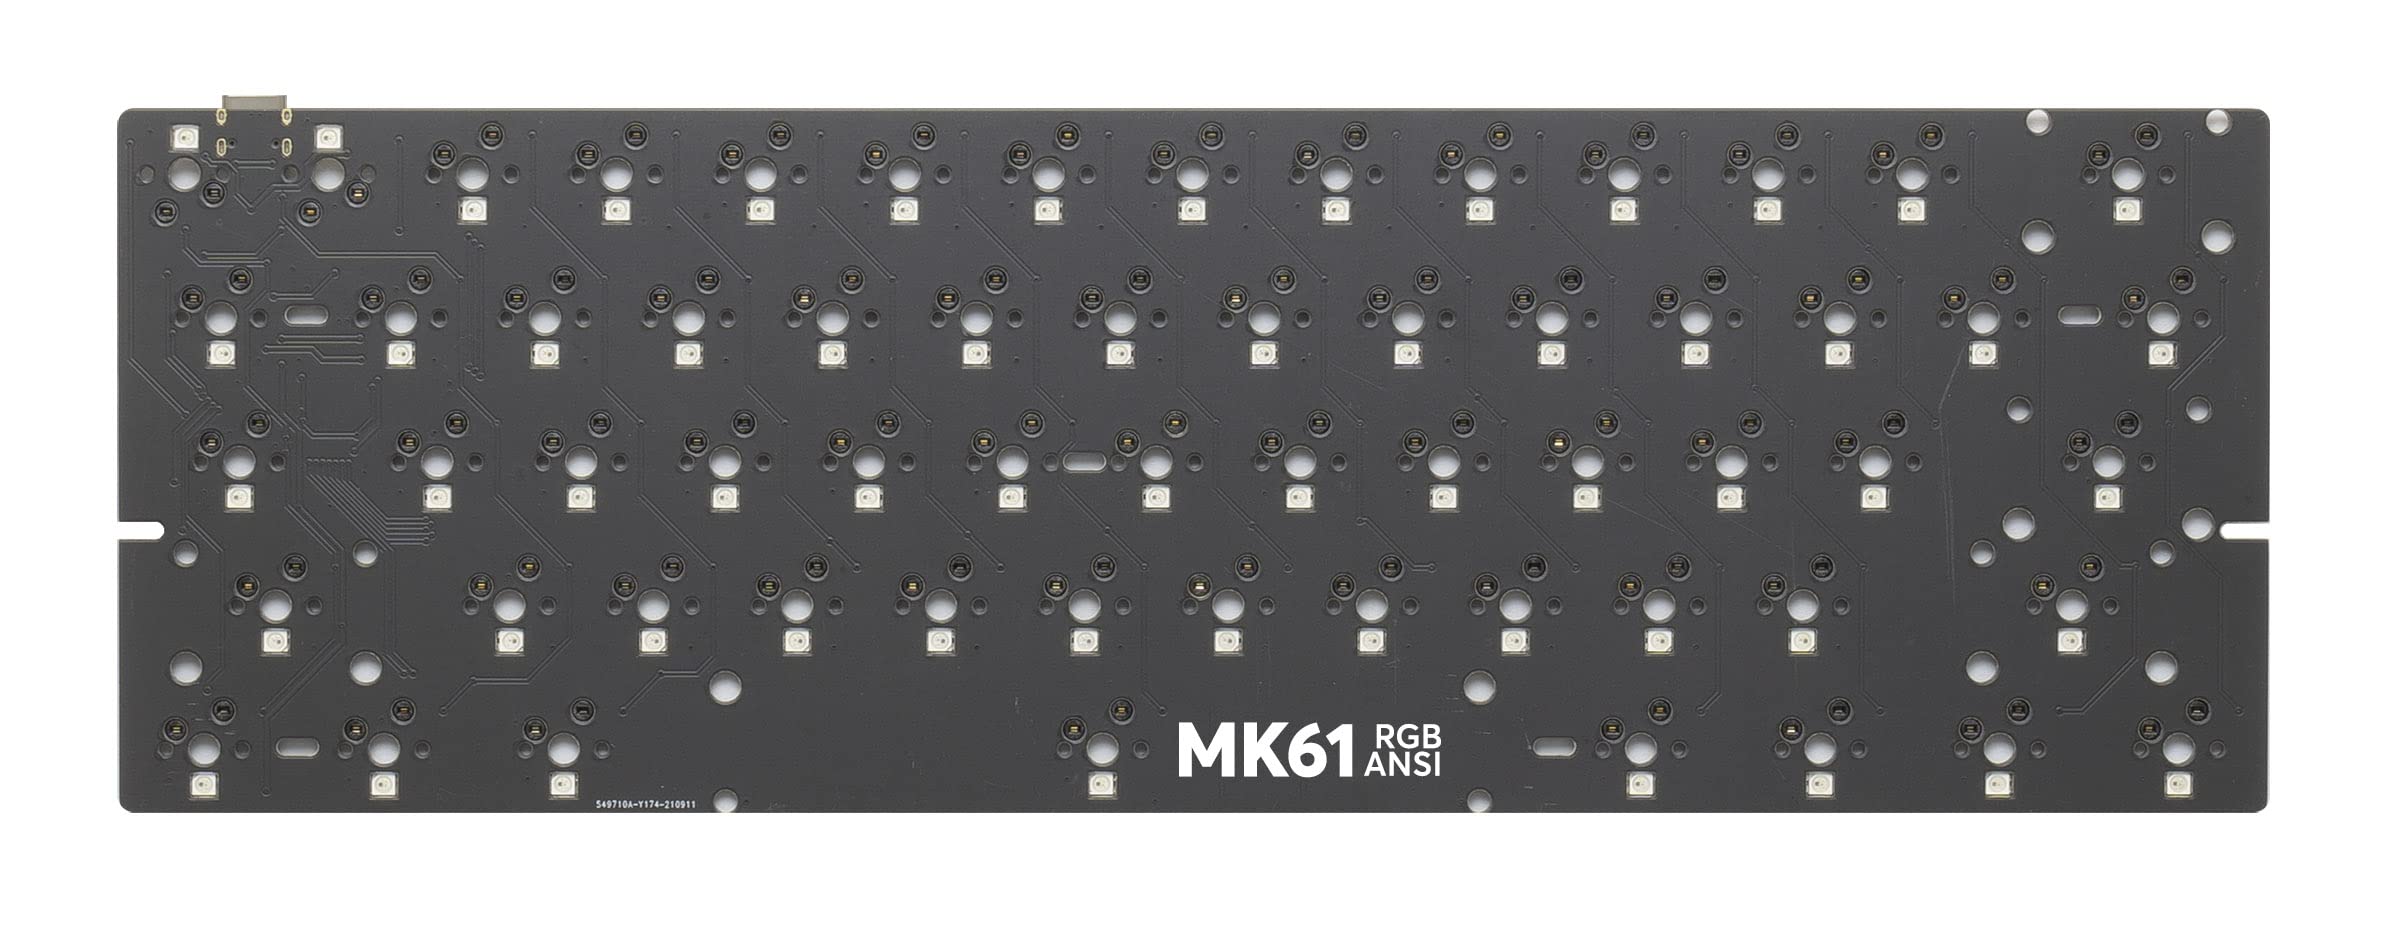
Immaġni: The MK MK61 Hotswap PCB, featuring Kailh hotswap sockets for easy switch installation and individual SMD LEDs for per-key RGB backlighting. The USB-C port is visible on the top right edge.
Istruzzjonijiet Operattivi
The MK MK61 PCB is designed for advanced customization and offers per-key RGB lighting.
- Funzjonalità Bażika: Once connected, the keyboard will function as a standard 60% ANSI layout keyboard.
- Dawl ta' wara RGB: The PCB features per-key RGB SMD LEDs. Lighting effects and colors can be customized using QMK/VIA software.
- Kompatibilità QMK/VIA: The MK61 PCB is fully compatible with QMK firmware and VIA configurator software.
- QMK Firmware: For advanced users, QMK allows for deep customization of keymaps, macros, and lighting effects. You will need to compile and flash custom firmware. Refer to the official QMK documentation for detailed instructions: QMK Firmware Documentation.
- VIA Configurator: VIA is a user-friendly graphical interface for real-time keymap and lighting adjustments without needing to re-flash the firmware. Download the VIA software from the official websit: VIA Configurator. Ensure your PCB's JSON definition is loaded if it's not automatically detected.
Manutenzjoni
Proper maintenance ensures the longevity of your PCB.
- Tindif: Disconnect the PCB from your computer before cleaning. Use a soft, dry brush or compressed air to remove dust and debris from the PCB surface and between switches. Avoid using liquid cleaners directly on the PCB.
- Tneħħija tas-Swiċċ: When removing switches from the hotswap sockets, use a switch puller tool. Gently rock the switch while pulling upwards to avoid damaging the socket or switch pins.
- Ħażna: If storing the PCB separately, keep it in an anti-static bag in a dry environment to prevent static discharge and moisture damage.
Issolvi l-problemi
Jekk tiltaqa' ma' problemi, irreferi għall-problemi u s-soluzzjonijiet komuni li ġejjin.
- Tastiera Mhux skoperta:
- Ensure the USB-C cable is fully inserted into both the PCB and your computer.
- Ipprova kejbil USB-C differenti.
- Connect to a different USB port on your computer.
- Test the PCB on another computer to rule out driver issues.
- Ċwievet Speċifiċi Mhux qed Jirreġistraw:
- Remove the keycap and switch for the problematic key.
- Inspect the switch pins for bends or damage. Straighten bent pins carefully or replace the switch if damaged.
- Re-insert the switch firmly into the hotswap socket, ensuring good contact.
- Check for debris in the hotswap socket.
- Id-Dawl RGB Mhux Jaħdem jew Mhux Korrett:
- Ensure the PCB is properly connected and recognized.
- Use the VIA configurator to check and adjust lighting settings.
- If using custom QMK firmware, verify your lighting configuration.
- VIA Software Not Detecting PCB:
- Ensure you have the latest version of VIA installed.
- Download and load the correct JSON definition file for the MK61 PCB within VIA. This file is usually available from the manufacturer's support page or the VIA websit.
- Restart VIA and reconnect the PCB.
Speċifikazzjonijiet
| Brand | MK |
| Mudell | MK61 |
| Tqassim | ANSI 60% (61 keys) |
| Hotswap Sockets | Kailh Hotswap (compatible with 3-pin and 5-pin mechanical switches) |
| Backlighting | Per-key RGB SMD LED |
| Konnettività | USB-C |
| Programmabilità | QMK/VIA Compatible |
| Apparati Kompatibbli | PC |
| Sors tal-Enerġija | Powered mill-USB |
| Materjal | Plastik |
| Komponenti Inklużi | PCB only |
| UPC | 810511031123 |
| ASIN | B0BDSFWGRF |
Garanzija u Appoġġ
For warranty information and technical support, please refer to the official MK webis-sit jew ikkuntattja lill-bejjiegħ tiegħek. Żomm il-prova tax-xiri tiegħek għal talbiet ta' garanzija.
- Manifattur: MK
- Bejjiegħ: Mechanical Keyboards Inc (as per Amazon listing)
- Link tal-Amazon Store: Visit the MK Store on Amazon