Introduzzjoni
Grazzi tax-xiriasing the Edifier Tick Tock Retro Multifunctional Alarm Clock. This device combines a retro design with modern functionality, offering an alarm clock, FM radio, and media playback from SD cards, USB drives, and auxiliary input. This manual provides detailed instructions for setup, operation, and maintenance to ensure optimal performance and longevity of your device.
Karatteristiċi tal-Prodott
- SD card reader and USB input port for media playback.
- LCD display screen for time, date, alarm status, and input mode (SD/USB/FM/AUX).
- Alarm clock function with customizable audio sources: SD card, USB drive, FM radio, or Auxiliary input.
- Auxiliary 3.5mm input jack for connecting external audio devices.
- FM radio function with 24 preset channels for easy access to your favorite stations.
- Two 360° omni-directional full-range speakers for rich, multi-directional sound.
Kontrolli u Portijiet
Portijiet tal-Panew ta' wara
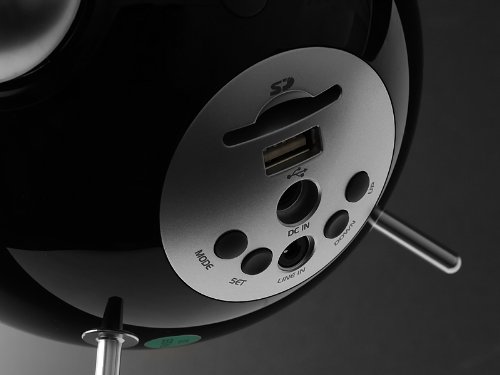
This image displays the rear panel of the Edifier Tick Tock alarm clock. Visible ports and buttons include:
- Slot tal-Kard SD: Insert an SD card for music playback.
- Port USB: Connect a USB flash drive for music playback.
- DC IN: Power input for the included AC adapter.
- LINE IN (AUX): Input awdjo ta' 3.5mm għal apparati esterni.
- Buttuna MODE: Cycles through input modes (SD, USB, FM, AUX).
- Buttuna SET: Used for entering settings menus (e.g., time, alarm).
- Buttuni UP/DOWN: Navigate menus, adjust volume, or change settings.
Kontrolli tal-Panel Fuq

This image shows the top panel controls of the Edifier Tick Tock alarm clock. These include:
- Buttuna Play/Pause: Jibda jew iwaqqaf il-plejbek tal-midja.
- Buttuni tal-Track ta' Preċedenti/Li jmiss: Skips to the previous or next track during media playback. Also used for tuning FM radio.
- Buttuni Volum 'il fuq /' l isfel: Jaġġusta l-volum tal-ħruġ tal-awdjo.
- Buttuna SNOOZE/DAWL: Jattiva s-snooze waqt allarm jew jaġġusta l-luminożità tad-displej.
Setup
- Spakkjar: Carefully remove the alarm clock and all accessories from the packaging. Ensure all components are present: the alarm clock unit, AC power adapter, and this user manual.
- Konnessjoni tal-Enerġija: Connect the AC power adapter to the "DC IN" port on the rear of the alarm clock. Plug the adapter into a standard wall outlet. The display should illuminate.
- Qawwa Inizjali Mixgħula: The unit should power on automatically. If not, press the power button (if available, otherwise it's always on when plugged in).
- Antenna (FM Radio): Extend the FM antenna located at the back of the unit for optimal radio reception.
Istruzzjonijiet Operattivi
L-issettjar tal-Ħin u d-Data
- Agħfas u żomm il- SET Agħfas il-buttuna sakemm il-wiri tal-ħin jibda jteptep.
- Uża l- UP u 'L isfel buttuni biex taġġusta s-siegħa. Agħfas SET biex tikkonferma u tgħaddi għall-minuti.
- Aġġusta l-minuti billi tuża UP u 'L isfel. Agħfas SET biex tikkonferma.
- Continue this process to set the year, month, and day. Press SET to exit the time/date setting mode.
L-issettjar tal-allarm
- Agħfas il- SET button once (do not hold) to enter alarm setting mode. The alarm time will flash.
- Uża l- UP u 'L isfel buttuni biex taġġusta s-siegħa tal-allarm. Agħfas SET biex tikkonferma u tgħaddi għall-minuti.
- Aġġusta l-minuti billi tuża UP u 'L isfel. Agħfas SET biex tikkonferma.
- Next, select the alarm source (FM, SD, USB, AUX). Use UP u 'L isfel to cycle through options. Press SET biex tikkonferma.
- If FM is selected, use UP u 'L isfel to select a preset FM station (P01-P24).
- If SD or USB is selected, ensure a card/drive with audio is inserted. The alarm will play the first track.
- If AUX is selected, ensure an external device is connected and playing audio.
- Agħfas SET again to activate the alarm. An alarm icon will appear on the display.
- Biex tiddiżattiva l-allarm, agħfas SET sakemm l-ikona tal-allarm tisparixxi.
- Meta l-allarm jinstema ', agħfas il-buttuna SNOOZE / DAWL button to activate snooze (typically 9 minutes). To turn off the alarm completely, press any other button.
Operazzjoni tar-Radju FM
- Agħfas il- MODALITÀ Agħfas il-buttuna ripetutament sakemm jidher "FM" fuq id-displej.
- Skennjar Awtomatiku u Preset: Agħfas u żomm il- DĦABBA/PAWŻA button. The radio will automatically scan for available stations and save them to presets (P01-P24).
- Irfinar Manwali: Uża l- TRACK PREĊEDENTI/LI JMISS buttuni biex tirfina l-frekwenza.
- L-Għażla tal-Presets: In FM mode, briefly press the TRACK PREĊEDENTI/LI JMISS buttons to cycle through saved preset stations.
- Aġġusta l-volum billi tuża l- UP u 'L isfel buttons on the rear panel.
SD Card / USB Playback
- Insert an SD card into the SD card slot or a USB flash drive into the USB port on the rear panel.
- Agħfas il- MODALITÀ button repeatedly until "SD" or "USB" appears on the display. The device will automatically start playing audio files.
- Uża l- DĦABBA/PAWŻA buttuna biex tieqaf jew terġa’ tibda d-daqq.
- Uża l- TRACK PREĊEDENTI/LI JMISS buttons on the top panel to skip tracks.
- Aġġusta l-volum billi tuża l- UP u 'L isfel buttons on the rear panel.
Auxiliary Input (LINE IN)
- Connect an external audio device (e.g., smartphone, MP3 player) to the "LINE IN" (3.5mm) port on the rear panel using an audio cable (not included).
- Agħfas il- MODALITÀ button repeatedly until "AUX" appears on the display.
- Ibda l-plejbek fuq l-apparat estern konness tiegħek.
- Aġġusta l-volum billi tuża l- UP u 'L isfel buttons on the rear panel, and also control volume from your external device.
Il-luminożità tal-wiri
Agħfas fil-qosor il- SNOOZE / DAWL button on the top panel to cycle through different display brightness levels.
Manutenzjoni
- Tindif: Use a soft, dry cloth to clean the surface of the alarm clock. Do not use abrasive cleaners, waxes, or solvents.
- Pjazzament: Place the unit on a stable, flat surface. Avoid direct sunlight, high temperatures, humidity, or dusty environments.
- Qawwa: Skonnettja l-adapter tal-enerġija mis-sokit tal-ħajt jekk l-unità ma tkunx se tintuża għal perjodu estiż.
Issolvi l-problemi
| Problema | Kawża / Soluzzjoni Possibbli |
|---|---|
| Bla enerġija / Wiri mitfi |
|
| L-ebda ħoss mill-kelliema |
|
| Riċeviment ħażin tar-radju FM |
|
| Alarm does not sound or plays static |
|
| Id-displej huwa qawwi wisq bil-lejl |
|
Speċifikazzjonijiet
| Brand | Edifikatur |
| Numru tal-Mudell | MF240Reto |
| Tip ta 'Wiri | LCD |
| Teknoloġija tal-Konnettività | AUX, USB |
| Karatteristiċi Speċjali | Alarm, Radio, SD Card Reader, USB Playback |
| Sors tal-Enerġija | Corded Elettriku |
| Materjal | Plastik |
| Piż tal-oġġett | 0.74 Libbra (madwar 0.34 kg) |
| Manifattur | Edifier USA |
Garanzija u Appoġġ
This Edifier product comes with a Garanzija tal-manifattur ta 'sena. For warranty claims, technical support, or further assistance, please contact Edifier USA customer service. Please retain your proof of purchase for warranty validation.
Għall-aktar informazzjoni ta' appoġġ aġġornata, jekk jogħġbok żur l-Edifier uffiċjali websit.