1. Introduzzjoni
This manual provides essential instructions for the safe and efficient operation of your Grundig Scenos LCD 6000 HE Hi 8 Analog Camcorder, model GMI 7100. Please read this manual thoroughly before using the camcorder and retain it for future reference.
2. Informazzjoni dwar is-Sigurtà
WARNING: To prevent fire or electric shock, do not expose this appliance to rain or moisture.
- Do not open the camcorder casing. Irreferi s-servizz kollu lil persunal tas-servizz kwalifikat.
- Keep the camcorder away from direct sunlight, heat sources, and excessive dust.
- Uża biss l-adapter tal-enerġija u l-pakkett tal-batterija speċifikati.
- Avoid dropping or subjecting the camcorder to strong impacts.
- Do not use the camcorder near water or in wet conditions.
- Armi l-batteriji kif suppost skont ir-regolamenti lokali.
3. Kontenut tal-Pakkett
Ivverifika li l-oġġetti kollha huma preżenti fil-pakkett:
- Grundig Scenos LCD 6000 HE Hi 8 Camcorder (GMI 7100)
- Adapter/Ċarġer tal-Enerġija
- Pakkett ta' Batteriji Rikarikabbli
- Audio/Video Connection Cable
- Ċinga ta 'l-ispalla
- Manwal għall-Utent (dan id-dokument)
- (Actual contents may vary. Please check your product packaging.)
4. Prodott Aktarview
Iffamiljarizza ruħek mal-komponenti ewlenin tal-camcorder tiegħek.
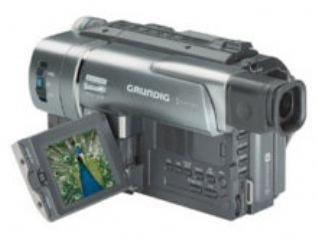
Figura 4.1: Quddiem view of the Grundig Scenos LCD 6000 HE Hi 8 Analog Camcorder. This image shows the lens, microphone, and general body shape.
Note: Detailed diagrams of specific buttons and ports are not available in the provided data. Please refer to the physical camcorder for exact button locations.
Komponenti Ewlenin:
- Lenti: Captures video and images.
- Mikrofonu: Rekords awdjo.
- Skrin LCD: Wirjiet diretti view, playback, and menu options.
- Viewisib: Alternative display for recording.
- Tape Compartment: Holds the Hi8 video cassette.
- Kompartiment tal-batterija: Fiha l-batterija rikarikabbli.
- Buttuni tal-Kontroll: Record, Play, Stop, Zoom, Menu, etc.
- Portijiet ta 'Input / Output: A/V Out, DC In, etc.
5. Setup
5.1. Iċċarġjar u Installazzjoni tal-Batterija
- Iftaħ l-għatu tal-kompartiment tal-batterija.
- Daħħal il-pakkett tal-batterija, waqt li tiżgura li jikklikkja f'postu.
- Agħlaq l-għatu tal-kompartiment tal-batterija.
- Connect the power adapter to the camcorder's DC IN jack and then to a power outlet. The charging indicator will illuminate.
- Charge the battery fully before first use (typically 2-4 hours). The indicator will change or turn off when charging is complete.
5.2. Inserting a Hi8 Video Cassette
- Locate the tape compartment release button, usually on the top or side of the camcorder.
- Press the release button to open the tape compartment.
- Insert a Hi8 video cassette with the window facing outwards and the tape opening facing the camcorder's head mechanism.
- Gently push the cassette until it seats correctly.
- Agħlaq l-għatu tal-kompartiment tat-tejp sew sakemm jissakkar.
6. Tħaddim tal-Vidjokamera
6.1. Tixgħil / Mitfi
Slide the POWER switch to the "ON" position to turn on the camcorder. To turn it off, slide the switch to "OFF".
6.2. Reġistrazzjoni tal-Vidjo
- Open the LCD screen or use the viewfinder
- Set the camcorder to "CAMERA" or "RECORD" mode.
- Point the lens at your subject. Use the zoom lever to adjust the focal length.
- Agħfas il- REKORD button (usually red) to start recording. A red indicator or "REC" will appear on the screen.
- Agħfas il- REKORD buttuna għal darb'oħra biex tieqaf tirrekordja.
6.3. Daqq
- Set the camcorder to "VCR" or "PLAYBACK" mode.
- Agħfas il- PLAY button to start playback of the recorded tape.
- Uża l- RAPID QUDDIEM u REWIND buttuni biex tinnaviga t-tejp.
- Agħfas il- STOP buttuna biex twaqqaf il-plejbek.
6.4. Konnessjoni ma' Televiżjoni
Biex view your recordings on a television:
- Ensure both the camcorder and TV are turned off.
- Connect the supplied A/V cable to the camcorder's A/V OUT port and the corresponding A/V INPUT ports on your television (typically yellow for video, white/red for audio).
- Turn on the TV and select the correct A/V input channel.
- Turn on the camcorder and switch to "VCR" or "PLAYBACK" mode.
- Start playback on the camcorder; the video should appear on your TV screen.
7. Manutenzjoni
7.1. Tindif tal-Kamera
- Uża drapp artab u niexef biex tnaddaf il-barra tal-camcorder.
- Għal-lenti, uża drapp u soluzzjoni speċjalizzati għat-tindif tal-lentijiet. Evita li tmiss il-wiċċ tal-lenti b'subgħajk.
- Tużax deterġenti qawwija jew tindif li joborxu.
7.2. Tape Head Cleaning
Over time, tape heads can accumulate dirt, leading to poor picture quality. Use a dry head cleaning cassette periodically, following its instructions. Excessive use of cleaning cassettes can cause wear.
7.3. Ħażna
- Store the camcorder in a cool, dry place, away from direct sunlight and extreme temperatures.
- Neħħi l-batterija jekk il-camcorder ma tkunx se tintuża għal perjodu twil ta’ żmien.
- Store video cassettes in their cases to protect them from dust and damage.
8 Issolvi l-problemi
If you encounter problems with your camcorder, refer to the following table for possible solutions.
| Problema | Kawża Possibbli | Soluzzjoni |
|---|---|---|
| Il-kamkorder ma jixgħelx. | Il-batterija hija skarikata jew mhux installata sew. | Iċċarġja l-batterija kompletament. Kun żgur li l-batterija hija mdaħħla sew. |
| No recording or poor picture quality. | Tape is full, write-protect tab is engaged, dirty tape heads, or incorrect mode. | Insert a new tape. Disengage the write-protect tab. Clean tape heads. Ensure camcorder is in "CAMERA" mode. |
| L-ebda ħoss waqt id-daqq. | Volume is too low or A/V cables are not connected properly. | Increase volume on camcorder/TV. Check A/V cable connections. |
| L-iskrin tal-LCD huwa vojt. | Camcorder is off, battery is dead, or screen is switched off. | Turn on camcorder. Charge battery. Check display settings or switch. |
If the problem persists after trying these solutions, please contact Grundig customer support.
9. Speċifikazzjonijiet
| Karatteristika | Dettall |
|---|---|
| Numru tal-Mudell | GMI 7100 |
| Brand | Grundig |
| Format tar-reġistrazzjoni | Hi8 Analog |
| Wiri | Skrin LCD |
| ASIN | B0000D84LU |
| GTIN | 04013833445852 |
| Sors tal-Enerġija | Rechargeable Battery Pack, AC Adapter |
| Konnettività | Output Awdjo/Vidjo |
10. Garanzija u Appoġġ
10.1. Informazzjoni dwar Garanzija
Grundig products are manufactured to high quality standards and are covered by a manufacturer's warranty. Please refer to the warranty card included with your product or visit the official Grundig websit għal termini u kundizzjonijiet dettaljati tal-garanzija speċifiċi għar-reġjun tiegħek.
10.2. Appoġġ għall-Klijent
For technical assistance, service, or further information, please contact Grundig customer support. Contact details can typically be found on the official Grundig website or in the documentation provided with your camcorder.
You may also find helpful resources, FAQs, and software updates (if applicable) on the Grundig Brand Store on Amazon.