1. Pengenalan
This manual provides detailed instructions for the installation, operation, and maintenance of your Zebronics DMS200 Monitor Desk Stand. Please read this manual thoroughly before installation and use to ensure proper function and safety. The DMS200 is designed to support monitors from 17 to 32 inches, with a maximum load capacity of 7 kg, offering ergonomic adjustments for an optimized viewpengalaman dalam.

Image 1.1: Zebronics DMS200 Monitor Desk Stand overview.
2. Maklumat Keselamatan
Sila patuhi langkah keselamatan berikut untuk mengelakkan kecederaan atau kerosakan pada produk:
- Jangan melebihi kapasiti berat maksimum 7 kg (15.4 lbs).
- Ensure the desk surface is stable and strong enough to support the combined weight of the stand and monitor.
- Always follow the installation instructions carefully. Improper installation can lead to equipment damage or personal injury.
- Jauhkan kanak-kanak dan haiwan peliharaan semasa pemasangan. Bahagian kecil mungkin boleh menyebabkan tercekik.
- Jangan ketatkan skru terlalu ketat, kerana ini boleh menyebabkan kerosakan.
- Periksa semua sambungan secara kerap untuk memastikan ia kekal selamat.
3. Kandungan Pakej
Sahkan bahawa semua komponen hadir sebelum memulakan pemasangan:
- Perhimpunan Lengan Monitor
- Meja Clamp (C-clamp)
- Tapak Pemasangan Grommet
- Plat VESA
- Kit Perkakasan (skru, pencuci, kunci Allen)
- Manual Arahan
4. Persediaan dan Pemasangan
The Zebronics DMS200 offers two installation methods: C-clamp and Grommet mount. Choose the method best suited for your desk.
4.1. Choosing a Mounting Method
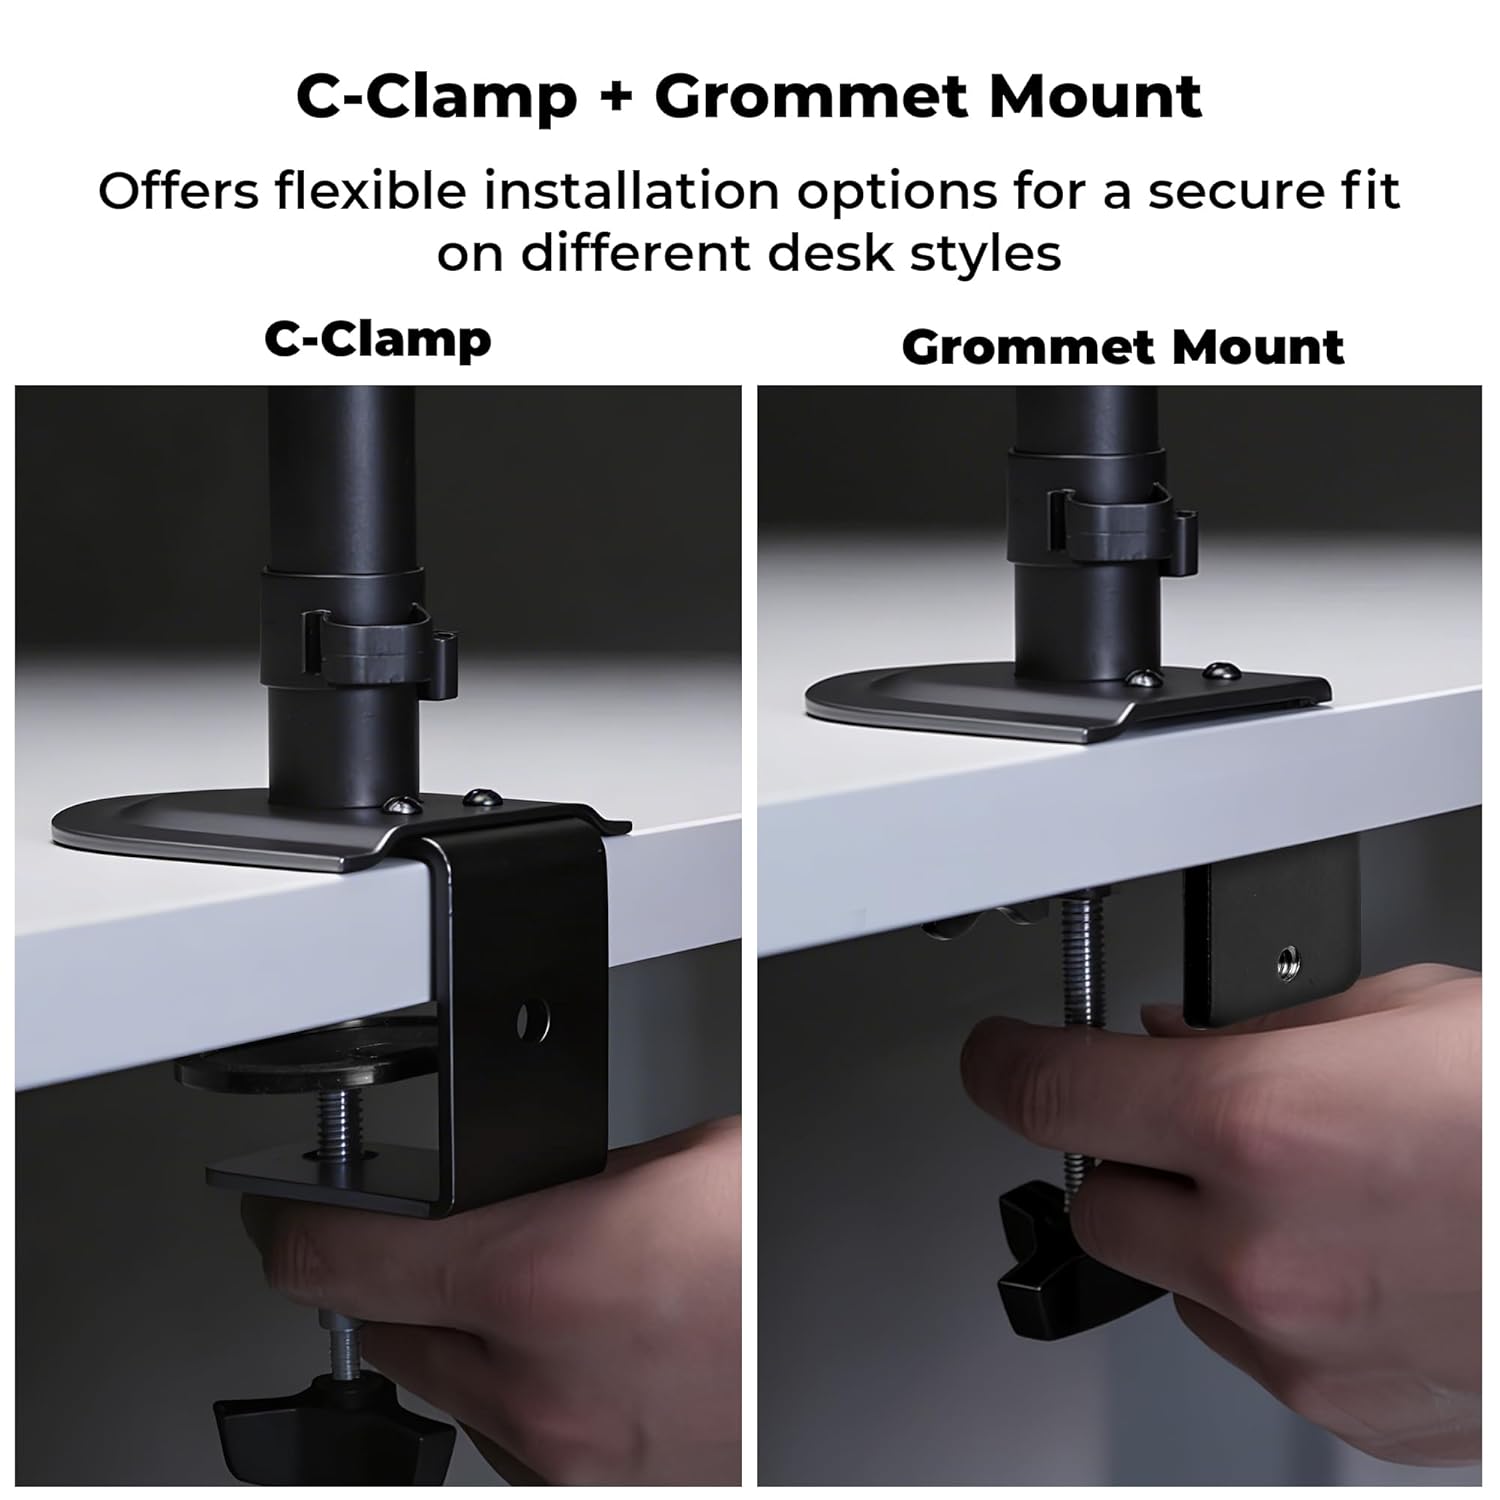
Image 4.1: C-Clamp and Grommet Mount options.
- C-Clamp: Ideal for desks without pre-drilled holes. Clamps to the edge of the desk.
- Gunung Grommet: Requires a pre-drilled hole (or drilling one) in the desk. Provides a more flush installation.
4.2. C-Clamp Pemasangan
- Pasangkan C-clamp to the bottom of the main pole.
- Position the stand on the edge of your desk.
- Ketatkan C-clamp skru sehingga penyangga dipasang dengan kukuh pada meja. Pastikan ia stabil dan tidak goyah.
4.3. Pemasangan Grommet
- Bongkar C-clamp from the main pole if it was pre-attached.
- Insert the main pole through the grommet hole in your desk.
- Secure the grommet base plate and tighten the nut from underneath the desk until the stand is firm.
4.4. Ensuring Stability
After mounting the stand, verify its stability on the desk. The anti-slip base and robust construction ensure reliable support for monitors up to 7 kg.

Image 4.4: Stand stability and maximum load capacity.
4.5. Memasang Monitor
The DMS200 supports VESA patterns of 75x75mm and 100x100mm.

Image 4.5: VESA mount plate for monitor attachment.
- Attach the VESA plate to the back of your monitor using the appropriate screws from the hardware kit. Ensure the screws are not overtightened.
- Carefully slide the monitor (with the VESA plate attached) onto the monitor arm's mounting head.
- Secure the monitor to the arm by tightening the locking screw or mechanism on the mounting head.
4.6. Pengurusan Kabel
Utilize the integrated cable management clips to keep your workspace tidy.

Image 4.6: Integrated cable management.
- Route your monitor's power and display cables through the clips located along the arm and pole.
- Ensure cables have enough slack for full range of motion without being strained.
5. Arahan Operasi
The DMS200 monitor arm provides various adjustments for optimal ergonomic positioning.

Image 5.1: Monitor arm adjustment capabilities.
- Pelarasan Ketinggian: Loosen the collar on the main pole, adjust the arm to the desired height, and then re-tighten the collar.
- Pelarasan Kecondongan: The monitor can be tilted up to ±5°. Adjust the tilt angle by gently pushing or pulling the top or bottom of the monitor. If the monitor does not hold its position, tighten the tilt mechanism screw with an Allen key.
- Pelarasan Pusing: The arm allows for ±90° swivel. Gently rotate the monitor left or right to achieve the desired viewsudut ing.
- Putaran: The VESA plate allows for 360° rotation, enabling portrait or landscape orientation. Rotate the monitor gently to switch orientations.
- Arm Extension: The mechanical arm can extend up to 42 cm. Adjust the arm's position by gently pulling or pushing it to bring the monitor closer or further away.
6. Penyelenggaraan
Untuk memastikan jangka hayat dan fungsi penyangga monitor anda yang betul:
- Pembersihan: Lap dirian dengan lembut, damp kain. Elakkan pembersih atau pelarut yang kasar yang boleh merosakkan kemasan.
- Pemeriksaan Berkala: Periksa semua skru dan sambungan secara berkala untuk memastikan ia ketat dan kukuh. Ketatkan semula jika perlu.
- Kapasiti Muatan: Do not place items on the monitor arm or exceed the maximum weight capacity.
7. Penyelesaian masalah
| Masalah | Kemungkinan Punca | Penyelesaian |
|---|---|---|
| Monitor sags or does not hold tilt position. | Tilt mechanism screw is loose. | Tighten the tilt adjustment screw on the VESA head using the provided Allen key. |
| Berdiri goyah atau tidak stabil. | Meja klamp/grommet mount is not tight enough. | Ketatkan semula C-clamp or grommet mount screw/nut. Ensure the desk surface is stable. |
| Monitor cannot be rotated or swiveled smoothly. | Joints may be too tight or require lubrication. | Check for any obstructions. If joints are too stiff, apply a small amount of silicone-based lubricant (avoid oil-based). |
| Cables are strained during adjustment. | Insufficient slack in cable management. | Re-route cables, ensuring enough slack is provided for the full range of arm movement. |
8. Spesifikasi
| Ciri | Perincian |
|---|---|
| Model | DMS200 |
| Saiz Skrin yang Disokong | 17 - 32 inci |
| Kapasiti Beban Maksimum | 7 kg (15.4 lbs) |
| Keserasian VESA | 75x75mm, 100x100mm |
| Jenis Pemasangan | C-Clamp, Gunung Grommet |
| Pelarasan | Height, Tilt (±5°), Swivel (±90°), Rotation (360°) |
| Tambahan Lengan | Sehingga 42 cm |
| bahan | Metal (Rust-Proof) |
| warna | Hitam |
| Berat Barang | 1670 Gram |
9. Waranti dan Sokongan
Waranti: The Zebronics DMS200 Monitor Desk Stand comes with a 1-year carry-in warranty to the service center from the date of purchase.
Sokongan: For technical assistance, troubleshooting, or warranty claims, please contact Zebronics customer support. Refer to the official Zebronics webtapak atau dokumentasi pembelian anda untuk butiran hubungan.
Manufacturer: Zebronics India Private Limited, 13/7 Smith Road, Royapettah, Chennai, Tamil Nadu - 600 002, India.