Optoma W307UST
Optoma W307UST DLP Projector User Manual
Model: W307UST
1. Pengenalan
Terima kasih kerana membeliasing the Optoma W307UST Ultra Short Throw DLP Projector. This manual provides detailed instructions for the safe and efficient operation of your projector. Please read this manual thoroughly before using the projector and keep it for future reference.
The Optoma W307UST is a high-performance, 3D-ready projector designed for educational and business environments, offering a large image from a very short distance.
2. Maklumat Keselamatan
Sentiasa patuhi langkah berjaga-jaga keselamatan berikut untuk mengelakkan kebakaran, kejutan elektrik atau kecederaan:
- Jangan halang bukaan pengudaraan. Pastikan aliran udara yang mencukupi di sekitar projektor.
- Jangan lihat terus ke dalam kanta projektor apabila lamp is on. The bright light can damage your eyes.
- Jangan letakkan projektor pada troli, kaki atau meja yang tidak stabil.
- Gunakan hanya kord kuasa yang dibekalkan dengan projektor.
- Disconnect the power cord from the wall outlet if the projector is not to be used for an extended period.
- Rujuk semua servis kepada kakitangan perkhidmatan yang berkelayakan.
3. Produk Lebihview
Familiarize yourself with the components and connections of your Optoma W307UST projector.

Figure 3.1: Optoma W307UST Projector showing its compact design and ultra-short throw lens housing.

Rajah 3.2: Atas view of the projector, highlighting the integrated control panel and focus ring for easy adjustments.
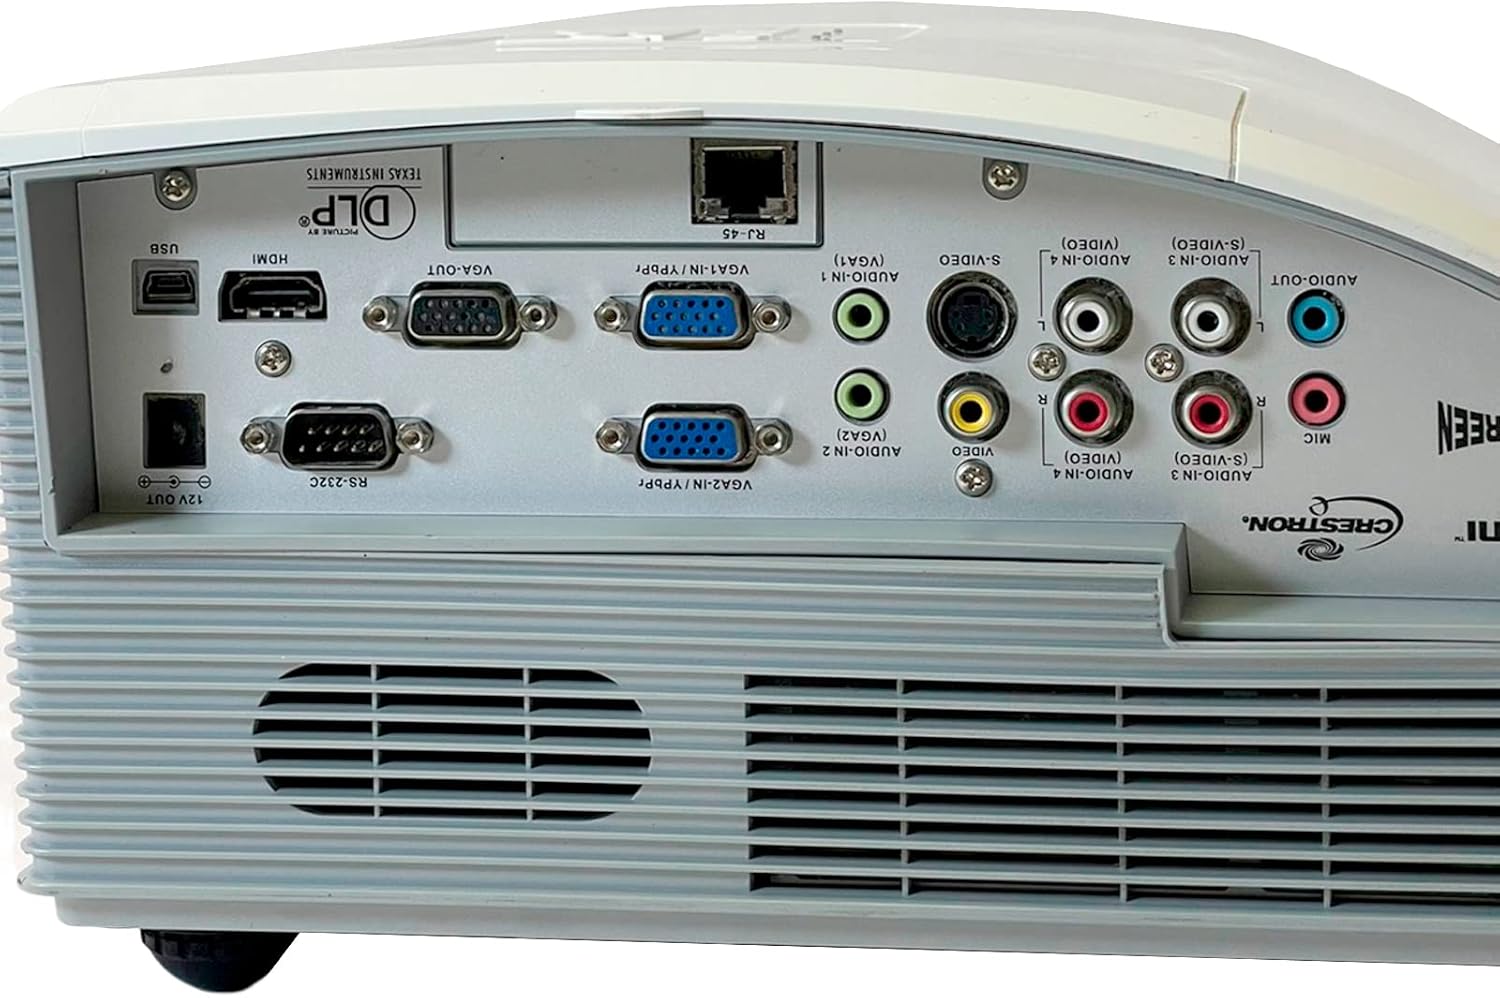
Rajah 3.3: Terperinci view of the rear connectivity panel, showcasing various input and output ports including HDMI, VGA, S-Video, Composite, and audio connections.

Rajah 3.4: Bawah view of the projector, showing the adjustable feet, mounting points for ceiling installation, and the product information label.
4. Persediaan
4.1 Penempatan
Due to its ultra-short throw design, the W307UST can be placed very close to the projection surface. Ensure the surface is flat and free of obstructions. For optimal image quality, position the projector directly in front of the screen.
4.2 Kuasa Penyambung
- Connect the power cord to the AC power inlet on the projector.
- Palamkan hujung kord kuasa yang lain ke dalam salur keluar elektrik yang dibumikan.
4.3 Menyambungkan Sumber Input
Projektor ini menyokong pelbagai sumber input:
- HDMI: Connect an HDMI cable from your source device (e.g., laptop, Blu-ray player) to the HDMI port on the projector.
- VGA: Connect a VGA cable from your computer to one of the VGA IN ports (VGA1 or VGA2).
- S-Video/Komposit: Use the S-Video or Composite video ports for older devices.
- Audio: Connect audio cables to the corresponding Audio In ports (3.5mm or RCA) for each video input.
- USB (Interactive): For interactive features, connect a USB cable from your computer to the USB port.
4.4 Penghidupan dan Pelarasan Awal
- Tekan ke kuasa button on the control panel or remote control to turn on the projector.
- Adjust the image focus using the focus ring located near the lens.
- If the image is trapezoidal, use the keystone correction feature in the OSD menu to square the image.
5. Mengendalikan Projektor
5.1 Menghidupkan/Mematikan
- Untuk Menghidupkan: Tekan ke kuasa button once. The power LED will turn solid blue.
- Untuk Mematikan: Tekan ke kuasa button twice. The projector will enter a cooling down cycle before shutting off completely. Do not unplug the power cord until the cooling cycle is complete.
5.2 Pemilihan Sumber
Tekan ke Sumber button on the control panel or remote control to cycle through available input sources (HDMI, VGA1, VGA2, S-Video, Composite). Alternatively, use the dedicated source buttons on the remote control.
5.3 Menu Navigation (OSD)
Tekan ke Menu button to display the On-Screen Display (OSD). Use the arrow buttons to navigate through menu options and the Masuk button to select. Press Menu lagi untuk keluar.
5.4 Pelarasan Gambar
Within the OSD, you can adjust various picture settings:
- Kecerahan: Laraskan kecerahan atau kegelapan keseluruhan imej.
- Kontras: Controls the difference between the light and dark areas of the image.
- Mod Paparan: Select from preset modes (e.g., Presentation, Bright, Movie, sRGB) or customize your own.
- Nisbah Aspek: Change the image aspect ratio (e.g., 4:3, 16:9, Auto).
5.5 Fungsi 3D
The Optoma W307UST is 3D Ready. To view 3D content, you will need compatible 3D glasses and a 3D source device. Refer to your 3D source device's manual for specific setup instructions.
5.6 Tetapan Audio
Adjust the volume using the volume buttons on the remote control. The projector features a built-in 10W speaker. For external audio, connect speakers to the Audio Out port.
6. Penyelenggaraan
6.1 Membersihkan Lensa
Gunakan kain lembut dan bebas bulu yang direka khas untuk kanta optik. Jangan gunakan pembersih atau pelarut yang kasar.
6.2 Cleaning Air Filters and Vents
Regularly clean the air filters and ventilation grilles to ensure proper airflow and prevent overheating. Use a soft brush or a vacuum cleaner with a brush attachment. Refer to the manual for filter location.
6.3 Lamp Penggantian
Lamp mempunyai jangka hayat yang terhad. Apabila lamp life is nearing its end, a warning message may appear on the screen. Replace the lamp with an authorized Optoma replacement lamp. Refer to the service manual or Optoma support for detailed lamp arahan penggantian.
6.4 Penjagaan Am
Keep the projector in a clean, dust-free environment. Avoid exposing it to extreme temperatures or humidity.
7. Penyelesaian masalah
If you encounter problems with your projector, refer to the following common issues and solutions:
| Masalah | Kemungkinan Punca | Penyelesaian |
|---|---|---|
| Tiada gambar di skrin | Kord kuasa diputuskan Sumber input salah dipilih Peranti sumber tidak dihidupkan | Periksa sambungan kuasa Press the Source button to select correct input Ensure source device is on and outputting signal |
| Imej kabur | Lensa tidak fokus Projektor terlalu dekat/jauh dari skrin | Laraskan cincin fokus Reposition the projector within recommended throw distance |
| Tiada audio | Kelantangan terlalu rendah Audio cable not connected Input audio yang salah dipilih | Tingkatkan kelantangan Ensure audio cable is securely connected Select correct audio input in OSD |
| Projektor terlalu panas dan mati | Pengudaraan disekat Penapis udara kotor | Ensure clear space around vents Clean air filter and vents |
8. Spesifikasi
| Ciri | Penerangan |
|---|---|
| Nombor Model | W307UST |
| Resolusi Asli | WXGA 1280 x 800 |
| Nisbah Kontras | 15,000:1 |
| Penyambung I/O | HDMI (1.4a 3D support), 2 x VGA (YPbPr/RGB), S Video, Composite, 4 x Audio In (RCA/3.5mm), Audio Out 3.5mm, VGA Out, RJ45, RS232, USB (interactive), 12V trigger, Mic In |
| Dimensi Produk | 14.41 x 14.02 x 9.09 inci |
| Berat Barang | 16.53 paun |
| Ciri Khas | 3D-Sedia |
| Teknologi Ketersambungan | HDMI |
| Pengeluar | OPTOMA TECHNOLOGY |
9. Waranti dan Sokongan
9.1 Maklumat Waranti
The Optoma W307UST projector comes with a 3-year limited warranty. The lamp is covered by a 1-year limited warranty. Please retain your proof of purchase for warranty claims. For full warranty terms and conditions, refer to the warranty card included with your product or visit the official Optoma webtapak.
9.2 Sokongan Pelanggan
For technical assistance, troubleshooting beyond this manual, or warranty service, please contact Optoma customer support. Visit the official Optoma website for contact information, FAQs, and driver downloads.
Ask a question about this manual
Ask about setup, troubleshooting, compatibility, parts, safety, or missing instructions. Manuals+ will review the question and use this page’s manual context to help answer it.