pengenalan
This manual provides detailed instructions for the proper setup, operation, and maintenance of your Nortek NDVX 2503 DVD Player. Please read this manual thoroughly before using the device to ensure optimal performance and safety. Keep this manual for future reference.
Maklumat Keselamatan
- Sumber Kuasa: Connect the DVD player only to the specified power supply voltage.
- Pengudaraan: Pastikan pengudaraan yang mencukupi di sekeliling unit. Jangan sekat bukaan pengudaraan.
- Air dan Kelembapan: Do not expose the unit to rain, moisture, or dripping/splashing liquids.
- haba: Jauhkan unit daripada sumber haba seperti radiator, daftar haba, dapur, atau radas lain yang menghasilkan haba.
- Pembersihan: Cabut palam unit dari salur keluar dinding sebelum membersihkan. Gunakan kain kering untuk pembersihan.
- Servis: Jangan cuba servis produk ini sendiri. Rujuk semua perkhidmatan kepada pegawai perkhidmatan yang berkelayakan.
Kandungan Pakej
Sahkan bahawa semua item yang disenaraikan di bawah disertakan dalam pakej anda:
- Nortek NDVX 2503 DVD Player
- Alat Kawalan Jauh (dengan bateri)
- Kabel AV (jenis RCA)
- Manual Pengguna (dokumen ini)
- Kord Kuasa
Produk Selesaiview
Familiarize yourself with the components and controls of your DVD player.
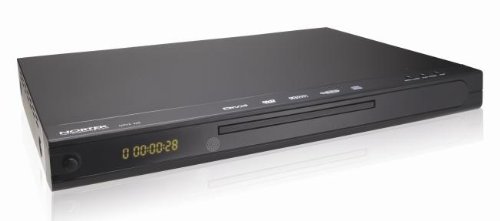
Rajah 1: Depan view of the Nortek NDVX 2503 DVD Player. This image shows the sleek black casing, the central disc tray, the digital display on the left, and control buttons on the right side of the front panel.
Kawalan Panel Depan:
- Butang Kuasa: Menghidupkan atau mematikan unit.
- Dulang Cakera: Insert your DVD or CD here.
- paparan: Shows playback time, track number, and other status indicators.
- Butang Buka/Tutup: Membuka dan menutup dulang cakera.
- Butang Main/Jeda: Memulakan atau menjeda main balik cakera.
- Butang Berhenti: Menghentikan main balik cakera.
- Skip Buttons (Forward/Backward): Melangkau ke trek/bab seterusnya atau sebelumnya.
Sambungan Panel Belakang:
(Note: Specific connections may vary. Common connections include:)
- Audio/Video Output (RCA): Red, White (audio) and Yellow (video) jacks for connecting to a TV or amplebih hidup.
- Coaxial/Optical Digital Audio Output: For connecting to a home theater receiver for digital audio.
- Input Kuasa: Menyambungkan kord kuasa.
Persediaan
1. Connecting to a Television:
- Ensure both the DVD player and your television are turned off and unplugged.
- Connect the yellow RCA video cable from the "Video Out" jack on the DVD player to the "Video In" jack on your television.
- Connect the red and white RCA audio cables from the "Audio Out" jacks (Red for Right, White for Left) on the DVD player to the corresponding "Audio In" jacks on your television or audio receiver.
- If using digital audio, connect a coaxial or optical cable from the DVD player's digital audio output to your receiver's digital audio input.
2. Sambungan Kuasa:
- Plug the power cord into the power input on the rear of the DVD player.
- Palamkan hujung kord kuasa yang lain ke salur keluar dinding.
3. Initial Power-On:
- Turn on your television and select the correct input source (e.g., AV1, Video 1) that corresponds to where you connected the DVD player.
- Press the Power button on the DVD player or its remote control to turn it on.
- The Nortek logo or a setup menu should appear on your TV screen.
Arahan Operasi
1. Disc Playback:
- Tekan ke BUKA/TUTUP butang pada panel hadapan atau alat kawalan jauh untuk membuka dulang cakera.
- Place a DVD, DVD+R, or Video CD disc gently into the tray with the label side facing up.
- Tekan ke BUKA/TUTUP butang sekali lagi untuk menutup dulang.
- The player will automatically begin reading the disc. Playback should start shortly. If a menu appears, use the arrow keys on the remote to navigate and the MASUK butang untuk memilih.
- Gunakan MAIN/JEDA, BERHENTI, dan SKIP buttons on the remote or front panel to control playback.
2. Navigasi Menu:
- Gunakan anak panah buttons on the remote control to move through menu options.
- Tekan ke MASUK or OK butang untuk mengesahkan pilihan.
- The MENU button typically returns you to the disc's main menu.
Penyelenggaraan
Membersihkan Unit:
- Unplug the DVD player from the power outlet before cleaning.
- Gunakan kain lembut dan kering untuk mengelap bahagian luar unit. Jangan gunakan pembersih cecair atau semburan aerosol.
- Avoid getting dust or debris inside the disc tray mechanism.
Penjagaan Cakera:
- Pegang cakera di tepinya untuk mengelakkan cap jari pada permukaan mainan.
- Simpan cakera dalam bekasnya apabila tidak digunakan untuk mengelakkan calar.
- Bersihkan cakera kotor dengan kain lembut dan tidak berbulu, lap dari tengah ke luar.
Menyelesaikan masalah
| Masalah | Kemungkinan Punca | Penyelesaian |
|---|---|---|
| Tiada kuasa | Kord kuasa tidak disambungkan; Salur keluar kuasa tidak aktif. | Pastikan kord kuasa dipasang dengan selamat. Uji alur keluar dengan peranti lain. |
| Tiada gambar atau bunyi | AV cables not connected correctly; Incorrect TV input selected. | Check all AV cable connections. Select the correct input source on your TV (e.g., AV1, Video 1). |
| Cakera tidak dimainkan | Disc is dirty or scratched; Disc inserted incorrectly; Incompatible disc format. | Clean the disc. Ensure the disc is inserted label-side up. Verify the disc is a supported format (DVD, DVD+R, Video CD). |
| Alat kawalan jauh tidak berfungsi | Bateri mati atau dipasang dengan salah; Halangan antara alat kawalan jauh dan pemain. | Replace batteries. Ensure correct battery polarity. Remove any obstructions. Point remote directly at the player's sensor. |
Spesifikasi
- Jenama: Nortek
- Nama Model: NDVX 2503
- Media Types Supported: DVD, DVD+R, Video CD
- ASIN: B0044AL0TM
- Pengeluar: Nortek
- Note: Other specifications such as dimensions, weight, and power consumption are not available in the provided data.
Waranti dan Sokongan
For warranty information or technical support, please refer to the warranty card included with your product or visit the official Nortek webtapak. Simpan bukti pembelian anda untuk sebarang tuntutan waranti.
For further assistance, you may contact Nortek customer service through their official channels.